


Genuine Campbell Hausfeld replacement part, this item is sold individually.
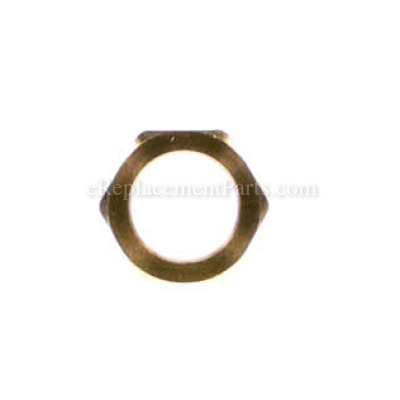
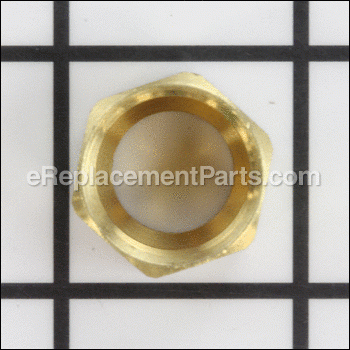
The ST033001AV Compression Nut is used to attach the copper tubing to certain components of the compressors listed below.
Along with the Compression Nut you will need to use a compression sleeve ( or Ferrule) to seal the tube from leaking air.
The Compression Nut will go on the tubing first then the Ferrule will slide into the nut.
Compression Nut ST033001AV
OEM part for: Campbell Hausfeld, Husky
Part Number: ST033001AV
$7.51
Factory Backorder
Jump To:
Product Description ?
- Classification: Part
- Weight: 0.01 lbs.
- Shipping: Ships Worldwide
Frequently Purchased Together ?


Compatibility
This Compression Nut will fit the following 612 machines. Confirm this part works with your model, and view the detailed model diagrams and repair help we have to offer.
Campbell Hausfeld
Husky
Show More Compatible ModelsThis item works with the following types of products:
- Compressor Parts
Customer Part Reviews ?
Average Rating (out of 5):
Click to filter by ratings:
5 stars
6
4 stars
0
3 stars
0
2 stars
0
1 stars
0
< PREV
- 1
Part made for easy repair
Part is the correct part, it fit perfectly and does what it is supposed to do. Was very easy to order.
Guest -
October 8, 2020
Verified Purchase
Easy fix and great part
Perfect fit
Guest -
June 12, 2020
Verified Purchase
A nut is a nut is a nut
As a nuts go’s it was a great nut! Did what it was supposed to do!
Guest -
February 24, 2020
Verified Purchase
Outstanding
ease to work with
Guest -
September 24, 2019
Verified Purchase
Funcionamiento
Funciono muy bien en mi equipo
Guest -
August 19, 2019
Verified Purchase
Excellent!
All parts are compatible. Very knowledgeable. I highly recommend this company.
Jason -
August 15, 2019
Verified Purchase
Questions & Answers ?
Our customer Service team is at the ready daily to answer your part and product questions.

Ask our Team
We have a dedicated staff with decades of collective experience in helping customers just like you purchase parts to repair their products.
Does this fit my product?Questions & Answers for Compression Nut
No questions have been asked yet
Customer Repair Instructions ?
All our customer repair instructions are solicited directly from other customers just like you who have purchased and replaced this exact part.
Nut holding copper tube into compressor discharge split. (Odd, huh?)
Steve - August 4, 2023
Tool Type
Compressor
Difficulty
Easy
Time
15-30 minutes
Tools Used
Wrench Set, Teflon tape
Parts Used
This is a 40 gallon vertical compressor with the electric motor and compressor mounted at the top of a 40 gallon storage tank. A piece of 3/8" copper tube with a female compression fitting at either end conducts to male fittings at the compressor and at the storage tank. This tube conducts the compressed air from the compressor to the storage tank where it remains until called for.
Problem: The brass female compression fitting connecting the copper tube to the compressor had split at the male fitting on the compressor..
1.Unplugged compressor.
2 Loosened female compression fitting nut at top end of copper tube from male compressor unit fitting.
3. Loosened female compression fitting nut at bottom end of copper tube from male tank fitting.
4. Removed copper tube from compressor tank & compressor unit.
5. Removed both female compression fitting nuts from copper tube.
6. Placed new female compression fitting nut on copper tube
7. Placed old, existing female compression fitting nut on copper tube.
8. Wrapped both male fittings (on the compressor & tank fittings) with Teflon tape.
9. Replaced copper tube on compressor unit & tank.
10. Tightened female compression fitting nuts.
11. Plugged compressor in.
Voila!
Did you find this story helpful?
Thanks for voting and helping fellow customers!
old exhaust tube was cracked.
James - March 11, 2020
Tool Type
Compressor
Difficulty
Easy
Time
15-30 minutes
Tools Used
Screwdriver, Wrench Set, tubing cutter
Remove old exhaust tube, adjusted compressor on compressor mounting for new tube and compression nuts with new compression gaskets then installed tube the tightened compression nuts. started compressor, checked for leaks (none). So back in business!!!
Did you find this story helpful?
Thanks for voting and helping fellow customers!
Air leak
Stephen - January 30, 2019
Tool Type
Compressor
Difficulty
Medium
Time
Less than 15 minutes
Tools Used
Wrench Set
Parts Used
Removed compression nuts and discharge tube
Cleaned discharge tube and replaced ferrule and compression nut
Reassembled
Cleaned discharge tube and replaced ferrule and compression nut
Reassembled
Did you find this story helpful?
Thanks for voting and helping fellow customers!
Tube cracked
Thomas - December 26, 2018
Tool Type
Compressor
Difficulty
Easy
Time
15-30 minutes
Tools Used
Socket set, Wrench Set, Allen wrench
Removed cover
Loosened compressor
Measured tube
Cut to length
Put on and tightened
Tightened compressor and reinstalled cover
Loosened compressor
Measured tube
Cut to length
Put on and tightened
Tightened compressor and reinstalled cover
Did you find this story helpful?
Thanks for voting and helping fellow customers!
Unloaded tube broke off at the unloader
Gaylen - July 24, 2018
Tool Type
Compressor
Difficulty
Easy
Time
Less than 15 minutes
Tools Used
Wrench Set, None
Simply threaded in the new unloaded and threaded in the new nipple. Then pushed the tube into each end. Turned the compressor on and watched it build pressure and shut off.
Did you find this story helpful?
Thanks for voting and helping fellow customers!
Air leaking at compression nut on pump
Martin - June 26, 2018
Tool Type
Compressor
Difficulty
Easy
Time
30-60 minutes
Tools Used
Wrench Set, Cooper tube cutter
Removed the cooper tubing from pump to valve. Rubber ferrules badly damaged and tubing was crushed. I just had to cut the cooper tubing supplied in the kit, put on the ferrules and compression nuts and that was it.
Did you find this story helpful?
Thanks for voting and helping fellow customers!
Leaking air at exhaust tube
Mark - June 22, 2018
Tool Type
Compressor
Difficulty
Easy
Time
15-30 minutes
Tools Used
Wrench Set
1. Unplugged compressor, and drained tank.
2. Loosened compression nuts on the exhaust tube.
3. Assembled new compression nuts and sleeves on both ends of exhaust tube.
4. Snugged up both sides while pushing on tube to make sure tube was inserted far enough while compressing sleeve creating a seal.
5. Put thread tape on center of threads of drain plug and tightened into bottom of tank.
6. Plugged compressor in and put enough air to leak test connections, using soapy water.
7. Tightened up any nuts where leak was found.
Did you find this story helpful?
Thanks for voting and helping fellow customers!
Copper line from pump to tank burst/seals on both ends degraded
Michael - April 18, 2018
Tool Type
Compressor
Difficulty
Easy
Time
Less than 15 minutes
Tools Used
Wrench Set
Quick and easy call with the model number of my old Campbell Hausfield compressor took 10 minutes to have parts on the way for 15 bucks or so. Once receive removed the nuts securing both ends of the failed pipe and installed new pipe/seals/nuts. Compressor holds 120PSI again.
Did you find this story helpful?
Thanks for voting and helping fellow customers!
Exhaust line broken
Eddie - March 21, 2018
Tool Type
Compressor
Difficulty
Easy
Time
Less than 15 minutes
Tools Used
Adjustable Wrench, Hacksaw
Removed of line and installed new tube with 2 compression rings. Had ordered extra compression ring due to confusing break down on picture of parts used to select parts.
Simply removed old line, slid compression rings on new tube, cut tube to proper lenghth, and tightened the copper nuts onto compression rings. Surprised by the fact that the tube was too long. Works perfect.
Simply removed old line, slid compression rings on new tube, cut tube to proper lenghth, and tightened the copper nuts onto compression rings. Surprised by the fact that the tube was too long. Works perfect.
Did you find this story helpful?
Thanks for voting and helping fellow customers!
Replaced the copper inlet tube.
Donald - October 18, 2017
Tool Type
Compressor
Difficulty
Easy
Time
15-30 minutes
Tools Used
Adjustable Wrench, Pipe cutter, steel wool
1. Removed the broke parts.
2. Cleaned the ports with a clean rag.
3. Measured and marked the new pipe to the proper length.
4. Cut the copper pipe with a pipe cutter.
5. Cleaned the ends of the pipe with a steel wool.
6. Installed the compression nuts and the rubber ferrules on the pipe.
7. Placed the pipe assembly onto the compressor head, then to the tank.
8. Tightened each compression nut.
Did you find this story helpful?
Thanks for voting and helping fellow customers!
Load More Install Stories
OEM stands for Original Equipment Manufacturer and means the part you’re buying is sourced directly from the manufacturer who made your product. At eReplacementParts, we sell only genuine OEM parts, guaranteeing the part you’re purchasing is of better design and of higher quality than aftermarket parts.
Our product descriptions are a combination of data sourced directly from the manufacturers who made your product as well as content researched and curated by our content & customer service teams. This content is edited and reviewed internally before being made public to customers.
Our customer service team are at the ready daily to answer your part and product questions. We have a dedicated staff with decades of collective experience in helping customers just like you purchase parts to repair their products.
All our part reviews are solicited directly from other customers who have purchased this exact part. While we moderate these reviews for profanity, offensive language or personally identifiable information, these reviews are posted exactly as submitted and no alterations are made by our team.
All our customer repair instructions are solicited directly from other customers just like you who have purchased and replaced this exact part. While we moderate these reviews for profanity, offensive language or personally identifiable information, these reviews are posted exactly as submitted and no alterations are made by our team.
Based on data from past customer purchasing behaviors, these parts are most commonly purchased together along with the part you are viewing. These parts may be necessary or helpful to replace to complete your current repair.
All our installation videos are created and produced in collaboration with our in-house repair technician, Mark Sodja, who has helped millions of eReplacementParts customers over the last 13 years repair their products. Mark has years of experience in selling and repairing both commercial and residential products with a specialty in gas-powered equipment.
This data is collected from customers who submitted a repair instruction after replacing this exact part. Customers can rate how easy the repair was to complete and how long it took. We aggregate this data to provide a repair rating that allows customers to quickly determine the difficulty and time needed to perform their own repair.