Bottom Tray Rail Assembly 97783 - OEM Weber - eReplacementParts.com
eReplacementParts.com
877-346-4815
Weber Parts
Repair Parts Home
  
Grill Parts
  
Weber Parts
  97783 Bottom Tray Rail Assembly

Bottom Tray Rail Assembly 97783

OEM part for: Weber

Part Number: 97783


Install
Videos!
Bottom Tray Rail Assembly - 97783:Weber 360 View
Bottom Tray Rail Assembly - 97783:WeberBottom Tray Rail Assembly - 97783:WeberBottom Tray Rail Assembly - 97783:Weber 360 View
In Stock
Ships within 1 business day
Easy 15-30 minutes (23 rated repairs)?
OEM: Original Equipment Manufacturer ?
Weber
Does this fit my product?

Product Description ?

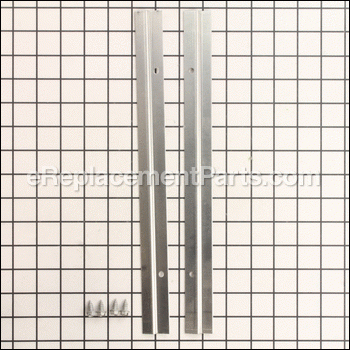
This is an authentic OEM sourced replacement part designed for use with Weber grills. These rails are used to hold the grease/drip funnel tray to the underside of the grill so you can slide the tray in and out for easy cleaning. This set includes two (2) aluminum bottom tray rails with four (4) screws used to mount rails.

To complete this repair you will need a screwdriver.

  • Classification: Part
  • Weight: 0.16 lbs.
  • Shipping: Ships Worldwide

Compatibility

This Bottom Tray Rail Assembly will fit the following 218 machines. Confirm this part works with your model, and view the detailed model diagrams and repair help we have to offer.

Weber

Show More Compatible Models
Don't see yours? Try searching our site for :

This item works with the following types of products:

Repair Videos ?

Articles:
Having trouble getting your grill to light up? A common cause of this issue is a defective ignition switch. We'll sho...
November 08, 2012

Customer Part Reviews ?

4.6
Average Rating (out of 5):
7 Reviews
Click to filter by ratings:
5 stars
6
4 stars
0
3 stars
0
2 stars
1
1 stars
0
  • Highest Rating
  • Most Recent
< PREV
  • 1
NEXT >
  • Fits Perfect
    Perfect replacement for rusted out rails. The new ones are aluminum, so they should last.
    Michael - 24 days ago Verified Purchase
    BETTER THAN THE ORIGINAL!
    Came complete as described.
    Kurt - April 13, 2021 Verified Purchase
    Easy repair, fast shipping
    The bottom tray rails fit perfectly with no modification. My old Genesis 3000 just keeps going. Fast shipping!
    Guest - August 1, 2020 Verified Purchase
    Bottom rail for drip pan
    Great service and prompt
    Guest - January 21, 2020 Verified Purchase
    Great Product
    Arrived quickly Easy to install. Would buy from them again.
    Guest - June 5, 2019 Verified Purchase
    Simple part, easy installation
    The bottom tray rail assembly arrived in good condition and soon after I placed the order. It came with new screws so damaging the old screws to remove them didn't matter. Everything fit as it was supposed to.
    Guest - April 21, 2019 Verified Purchase
    Holes didn't line up.
    Required drilling two holes because the they didn't line up with the mating piece.
    Guest - July 24, 2020 Verified Purchase

    Questions & Answers ?

    Our customer Service team is at the ready daily to answer your part and product questions.

    photo of team member
    Ask our Team

    We have a dedicated staff with decades of collective experience in helping customers just like you purchase parts to repair their products.

    Does this fit my product?

    Questions & Answers for Bottom Tray Rail Assembly


    What are the dimensions for this part mine are 13 1/2 long
    Robert for model number 1995 genesis 5 asked on 2023-01-11
    Hello Robert, Thank you for your inquiry. We show these rails as approximately 13 1/2 inches as per the one inch grid of squares behind the part. We hope this helps.
    eReplacementParts Team January 11, 2023
    What are the dimensions of this part?
    Dave for model number 1997 genesis 3burner asked on 2022-07-31
    Hello Dave, thank you for your question. The Rail is approximately 14" by 1". If you need help placing an order, customer service is open 7 days a week. Please feel free to give us a call. We look forward to hearing from you.
    eReplacementParts Team July 31, 2022

    Customer Repair Instructions ?

    All our customer repair instructions are solicited directly from other customers just like you who have purchased and replaced this exact part.

    Easy 15-30 minutes (23 rated repairs)?

    Bottom tray rails were corroded due to age (~17 years) - Weber Genesis gas grill

    Ross - December 11, 2015
    👍 15 of 16 people found this instruction helpful
    Tool Type

    Outdoor Grill

    Difficulty

    Medium

    Time

    30-60 minutes

    Tools Used

    Screwdriver, Pliers, Nutdriver, Kroll - penetrating oil; channel lock pilers, never seize

    The old rails were made of carbon steel. The new rails are made of aluminum. The pre-drilled holes and supplied screws were a perfect fit. The most difficult part was removing the old screws. One was removed with a nut driver the others were gripped with channel locks and removed. I sprayed krol penetrating oil on the screws and allowed it to soak for about 30 minutes. I suspect a longer soak time (overnight) may have loosed the rust making it easier to remove these screws. Prior to installing the new screws, I applied never seize to them. This should eliminate the corrosion issue should they need to be replaced in the future.
    Did you find this story helpful?
    Thanks for voting and helping fellow customers!

    Bottom tray rails and screws were completely rusted.

    jesse - May 30, 2016
    👍 5 of 5 people found this instruction helpful
    Tool Type

    Outdoor Grill

    Difficulty

    Medium

    Time

    30-60 minutes

    Tools Used

    Screwdriver, Pliers, Socket set, Vice grips

    Sprayed screws with WD40 & let it sit for a week. The rails & screws were rusted in place so bad I had to use vice grips to get them out. When I finally got a grip on the screws I worked them back and forth with the vice grips and they finally loosened up enough to back them out. This grill is 20 years old so I expected to spend more time to repair it. Weber makes a tough well built grill. The aluminum bottom tray rails & screws fit perfectly. Thanks Replacementparts.com !!!
    Did you find this story helpful?
    Thanks for voting and helping fellow customers!

    Rusted Drip Tray Rails

    Francis - May 31, 2016
    👍 3 of 3 people found this instruction helpful
    Tool Type

    Outdoor Grill

    Difficulty

    Easy

    Time

    30-60 minutes

    Tools Used

    Wrench Set

    Soaked the rusted screws with WD-40 a few times, then I was able to remove them. Once I had the rails removed, I cleaned up all around the area. Then simply installed the new ones.
    Did you find this story helpful?
    Thanks for voting and helping fellow customers!

    Original bottom tray rails had deteriorated so much that they no longer could support the tray.

    Jim - March 26, 2016
    👍 3 of 3 people found this instruction helpful
    Tool Type

    Outdoor Grill

    Difficulty

    Easy

    Time

    Less than 15 minutes

    Tools Used

    Socket set, WD-40

    Simply squirted some W-D 40 on the original screws that held the rails in place. Used a small socket to break them free and backed them out. Replaced the rails with what I ordered and rehung the tray. Done deal!

    Replacement rails were a bit lighter grade than the original, Excellent price, very nice young customer service gal and prompt delivery! Perfect! :-)
    Did you find this story helpful?
    Thanks for voting and helping fellow customers!

    Rails for bottom tray disintegrated, bottom tray fell onto lower rack

    George - March 24, 2016
    👍 3 of 3 people found this instruction helpful
    Tool Type

    Outdoor Grill

    Difficulty

    Easy

    Time

    Less than 15 minutes

    Tools Used

    Screwdriver, Socket set

    Bought this Weber Genesis 1000 new in the Spring of 1996. Once a year I disassemble, clean and repair/replace parts that have gone bad. This has included the igniter, flavorizer bars, grill cooking surface, opening handle and (three times) all wood parts on flat table surfaces. (Finally resorted to Trex decking lumber to eliminate staining and rot; cut material to size on table saw.) When the rails for the bottom tray gave out, I thought my Weber might finally need replacement. But no, new tray rails from eReplacementParts solved the problem in less than 15 minutes. Remove four hex-head screws and the remaining parts of the old rails, insert new rails with enclosed four new screws. Done. After a good cleaning, some repainting and a coat of wax for the hood, my Weber looks like new...and works that way too. Twenty years down, hopefully 20 more to go,
    Did you find this story helpful?
    Thanks for voting and helping fellow customers!

    Drip pan rails rusted off bolts rusted and seized

    Robert - December 23, 2022
    Tool Type

    Outdoor Grill

    Difficulty

    Medium

    Time

    30-60 minutes

    Tools Used

    Power Drill, Socket set, Wrench Set, Hammer, center punch and 1/8”and 1/4” Colbalt drill bits

    After soaking the bolts with penetrating oil for a week and applying heat I was unsuccessful extracting the bolts. I used a dremel and cut the heads off, I used a center punch to stake the middle of the bolts, I drilled a pilot hole using a 1/8” drill bit all the way through the firebox and followed up drilling with a 1/4” bit. I drilled the new rails with the 1/4” bit because they were slightly smaller holes and bolted the rails on with SS 1.5” long bolts, nuts and washers. Everything worked perfectly!
    Note: use quality drill bits
    Note: drilling all the way through the firebox does not cause any interference problems
    Did you find this story helpful?
    Thanks for voting and helping fellow customers!

    Rusted out rails

    Gregory - November 23, 2020
    Tool Type

    Outdoor Grill

    Difficulty

    Easy

    Time

    Less than 15 minutes

    Tools Used

    Screwdriver, Pliers, Socket set

    Used vice-grip pliers to loosen 26 year old screws. Put a little high temperature oil on new screws, placed new rail(s) over holes, started screws with a screwdriver and tightened with socket.
    Did you find this story helpful?
    Thanks for voting and helping fellow customers!

    Original tray rails were rusted and one broke.

    Dana - June 22, 2020
    Tool Type

    Outdoor Grill

    Difficulty

    Easy

    Time

    Less than 15 minutes

    Tools Used

    Power Drill, Socket set

    1. Removed 4 screws holding the two old (20 years old) rails
    2. Installed new rails with 4 new (supplied) screws.
    Did you find this story helpful?
    Thanks for voting and helping fellow customers!

    Bottom tray rails had rusted away after 25+ yrs of use on Weber Genesis 1000 grill

    Richard - May 22, 2020
    Tool Type

    Outdoor Grill

    Difficulty

    Easy

    Time

    Less than 15 minutes

    Tools Used

    Socket set, Visegrip pliers and penetrating oil

    1) Sprayed in the old nuts with penetrating oil and let set for a day.
    2) Removed the bottom tray and then used the visegrips to grab hold of an old set screw. Then rotated to remove the screw.
    3) After all set screws were removed, put a little anti-seize compound on the new set screws. Started the new screws with a nut driver.
    4) Finished. The rails were a perfect fit for the Weber Genesis 1000 purchased in the mid 1990's. Yep, figure I have another 5 years on the grill before I breakdown for a new one.
    Did you find this story helpful?
    Thanks for voting and helping fellow customers!

    Bottom tray rail assembly rusted out and fell off.

    Jonathan - April 21, 2019
    Tool Type

    Outdoor Grill

    Difficulty

    Easy

    Time

    Less than 15 minutes

    Tools Used

    Screwdriver, Pliers, Socket set, Nutdriver

    Removed old rail and screws and installed new rail.
    Did you find this story helpful?
    Thanks for voting and helping fellow customers!

    OEM stands for Original Equipment Manufacturer and means the part you’re buying is sourced directly from the manufacturer who made your product. At eReplacementParts, we sell only genuine OEM parts, guaranteeing the part you’re purchasing is of better design and of higher quality than aftermarket parts.

    Our product descriptions are a combination of data sourced directly from the manufacturers who made your product as well as content researched and curated by our content & customer service teams. This content is edited and reviewed internally before being made public to customers.

    Our customer service team are at the ready daily to answer your part and product questions. We have a dedicated staff with decades of collective experience in helping customers just like you purchase parts to repair their products.

    All our part reviews are solicited directly from other customers who have purchased this exact part. While we moderate these reviews for profanity, offensive language or personally identifiable information, these reviews are posted exactly as submitted and no alterations are made by our team.

    All our customer repair instructions are solicited directly from other customers just like you who have purchased and replaced this exact part. While we moderate these reviews for profanity, offensive language or personally identifiable information, these reviews are posted exactly as submitted and no alterations are made by our team.

    Based on data from past customer purchasing behaviors, these parts are most commonly purchased together along with the part you are viewing. These parts may be necessary or helpful to replace to complete your current repair.

    All our installation videos are created and produced in collaboration with our in-house repair technician, Mark Sodja, who has helped millions of eReplacementParts customers over the last 13 years repair their products. Mark has years of experience in selling and repairing both commercial and residential products with a specialty in gas-powered equipment.

    This data is collected from customers who submitted a repair instruction after replacing this exact part. Customers can rate how easy the repair was to complete and how long it took. We aggregate this data to provide a repair rating that allows customers to quickly determine the difficulty and time needed to perform their own repair.

    eReplacementParts.com
    7174 South 400 West
    Suite 5
    Midvale, UT 84047
    visa mastercard discover american express PayPal