eReplacementParts.com
877-346-4815
Campbell Hausfeld Parts

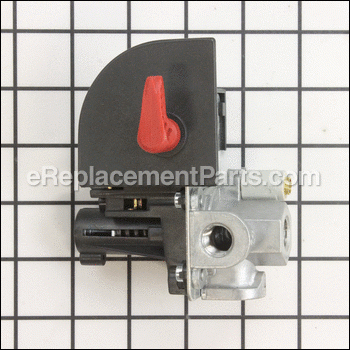
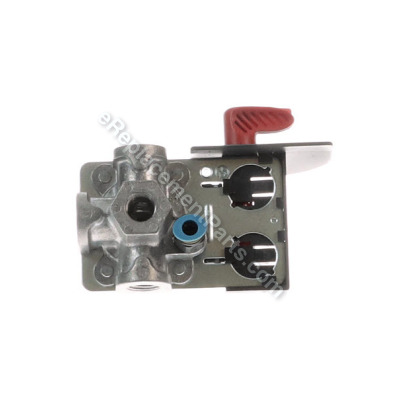
Pressure Switch CW209400AV

OEM part for: Campbell Hausfeld

Part Number: CW209400AV


Install
Videos!
Pressure Switch - CW209400AV:Campbell Hausfeld 360 View
Pressure Switch - CW209400AV:Campbell HausfeldPressure Switch - CW209400AV:Campbell HausfeldPressure Switch - CW209400AV:Campbell Hausfeld 360 View
In Stock
Order within the next 3 hours and your part ships today!
Medium 30-60 minutes (7 rated repairs)?
OEM: Original Equipment Manufacturer ?
Campbell Hausfeld
Does this d-block d-md-none fit my product?

Product Description ?

Authentic Campbell Hausfeld replacement part designed to work with air compressors. The pressure switch is made to tell your compressor when to stop and when to start building up pressure. There are multiple reasons a pressure switch could be leaking air. Replacing switch should keep it running at optimum performance.

To complete replace this pressure switch you will need: wrench set, nut driver set and a thread-sealing tape.

• Shut off the electricity and drain the air tank
• Remove the tank pressure gauge
• Remove the pressure switch tube
• Remove the pressure regulator assembly
• Disconnect the wires
• Remove the safety valve
• Install the new pressure switch
• Reinstall the safety valve
• Connect the wires
• Reinstall the pressure switch tube
• Screw the pressure gauge onto the new pressure switch and tighten the gauge firmly
• Test the air compressor

  • Classification: Part
  • Weight: 0.50 lbs.
  • Shipping: Ships Worldwide

Frequently Purchased Together ?

Compatibility

This part will fit the following 31 machines

Campbell Hausfeld

WL650001 Oilless Air Compressor View Diagrams & Manuals
WL650101 Oilless Air Compressor View Diagrams & Manuals
WL650201 Oilless Air Compressor View Diagrams & Manuals
WL650500 Oilless Air Compressor View Diagrams & Manuals
WL016900AV Oilless Air Compressor View Diagrams & Manuals
WL660004 Oilless Air Compressor View Diagrams & Manuals
WL660102 Oilless Air Compressor View Diagrams & Manuals
WL611106 Oilless Air Compressor View Diagrams & Manuals
WL660402 Oilless Air Compressor View Diagrams & Manuals
WL650002 Oilless Air Compressor View Diagrams & Manuals
WL650102 Oilless Air Compressor View Diagrams & Manuals
WL650202 Oilless Air Compressor View Diagrams & Manuals
WL650501 Oilless Air Compressor View Diagrams & Manuals
WL650601 Oilless Air Compressor View Diagrams & Manuals
WL650003 Oilless Air Compressor View Diagrams & Manuals
WL651300 Oilless Air Compressor View Diagrams & Manuals
WL650801 Oilless Air Compressor View Diagrams & Manuals
WL650600 Oilless Air Compressor View Diagrams & Manuals
WL660302 Oilless Air Compressor View Diagrams & Manuals
WL651001 Oilless Air Compressor View Diagrams & Manuals
WL651700 Oilless Air Compressor View Diagrams & Manuals
WL650702 Oilless Air Compressor View Diagrams & Manuals
WL650800 Oilless Air Compressor View Diagrams & Manuals
WL650101AJ Oilless Air Compressor View Diagrams & Manuals
WL650102AJ Oilless Air Compressor View Diagrams & Manuals
WL660002 Oilless Air Compressor View Diagrams & Manuals
WL660003 Oilless Air Compressor View Diagrams & Manuals
WL660101 Oilless Air Compressor View Diagrams & Manuals
WL611105 Oilless Air Compressor View Diagrams & Manuals
WL660301 Oilless Air Compressor View Diagrams & Manuals
WL660401 Oilless Air Compressor View Diagrams & Manuals
Show More Compatible Models
Don't see yours? Try searching our site for :

This item works with the following types of products:

  • Compressor Parts

Customer Part Reviews ?

4.8
Average Rating (out of 5):
5 Reviews
Click to filter by ratings:
5 stars
4
4 stars
1
3 stars
0
2 stars
0
1 stars
0
  • Highest Rating
  • Most Recent
< PREV
  • 1
NEXT >
  • Pressure switch
    Good price, fast delivery & just what was needed. Air compressor back up & running.
    Guest - January 29, 2022 Verified Purchase
    Repair was easy and the part worked perfectly.
    Part was new and was an exact replacement for the original.
    Guest - May 17, 2021 Verified Purchase
    The right part
    Needed a part for a air compressor that is 10 plus years old. It was just what I needed and I was able to find it on the sight easily.
    Randy - October 11, 2019 Verified Purchase
    Perfect fit
    This place is perfect for replacement parts, the parts list made it easy to fine what I needed. Pressure switch for my compressor was the same as the old one perfect ! Thank you.
    William - September 16, 2019 Verified Purchase
    Replacement part for discontinued one.
    I have shopped e-ReplacementParts many times in the past, Good service, good parts, and good prices. This part was a challenge. I could not find the exact part here so I went to the manufacturer site, clicking on parts there, I was directed to this site, surprise! I talked to a rep at e - ReplacementParts and he said the part was discontinued and this is the replacement number. I ordered it, arrived as expected. This part had all the right connections, just not in the right places. I had to get some extra airline to make it work, and some mods to the cover to get it back together. The 4 stars are for the inconvenience, not the quality of the part or the service. Just be aware of replacements for discontinued parts. I will continue to shop here for parts first.
    Guest - October 23, 2021 Verified Purchase
    t
    t
    t - t days ago Verified Purchase
    eReplacementParts Team
    t

    Questions & Answers ?

    Our customer Service team is at the ready daily to answer your part and product questions.

    photo of team member
    Ask our Team

    We have a dedicated staff with decades of collective experience in helping customers just like you purchase parts to repair their products.

    Does this fit my product?

    Questions & Answers for Pressure Switch


    No questions have been asked yet

    Customer Repair Instructions ?

    All our customer repair instructions are solicited directly from other customers just like you who have purchased and replaced this exact part.

    Medium 30-60 minutes (7 rated repairs)?

    Air leaking at pressure switch

    Steven - March 19, 2017
    👍 2 of 2 people found this instruction helpful
    Tool Type

    Compressor

    Difficulty

    Medium

    Time

    1-2 hours

    Tools Used

    Screwdriver, Pliers, Socket set, Wrench Set

    Before you get started take some pictures that you can refer back to when reassembly begins.

    Removed top cover
    Removed all piping and gauges from pressure switch
    Removed the pressure switch by turning the unit counter clockwise.
    Applied Teflon tape to external threads.
    Screwed on pressure switch so it was in line
    Attach all piping and gauges using Teflon tape.
    Make sure all connections are tight
    Check the pictures along the way to assure everything looks fine
    Check and check for leaks
    No leaks, install cover

    Did you find this story helpful?
    Thanks for voting and helping fellow customers!

    R - April 2, 2018
    👍 2 of 3 people found this instruction helpful
    Tool Type

    Compressor

    Difficulty

    Medium

    Time

    1-2 hours

    Tools Used

    Screwdriver, Power Drill, Socket set, Nutdriver, Adjustable Wrench, Needle nose and clamps

    Unplugged the compressor. Removed the old pressure switch and the broken bracket. Successfully installed both by using a phone camera (to get a picture of wiring) and tools listed above. All works well!
    Did you find this story helpful?
    Thanks for voting and helping fellow customers!

    Pressure switch broke. Would not turn on

    MICHAEL - December 26, 2020
    Tool Type

    Compressor

    Difficulty

    Easy

    Time

    30-60 minutes

    Tools Used

    Screwdriver, Wrench Set, Pipe wrench

    Unplug
    1 Opened cover
    2 Disconnected wires
    3 Removed hose from old switch. Just turns half way to remove.
    3 Attempted to unscrew switch. Pipe connecting switch to tank BROKE OFF.
    4.Removed 1/4 inch pipe from tank and replaced.
    5.In a vise removed pressure gauge, bleeder valve, and pressure outlet from old switch.
    6 Installed new switch.
    7.Installed above from #3 and 5.
    8.Connected wires
    9. Plugged in and tested.
    10. Reinstalled cover.
    Did you find this story helpful?
    Thanks for voting and helping fellow customers!

    replace parts on compresser

    jerry - November 14, 2019
    Tool Type

    Compressor

    Difficulty

    Easy

    Time

    30-60 minutes

    Tools Used

    Screwdriver, Socket set, Wrench Set

    none
    Did you find this story helpful?
    Thanks for voting and helping fellow customers!

    Pressure switch went bad

    Robert - May 23, 2018
    👍 1 of 2 people found this instruction helpful
    Tool Type

    Compressor

    Difficulty

    Easy

    Time

    Less than 15 minutes

    Tools Used

    Screwdriver, Adjustable Wrench

    Just followed instructions from the online video courtesy of ereplacementparts.com.
    was easy.
    Did you find this story helpful?
    Thanks for voting and helping fellow customers!

    My compressor Campbell Hausfeld WL650202AJ will not start. I have used this compressor for many many years.

    Gene - July 7, 2018
    👍 0 of 1 people found this instruction helpful
    Tool Type

    Compressor

    Difficulty

    Medium

    Time

    15-30 minutes

    Tools Used

    Screwdriver, Pliers, Wrench Set

    I watched the eReplacement video on how to replace the pressure switch. it was direct to the point except for the copper wire cable with a plastic end connected to the pressure switch. it was not on the video and i could not find anything on how to disconnect. So i looked closely - ---to remove turn counter clockwise 1/4 turn to align the notch with the plastic tongue then pull out - to connect back - align the plastic tongue to the metal groove push and then 1/4 turn clockwise. Make sure everything is connected (all wires) before plugging in and turning it on. I am happy that i can use my compressor again.
    Did you find this story helpful?
    Thanks for voting and helping fellow customers!

    Pressure switch failed

    Lee - May 21, 2016
    👍 0 of 1 people found this instruction helpful
    Tool Type

    Compressor

    Difficulty

    Medium

    Time

    30-60 minutes

    Tools Used

    Wrench Set

    Remove the parts that are not on the new pressure switch and set aside. Then open the electrical cover on the switch to remove the wires. You may want to make a wiring diagram. Then take off the broken pressure switch and put the new one on. Hook up the wires, then put the cover on. Then get all of the parts that you set aside and put those parts on the new pressure switch.
    Did you find this story helpful?
    Thanks for voting and helping fellow customers!

    OEM stands for Original Equipment Manufacturer and means the part you’re buying is sourced directly from the manufacturer who made your product. At eReplacementParts, we sell only genuine OEM parts, guaranteeing the part you’re purchasing is of better design and of higher quality than aftermarket parts.

    Our product descriptions are a combination of data sourced directly from the manufacturers who made your product as well as content researched and curated by our content & customer service teams. This content is edited and reviewed internally before being made public to customers.

    Our customer service team are at the ready daily to answer your part and product questions. We have a dedicated staff with decades of collective experience in helping customers just like you purchase parts to repair their products.

    All our part reviews are solicited directly from other customers who have purchased this exact part. While we moderate these reviews for profanity, offensive language or personally identifiable information, these reviews are posted exactly as submitted and no alterations are made by our team.

    All our customer repair instructions are solicited directly from other customers just like you who have purchased and replaced this exact part. While we moderate these reviews for profanity, offensive language or personally identifiable information, these reviews are posted exactly as submitted and no alterations are made by our team.

    Based on data from past customer purchasing behaviors, these parts are most commonly purchased together along with the part you are viewing. These parts may be necessary or helpful to replace to complete your current repair.

    All our installation videos are created and produced in collaboration with our in-house repair technician, Mark Sodja, who has helped millions of eReplacementParts customers over the last 13 years repair their products. Mark has years of experience in selling and repairing both commercial and residential products with a specialty in gas-powered equipment.

    This data is collected from customers who submitted a repair instruction after replacing this exact part. Customers can rate how easy the repair was to complete and how long it took. We aggregate this data to provide a repair rating that allows customers to quickly determine the difficulty and time needed to perform their own repair.

    eReplacementParts.com
    7174 South 400 West
    Suite 5
    Midvale, UT 84047
    visa mastercard discover american express PayPal