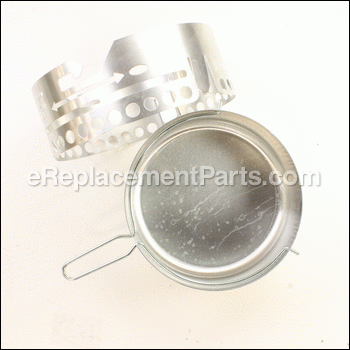
OEM Weber Ash Catcher Assembly for 22-1/2" One Touch Grills. Components included are: ash catcher bowl, ring, and handle. These parts are NOT sold separately. Ash Cather makes cleaning the ashes from your grill easier and a a lot less messy. If the ash catcher is bent or damaged it is recommended to replace it.
Ash Catcher Assembly 65143
OEM part for: Weber
Part Number: 65143
Jump To:
Product Description ?
- Circles on Ash Catcher Ring are oblong.
- Classification: Part
- Weight: 2.53 lbs.
- Shipping: Ships Worldwide
Frequently Purchased Together ?
Compatibility
This part will fit the following 51 machines
Weber
This item works with the following types of products:
This part replaces obsolete part #: 63038, 85531, 85527, 63093
Repair Videos ?
|
Having trouble getting your grill to light up? A common cause of this issue is a defective ignition switch. We'll sho...
November 08, 2012
|
|
Step-by-step instructions for removing and installing the ash catcher on your Weber charcoal grill....
January 22, 2018
|
Questions & Answers ?
Our customer Service team is at the ready daily to answer your part and product questions.

Ask our Team
We have a dedicated staff with decades of collective experience in helping customers just like you purchase parts to repair their products.
Does this fit my product?Questions & Answers for Ash Catcher Assembly
Customer Repair Instructions ?
All our customer repair instructions are solicited directly from other customers just like you who have purchased and replaced this exact part.
Put a "gold" series enclosed ash catcher on my older "silver" series Weber grill
Tool Type
Outdoor Grill
Difficulty
Easy
Time
15-30 minutes
Tools Used
Screwdriver, Pliers, Power Drill, Socket set
Parts Used
The leg positions on my older 22-1/2" Weber grill were correct, but the orientation of the leg attachment flanges was not compatible with the ash catcher. No problem, I simply drilled through the leg flanges, legs, and tabs on the ash catcher and bolted the catcher skirt to the grill. This was an easy fix and I am very happy with the results. I used stainless steel bolt and nuts with lock washers and it works great.
Thank you to eReplacementParts.com for having the parts I needed to get the job done.
I wanted to upgrade the ash catcher of my Weber Kettle
Tool Type
Outdoor Grill
Difficulty
Easy
Time
Less than 15 minutes
Tools Used
Pliers
Parts Used
Glad I did as it could not have been easier.
The new assembly comes complete and it's a simple process to invert the grill, remove the legs and snap the new assembly into the slots already manufactured into the leg supports. Then just replace the legs and you're ready to use the grill.
I should have done this long ago. No more errant breezes blowing ash on my patio and it will be much simpler to dump the ash from the enclosed pan.
Not only is it more convenient but it's a better looking unit now.
I have a 10 year old Weber Performer grill that the ash catcher assembly simply fell apart
Tool Type
Outdoor Grill
Difficulty
Easy
Time
Less than 15 minutes
Tools Used
, none
Parts Used
Nothing, I just updated and installed the newer ash catcher basket instead of the pan.
Tool Type
Outdoor Grill
Difficulty
Easy
Time
15-30 minutes
Tools Used
Screwdriver
Parts Used
I bought the most inexpensive kettle grill sold at my local home store. then added parts to upgrade it. With help from your customer service, I now have a premium grill setup without the price tags
Tool Type
Outdoor Grill
Difficulty
Easy
Time
Less than 15 minutes
Tools Used
, no tools needed
Parts Used
Weber grill ash catcher worn out
Tool Type
Outdoor Grill
Difficulty
Easy
Time
Less than 15 minutes
Tools Used
Screwdriver
Parts Used
The parts wore out due to age and being outside all the time
Tool Type
Outdoor Grill
Difficulty
Easy
Time
Less than 15 minutes
Tools Used
, None
Replaced ash tray with catcher bowl assembly
Tool Type
Outdoor Grill
Difficulty
Easy
Time
Less than 15 minutes
Tools Used
, No tools required
Parts Used
Align and insert cleaning handle thru horizontal slot on upper catcher assembly.
Snap in place 3 clips on upper assembly to each leg base at exposed slots on bottom of kettle
Insert bowl catcher onto upper assembly
Done!
The original ash catcher basket bracket broke. The new one fit nice and took me less than 10 minutes to install. No tools required.
Tool Type
Outdoor Grill
Difficulty
Easy
Time
Less than 15 minutes
Tools Used
, none
Parts Used
Ash Catcher was missing (purchased second hand)
Tool Type
Outdoor Grill
Difficulty
Easy
Time
Less than 15 minutes
Tools Used
Screwdriver
Parts Used
OEM stands for Original Equipment Manufacturer and means the part you’re buying is sourced directly from the manufacturer who made your product. At eReplacementParts, we sell only genuine OEM parts, guaranteeing the part you’re purchasing is of better design and of higher quality than aftermarket parts.
Our product descriptions are a combination of data sourced directly from the manufacturers who made your product as well as content researched and curated by our content & customer service teams. This content is edited and reviewed internally before being made public to customers.
Our customer service team are at the ready daily to answer your part and product questions. We have a dedicated staff with decades of collective experience in helping customers just like you purchase parts to repair their products.
All our part reviews are solicited directly from other customers who have purchased this exact part. While we moderate these reviews for profanity, offensive language or personally identifiable information, these reviews are posted exactly as submitted and no alterations are made by our team.
All our customer repair instructions are solicited directly from other customers just like you who have purchased and replaced this exact part. While we moderate these reviews for profanity, offensive language or personally identifiable information, these reviews are posted exactly as submitted and no alterations are made by our team.
Based on data from past customer purchasing behaviors, these parts are most commonly purchased together along with the part you are viewing. These parts may be necessary or helpful to replace to complete your current repair.
All our installation videos are created and produced in collaboration with our in-house repair technician, Mark Sodja, who has helped millions of eReplacementParts customers over the last 13 years repair their products. Mark has years of experience in selling and repairing both commercial and residential products with a specialty in gas-powered equipment.
This data is collected from customers who submitted a repair instruction after replacing this exact part. Customers can rate how easy the repair was to complete and how long it took. We aggregate this data to provide a repair rating that allows customers to quickly determine the difficulty and time needed to perform their own repair.


