

How to Install an Overhaul Kit in a Porter Cable Nail Gun
Nail guns require more frequent maintenance than other power tools. This is because the internal components experience rapid movement, lots of pressure and high forces. These forces can wear down the o-rings in the gun, causing them to leak air. You will need to install an overhaul kit in your nail gun if it is leaking from the nose, head or trigger.

If your nail gun is not leaking air, but has a broken driver, you will want to install a driver maintenance kit rather than an overhaul kit.
For this repair, we used a Porter Cable nail gun. Overhauls in other brands of nail guns will follow similar steps.
Before beginning this repair, be sure you find the right overhaul kit for your nail gun by using our Porter Cable parts search feature.
Breaking Down the Gun
Some of the bolts and screws used in your nail gun--primarily the ones in the head and nose--may have blue Loctite on the threads to help create a strong seal. This may make them difficult to remove and is normal.
1. Remove the nail gun head
Remove the four fasteners that secure the head of the nail gun.
2. Remove the magazine
Remove the two fasteners and bolt that hold the magazine on the nail gun.

3. Remove the nose piece
Remove the four fasteners that secure the nose piece.

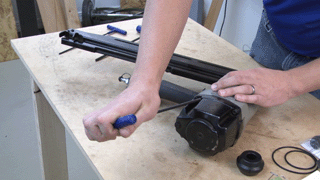
4. Remove the cylinder assembly
Use a rubber mallet or hammer to tap the nail gun housing. This should shake the cylinder loose so you can remove it.

Do not hit the cylinder assembly with the hammer as you could damage it.

Now you can remove the cylinder assembly from the gun.

Remove the cylinder alignment ring from the inside of the gun.

5. Remove the piston and bumper
Remove the piston and bumper from the cylinder assembly.

Overhauling the Piston, Head and Nose
It helps to lay out all the o-rings from the kit before you begin replacing them. This way you will be able to match the old o-rings with the new ones, streamlining the overhaul process.
1. Replace the cylinder o-rings
Replace each of the o-rings on the cylinder.

Add a thin layer of grease to the new o-rings.

Replace the check valve. Be sure that the shoulder on the check valve, the little ridge, is aligned towards the top of the cylinder. The check valve does not need grease.

2. Replace the piston o-ring
Replace and grease the piston o-ring.

3. Replace the alignment ring o-ring
Replace and grease the alignment ring o-ring.

4. Replace the head valve o-rings
Remove the cage from the head assembly.

Now remove the head valve. You will see two o-rings on the outside of the valve assembly. Another one is hidden just inside the valve with a piece of plastic and a spring in the way. Hold the assembly securely, then push the plastic piece to the side to get access to the inner o-ring.

Replace the three o-rings and apply grease to each of them.


5. Reassemble the head valve
Reassemble the head valve into the head of the gun.

6. Replace the nose o-ring
Replace the o-ring in the nose of the gun. This o-ring does not need grease.

Fasten the nose to the gun, torquing each screw a little bit at a time to guarantee a good seal.

7. Reinstall the head valve and cylinder assembly
Slide the new bumper onto the piston (with the arrow pointing up).

Slide the piston assembly into the cylinder and seat the bumper.

Slide the alignment ring over the cylinder.

If you extend the piston out of the cylinder, you will find it easier to align the driver with the nose. Align the nose and driver and slide the cylinder assembly into place.


Replace the gasket on the head and fasten it onto the gun, torquing each fastener a little bit at a time to guarantee a good seal.


Overhauling the Trigger
Porter Cable uses two types of triggers in their nail guns: triggers that thread into place and triggers help in place by pins. If your nail gun uses pin triggers, you can simply replace your trigger valve with the one in the overhaul kit. If your gun uses a threaded trigger, you will have to rebuild it using parts from the new trigger valve assembly.
1. Remove the trigger assembly
Remove the o-ring that holds the trigger pin into the gun and remove the trigger pin.


Now you can remove the trigger away from the gun.

Use a wrench to remove the trigger valve from the gun.

2. Break down the trigger valves
Pull on the two sides of your original valve to gain access to its internal components. Use a small punch to remove the pins that hold the new valve together.

3. Rebuild the trigger valve
Now you can swap parts between the two valves. Use the new valve's spring, brass fitting, inner valve and o-rings on your new valve.

Assemble your old, threaded valve with the new parts and add a thin layer of grease to the o-rings.

3. Reinstall the trigger assembly and magazine
Thread the trigger assembly back into your nail gun and tighten the valve down.

Reinstall the trigger, trigger pin and the o-ring that holds the pin in place.

Finalize the repair by reinstalling the magazine onto your gun.

Conclusion
Installing an overhaul kit is a simple, if somewhat long, repair that you can easily do yourself. This repair will definitely save you money compared to the repair shop option, and if you use your nail gun for a lot of projects, you will find that you have to overhaul it frequently.
Armed with the knowledge in this article, you can fix any leak issues with your nail gun in about an hour, which means you can get back to work on those important projects sooner.
Before you begin any repair, make sure you have the right parts by using our handy power tool parts search feature.