How to Change the Blade Clamp Assembly on the Bosch RS15 and RS20 Saws
Finish Nailer Repair - Replacing the Driver Guide (Ridgid Part # 79004001022)
This article explains how to remove the Blade Clamp Assembly from the Bosch RS15 and RS20 Reciprocating Saws. The blade clamp assembly needs to be removed when being replaced and when performing other repairs on the saw.
This article has a video and step-by-step instructions to demonstrate this.

Only a few tools are needed to remove the blade clamp assembly:
- a hammer
- a metal punch, and
- a small flat-head screwdriver
Step-By-Step Instructions
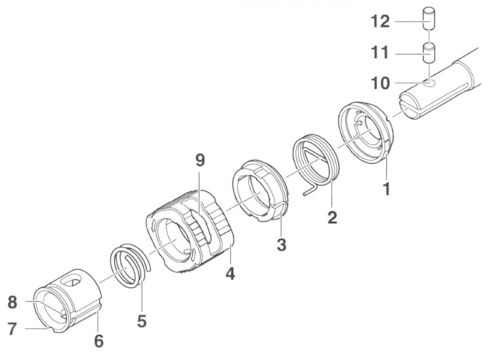
1. Assemble parts 1 through 6 on to the shaft as shown in the graphic below.
2. Compress and rotate counter-clockwise (1/2 turn) the Collar 4 and the Sleeve 6 until the radial slot 9* on the Collar, and the notch 7* and slot 8* on the Sleeve, all align with the hole 10* on the shaft. Be sure that both the collar 4 and the sleeve 6 make the 1/2 turn. A common mistake is to rotate only the collar.
3. With all the slots and hole aligned as described above, insert the Detent Pin 11 completely into the hole 10 (flat side first, pointed end towards you). Insert the Retaining Pin 12 just enough to clear the Sleeve 6 and engage the shaft hole. If the Collar 4 is locked and will not rotate in either direction, proceed to step 4. Otherwise, skip step 4 and go to step 5.
4. While holding the Retaining Pin 12 in place by hand, compress the Sleeve 6 inward (DO NOT INSERT A BLADE) until the collar releases and rotates clockwise.
5. The Retaining Pin 12 should now be pressed in until it stops, but only after wedging the tip of a flat blade screwdriver into the slot where the blade would normally go to avoid collapsing the shaft/blade opening.
Align all parts before inserting the Detent and Retaining Pins