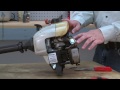
This is a genuine OEM approved replacement part, it is specially designed for use with Craftsman gas powered lawn and garden equipment. By pressing on the purge bulb, it will force fuel into the fuel line from the fuel tank into the carburetor. Once the carburetor is full of fuel, the excess fuel will be purged back into the tank in the fuel return line. Over time the material may begin to deteriorate and crack eventually requiring replacement. It is a high-quality assembly which consists of a durable rubber primer bulb with a flexible hose and it is sold individually.
The fuel line and filter, primer and hose assembly, and the fuel return line had deteriorated over time and were leaking fuel. I found the parts here and ordered them. When the parts arrived, I removed four screws from the rear cover on the engine, pulled off the old hoses and put the new ones on. I screwed the rear cover in place and was
... Read more done in about 30 minutes or less.
Read less
Did you find this story helpful?
Thank you for voting!
Bulb disintegrated because of ethanol in gas. (Use premium gas in small motors )
The priming bulb has disintegrated in this trimmer. Unit came with one gas line, simple swap. Website had great tools to ID the part, match it to model of trimmer. Just mind what hose goes where. Note the replacement hose will need an angle cut to go into the gas tank easier.
Did you find this story helpful?
Thank you for voting!
The old primer bulb had cracked and the was a hole where the top of the bulb is normally plugged shut in the mfg mold. Couldn\'t prime the carburetor.
1,removed the muffler and air filter housing four mount screws with the screwdriver
2,removed the center fuel tube leads from carburetor to the primer bulb outer connecting tube (make sure the fuel tank is empty of any fuel)
3,remove only the tube leading from the outer primer bulb connection to the inner hole in the fuel tank
... Read more.
4,unsnap the old primer bulb from the mount by squeezing the lock arms and pull the bulb assembly rearward.
Install the new tube to the longer outer connection port. Then cut a 45 degree angle on the loose end of the tube.
2,install the new primer bulb and tube into the mount bracket *you may have to squeeze the mount locks inward slightly bending them towards each other to get them in through the mount bracket hole. They fit tight.
3,put a drop of oil on the 45 degree end of the tube. Using needle nose pliers force the 45+é-¦end through the inner hole of the fuel tank. Look through the fuel cap opening of the tank to be sure all the 45+é-¦end is inside the tank.
Reinstall the muffler and air filter housing. Fuel up and go.
Read less
Did you find this story helpful?
Thank you for voting!
String trimmer wouldn\'t start and bogged down when the throttle was advanced.
Remove cover, loosen carburetor, pull up to get gas tank out, put new hoses in, ran from gas tank to carburetor. Needed 3 new hoses and primer, reconnected them, snapped new primer in place and put back together.
Did you find this story helpful?
Thank you for voting!
The primer bulb was degraded and leaking gas. The primer hose to the carburetor was degraded and broken. Other hoses were degraded and brittle.
1. Remove all the torx screws holding the outside covers in place. Remove the left cover.
2. Remove the old primer bulb assembly from the right cover. Disconnect old fuel lines as required.
3. Draw or take a picture of the throttle control trigger in the right cover, then remove it and the cable from the cover.
4. Remo
... Read moreve the throttle cable from the right cover and set it to the side. It won\'t go far because the kill switch is still attached.
5. Removed the gas tank and all old/broken hoses/parts.
6. Installed the fuel line in the bottom of the tank. (This requires pulling the filter hose connection through the small hole in the bottom of the tank from the inside. Do not use pliers. Just feed the end of the hose through the hole and apply a steady pull to the hose and wiggle it around. The piece will pull through without breaking anything.)
7. Install the new return fuel line (mine was blue) on the primer bulb assembly.
8. Cut a bevel on the other end to make it easy to feed it into the side hole on the gas tank. This hose was a little long, so I had to cut about an inch off to make it fit correctly.
9. Install the fuel line (bottom of gas tank) to the connection on the cylinder side of the carburetor. This requires good light and long needle nose pliers, unless you want to remove the air filter. (this also removes the carburetor.)
10. Install the primer bulb in the right side cover with the short (clear) fuel line to the front.
11. Connect the front line (clear) to the fitting on the intake side of the carburetor.
12. Push the rear line (blue return line) into the hole in the side of the gas tank.
13. Re-install the throttle cable and trigger assembly to the right cover.
14. With the right cover in place, but not screwed down, and without replacing the left cover, add fuel to the gas tank and check for leaks.
15. Press the primer bulb several times to be sure it is operating properly and there are still no leaks.
16. If all is good, replace the left cover and install all the mounting screws.
Note: I had not used my blower for about 5 years, so I had to do the fuel/air mix setup found in the manual and replace the spark plug. Runs like a dream and no gas leaks.
1. Reviewed operating manual on trouble shooting.
2. Watched your video on the replacement of the fuel lines for this make/model.
3. Made an install diagram of fuel lines from and to fuel tank and carburetor.
4. Placed all parts and screws removed in a container.
5. Inspected gaskets for damage.
6. Installed
... Read morethe two fuel lines and trimmed their length using the old fuel lines as a guide.
7. Replaced the carburetor mount and cover. Checked that all screws were tight.
8. Confirmed all parts and screws in the container were replaced.
9. Tested spark plug for spark and correct gap.
10. Added fresh gas to fuel tank. Fuel tank drained before repair.
11. Started trimmer and adjusted idle screw.
While cost of parts and were expensive, the online video was very helpful.
Read less
Did you find this story helpful?
Thank you for voting!
Primer bulb split , unable to prime engine to start
Removed carburetor and cleaned all internal parts. replaced all full lines, primer bulb and gas filter. Replaced spark plug. Started on 2nd pull and runs like a champ.
Did you find this story helpful?
Thank you for voting!
< Prev
1
2
3
Next >
Model Cross Reference
This part works with the following models:
ERP Number: ERP9150700
Manufacturer Part Number: 791-683974B
This part is in stock in our warehouse and will ship out within 1 business day of the order being placed.
New stock is on the way! On order parts usually ship within 7 business days.
Item is not in stock and usually ships 10-15 business days from the time you place your order.
This item is no longer being made by the manufacturer, and cannot be added to your shopping cart.
✖
Mail-In Recycling Rebate
Some of the parts we sell are eligible for mail-in rebates since we can recycle them. We will display any applicable rebates in your shopping cart. To redeem your rebate, contact Customer Service after you have received your part.
✖
[{"position":0,"name":"Home","title":"Home","url":"/"},{"position":1,"name":"Hose or Tube","title":"Hose or Tube","url":"/parts/lawn-and-garden/trimmer/hoses-and-tubes/"},{"position":2,"name":"791-683974B","title":"791-683974B","url":""}]