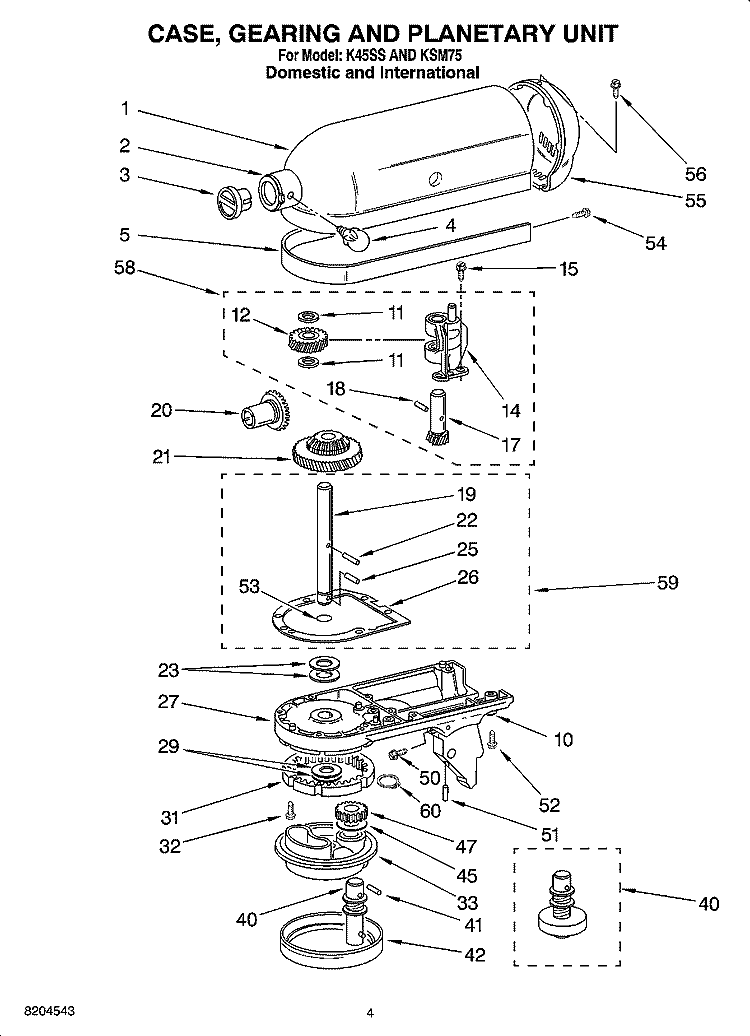
1. Detached the main mixer motor/transmission from the mount.
2. Disassembled the main motor and the transmission exposing the damaged gear assembly.
3. Cleaned up the whole unit including the grease in the transmission.
4. Cleaned up the contacts area and the mechanical switch.
5. Reassembled everything using
... Read morethe new gear assembly, grease and the gasket for the transmission.
6. Tested with and without normal operational load. Works well.
My mixer was not one that had video on how to repair it.
1. Removed mixer head from base
2. Removed press on ring and rear motor cover. Also removed paddle drive assembly
3. Removed screws to separate upper housing. 5 around drive and 2 at motor area
4. Separated housing and removed gasket
5. Removed all gre
... Read morease and removed gear tower
6. Removed pin from gear and replaced it.
7. Replace gear tower and greased everything.
The gear replacement video helped, but no one shows how to re-grease the gear box. This would be helpful
8. Reversed the order to reassemble
Take plenty of photos with smart phone !!! Remove the four large Philips Screws from stand.
Remove the stand.
Remove small screw from rounded end cap. Remove rounded end cap and two screws that hold the band on.
Remove the round chrome ring with a screwdriver and a light tap with a hammer.
Remove the pin from t
... Read morehe output shaft, and pull the gear cover off. This will expose the hidden screws from under side.
Remove the other screws that hold the cover on the motor housing to expose the guts of the power train.
Remove three screws that hold the nylon or Teflon gear support. Its hidden under a lot of grease.
Remove the pin from the gear and shaft. Its a good idea to photo steps with your smart phone as you go.
Reassemble parts in the reverse order. You should be good to go.
Read less
Did you find this story helpful?
Thank you for voting!
Grease leaking between the planetary and the motor housing.
Broke the mixer apart, found pinion gear stripped, ordered the part from e-replacement using their diagram pages. I\'m very happy using e-replacement parts, their service is excellent.
Did you find this story helpful?
Thank you for voting!
Plastic gear driven by worm gear was stripped due to dough being too dry.
Repair is easier if you remove base and bowl support from motor/transmission housing. Gently separate blade holder from output shaft with hammer and small pin punch. You can then access screws holding output gear housing to transmission housing. You can then see the plastic gear that the worm gear will eat into if blades hang up in dough
... Read morethat is too dry. Install new plastic gear assembly, redistribute gear grease in transmission and reassemble in reverse order making sure you let the gears mesh without forcing them. While you have the mixer apart I recommend cleaning thoroughly all the exterior surfaces, will look and work like a new one.
Read less
Did you find this story helpful?
Thank you for voting!
< Prev
1
Next >
✖
Stock Status
This part is in stock in our warehouse and will ship out within 1 business day of the order being placed.
New stock is on the way! On order parts usually ship within 7 business days.
Item is not in stock and usually ships 10-15 business days from the time you place your order.
This item is no longer being made by the manufacturer, and cannot be added to your shopping cart.
✖
Mail-In Recycling Rebate
Some of the parts we sell are eligible for mail-in rebates since we can recycle them. We will display any applicable rebates in your shopping cart. To redeem your rebate, contact Customer Service after you have received your part.