eReplacementParts.com
877-346-4814
Black and Decker Parts

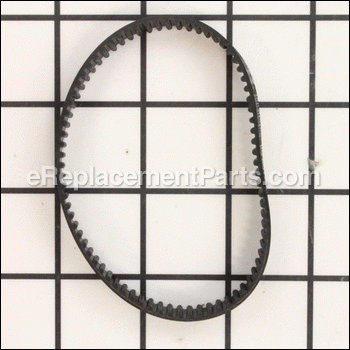
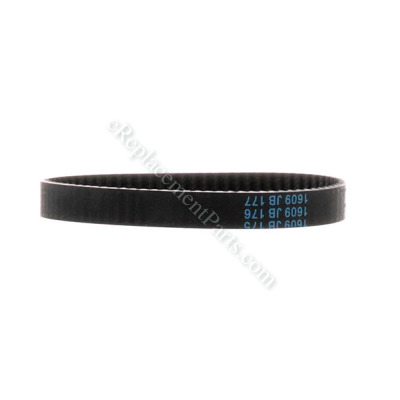
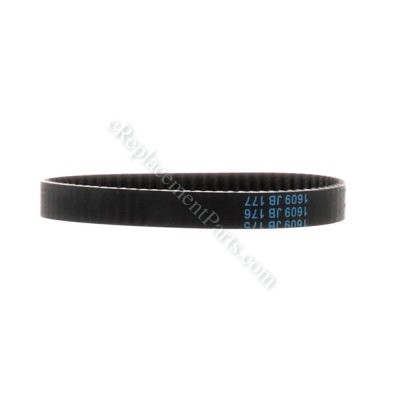
Belt 90552006

OEM part for: DeWALT, Black and Decker

Part Number: 90552006


Install
Videos!
Belt - 90552006:DeWALT 360 View
Belt - 90552006:DeWALTBelt - 90552006:DeWALTBelt - 90552006:DeWALT 360 View
In Stock
Order within the next 9 hours and your part ships today!
Easy 15-30 minutes (26 rated repairs)?
OEM: Original Equipment Manufacturer ?
DeWALTBlack and Decker
Does this d-block d-md-none fit my product?

Product Description ?

This is a genuine Black and Decker replacement part, it s sold individually.
This belt is installed on the drive pulley and driven pulley on the motor assembly on the models listed below.
The flex shaft is connected to the larger pulley which rotates the spool and cutting line on the trimmer.
Over time the cogs on the belt will become worn and the belt will have to be replaced.

  • Classification: Accessory
  • Weight: 0.01 lbs.
  • Shipping: Ships Worldwide

Frequently Purchased Together ?

Compatibility

This part will fit the following 14 machines

Black and Decker

GH1000 Type 1 14" Grass Hog XP Trimmer/Edger View Diagrams & Manuals
GH1000 Type 2 14" Grass Hog XP Trimmer/Edger View Diagrams & Manuals
GH1000 Type 4 14" String Trimmer View Diagrams & Manuals
GH2000 Type 1 Trimmer View Diagrams & Manuals
GH1100 Grass String Trimer View Diagrams & Manuals
GH1100-B2C (Type 1) Dustbuster Power Tool View Diagrams & Manuals
GH1100-B3LZ (Type 1) Dustbuster Power Tool View Diagrams & Manuals
GH1000-AR (Type 1) 900w Grass Trimmer/Edger Power Tool View Diagrams & Manuals
GH1000-B2 (Type 1) 900w Grass Trimmer/Edger Power Tool View Diagrams & Manuals
GH1000-B2C (Type 1) 900w Grass Trimmer/Edger Power Tool View Diagrams & Manuals
GH1000-B3LZ (Type 4) String Trimmer - Fob Inte Power Tool View Diagrams & Manuals
GH1000-BR (Type 1) 900w Grass Trimmer/Edger Power Tool View Diagrams & Manuals
GH1100 (Type 1) Dustbuster Power Tool View Diagrams & Manuals
GL1000-AR (Type 1) 900w String Trimmer Power Tool View Diagrams & Manuals
Show More Compatible Models
Don't see yours? Try searching our site for :

This item works with the following types of products:

  • Grass Trimmer Parts
  • Trimmer Parts

This part replaces obsolete part #: 477486-00

Customer Part Reviews ?

4.4
Average Rating (out of 5):
14 Reviews
Click to filter by ratings:
5 stars
11
4 stars
1
3 stars
0
2 stars
0
1 stars
2
  • Highest Rating
  • Most Recent
< PREV
  • 1
  • 2
NEXT >
  • Great place for replacement parts !
    Found exactly what I needed to make repair with quick sevice .
    DANIEL - April 5, 2023 Verified Purchase
    VERY PLEASE WELL CALL SOON THANK YOU
    THE PART WORK GREAT
    John - June 9, 2022 Verified Purchase
    Easy peacy
    Customer service helped me identify the correct part needed. I received it in a timely manner which was great. I installed it and it fit like a glove. Thank you guys for an awesome job all the way thru. .
    Guest - April 8, 2021 Verified Purchase
    Super quick and the part worked perfectly!
    the part worked perfectly!
    Guest - June 3, 2020 Verified Purchase
    Fast Delivery and right part
    Very nice quality replacement belt which I installed and my Black & Decker GH 1000 runs like new.
    Guest - June 1, 2020 Verified Purchase
    Fit
    arrived in good condition
    Guest - August 7, 2019 Verified Purchase
    Quick fix
    Quick service,good price, part fit,
    Guest - July 4, 2019 Verified Purchase
    Grass hog belt replacement
    Fast delivery of a belt drive for my grass hog weed eater. No problem replaced belt knocked down some weeds in back yard worked good.
    Guest - June 18, 2019 Verified Purchase
    Well done.
    This was not the easiest part to find, but you folks had it and it fit just fine. Old B&D electric trimmer works again after some years of inactivity due to my laziness in taking the housing apart. Almost scrapped it a time or two. Glad I didn't as the replacement I'd purchased just wasn't up to the tasks. This one was for many years and now is again. Part arrived quickly. Took me longer to put all those housing screws back in than it did to install the belt thanks to some helpful tips other customers posted.
    Guest - May 29, 2019 Verified Purchase
    weed trimmer belt
    The belt for my weed trimmer was the exact fit and works well.
    Guest - May 6, 2019 Verified Purchase
    t
    t
    t - t days ago Verified Purchase
    eReplacementParts Team
    t

    Questions & Answers ?

    Our customer Service team is at the ready daily to answer your part and product questions.

    photo of team member
    Ask our Team

    We have a dedicated staff with decades of collective experience in helping customers just like you purchase parts to repair their products.

    Does this fit my product?

    Questions & Answers for Belt


    No questions have been asked yet

    Customer Repair Instructions ?

    All our customer repair instructions are solicited directly from other customers just like you who have purchased and replaced this exact part.

    Easy 15-30 minutes (26 rated repairs)?

    Broken belt

    Riyaz - November 17, 2015
    👍 23 of 24 people found this instruction helpful
    Tool Type

    Trimmer

    Difficulty

    Medium

    Time

    15-30 minutes

    Tools Used

    Screwdriver

    After unscrewing the 20 screws, make sure you keep them safe. After removing the cover, take a picture in case you forget how it looks after assembly. It is easier to remove broken belt but requires some effort to replace. First remove the shaft from the trimmer, and gently lift the motor. The belt has to go around the motor and the gear which drives the trimmer. First pass the belt around the trimmer gear, and secure with one hand, or ask someone to hold it firmly. Pass the belt on one side of the motor gear and holding it firmly, rotate the motor gear. If you succeed in rotating half circle, the fan belt should snugly fit.
    Put the motor back into is hub. Insert the trimmer shaft, make sure all wiring is out of harm's way, and close the cover piece.
    Did you find this story helpful?
    Thanks for voting and helping fellow customers!

    Belt broke

    Jay - May 31, 2016
    👍 6 of 7 people found this instruction helpful
    Tool Type

    Trimmer

    Difficulty

    Easy

    Time

    15-30 minutes

    Tools Used

    Screwdriver

    Remove the screws from the housing. Then separate carefully. Take a picture of where the internal parts are located. Remove the motor from the housing. And remove the flex shaft. Place the belt on the large pulley, then start it on the edge of the small pulley while rotating the belt and pushing it on the small pulley. It might take a few tries, but it can be done. Once you have the belt on, put the flex shaft back in and place the motor where it was before. Make sure all of the internal parts are where they should be. Then assemble the housings.
    Did you find this story helpful?
    Thanks for voting and helping fellow customers!

    Broken belt

    Mikel - June 10, 2016
    👍 4 of 4 people found this instruction helpful
    Tool Type

    Trimmer

    Difficulty

    Medium

    Time

    15-30 minutes

    Tools Used

    Screwdriver

    The tooth belt on this model wears out every two-three years. The change is pretty straight forward. You need to remove a lot of screws holding the two halves together, some are hidden under decals. Be careful to note the position of the various parts that may move as you separate the halves, especially a little spring that works the button for rotating the shaft. Remove the old belt if still in one piece and put the new one over the gear on both parts. Making sure all is in place, reinstall the two halves with the many screws. While apart it is a good time to check other parts especially the shaft for general wear and lubrication.
    Did you find this story helpful?
    Thanks for voting and helping fellow customers!

    Belt worn

    john - June 7, 2016
    👍 2 of 2 people found this instruction helpful
    Tool Type

    Trimmer

    Difficulty

    Medium

    Time

    15-30 minutes

    Tools Used

    Screwdriver

    Remove the screws from the motor housing. Separate the halves, take a picture of the inside of the housings to see where all of the parts are placed. Remove the motor. Remove the worn belt. Install the new belt by placing it on the large pulley first, then start it on the edge of the small pulley. Start rotating the belt by turning the large pulley. While it is rotating the belt push it on the small pulley. Another pair of hand really helps. Once you have it on, assemble the parts inside and screw the housing together.
    Did you find this story helpful?
    Thanks for voting and helping fellow customers!

    Stripped cog belt & broken guard

    CHARLES - April 7, 2016
    👍 1 of 1 people found this instruction helpful
    Tool Type

    Trimmer

    Difficulty

    Medium

    Time

    15-30 minutes

    Tools Used

    Screwdriver

    Opened housing by removing phillips screws. Changed belt & reassembled. Ran for 15 minutes then the guard broke. Should have checked with previous parts order but didn't.
    Did you find this story helpful?
    Thanks for voting and helping fellow customers!

    Parts worn out

    Joe - April 9, 2019
    Tool Type

    Grass Trimmer

    Difficulty

    Easy

    Time

    30-60 minutes

    Tools Used

    Screwdriver

    Removed old parts and installed new parts, works good as new, easy repair using schematic from ereplacements parts.
    Did you find this story helpful?
    Thanks for voting and helping fellow customers!

    The belt broke

    Richard - February 19, 2018
    Tool Type

    Grass Trimmer

    Difficulty

    Medium

    Time

    30-60 minutes

    Tools Used

    Screwdriver

    Had to open the handle to get at the belt and then replace the belt and then put it all together
    Did you find this story helpful?
    Thanks for voting and helping fellow customers!

    Drive belt broke.

    Max - November 19, 2017
    Tool Type

    Grass Trimmer

    Difficulty

    Medium

    Time

    30-60 minutes

    Tools Used

    Screwdriver, Power screw driver

    Disassembled Motor Housing by removing philips head screws. Cleaned out bits and pieces of broken drive belt and reinserted the new belt over the splines. Reassembled the Housing.
    Did you find this story helpful?
    Thanks for voting and helping fellow customers!

    Drive belt on B&D Grasshog trimmer broke

    Don - November 2, 2017
    Tool Type

    Grass Trimmer

    Difficulty

    Hard

    Time

    1-2 hours

    Tools Used

    Screwdriver, Pliers

    1 Removed eleven screws to split the plastic housing in two parts
    2 Removed the remnants of the old belt
    3 Pulled the flexible drive shaft out of the driven pulley
    4 Raised the driven pulley to get the new Black and Decker belt over the pulley
    5 Belt was short and the tension extremely tight to replace the driven pulley and bearing back in the case.
    6 Screwed the two sides of the plastic case together.
    Did you find this story helpful?
    Thanks for voting and helping fellow customers!

    Needed new belt

    Stan - September 20, 2017
    Tool Type

    Grass Trimmer

    Difficulty

    Easy

    Time

    15-30 minutes

    Tools Used

    Screwdriver

    Open the unit .....removed belt.....replaced it...rock and roll :)
    Did you find this story helpful?
    Thanks for voting and helping fellow customers!

    OEM stands for Original Equipment Manufacturer and means the part you’re buying is sourced directly from the manufacturer who made your product. At eReplacementParts, we sell only genuine OEM parts, guaranteeing the part you’re purchasing is of better design and of higher quality than aftermarket parts.

    Our product descriptions are a combination of data sourced directly from the manufacturers who made your product as well as content researched and curated by our content & customer service teams. This content is edited and reviewed internally before being made public to customers.

    Our customer service team are at the ready daily to answer your part and product questions. We have a dedicated staff with decades of collective experience in helping customers just like you purchase parts to repair their products.

    All our part reviews are solicited directly from other customers who have purchased this exact part. While we moderate these reviews for profanity, offensive language or personally identifiable information, these reviews are posted exactly as submitted and no alterations are made by our team.

    All our customer repair instructions are solicited directly from other customers just like you who have purchased and replaced this exact part. While we moderate these reviews for profanity, offensive language or personally identifiable information, these reviews are posted exactly as submitted and no alterations are made by our team.

    Based on data from past customer purchasing behaviors, these parts are most commonly purchased together along with the part you are viewing. These parts may be necessary or helpful to replace to complete your current repair.

    All our installation videos are created and produced in collaboration with our in-house repair technician, Mark Sodja, who has helped millions of eReplacementParts customers over the last 13 years repair their products. Mark has years of experience in selling and repairing both commercial and residential products with a specialty in gas-powered equipment.

    This data is collected from customers who submitted a repair instruction after replacing this exact part. Customers can rate how easy the repair was to complete and how long it took. We aggregate this data to provide a repair rating that allows customers to quickly determine the difficulty and time needed to perform their own repair.

    eReplacementParts.com
    7174 South 400 West
    Suite 5
    Midvale, UT 84047
    visa mastercard discover american express PayPal