

How to Replace the Lower Motor Bearing on a Porter Cable Sander


Sander bearings wearing out? It's time to face the fix. Whether you are a master carpenter or a seasonal sander, eReplacementParts.com provides the parts, procedures and facts you need to fearlessly fix what fails you.
The lower motor bearing attaches to the motor's armature, enabling it to spin. Eventually, the bearing will wear out. The first signs of a bad bearing will be squealing sounds coming from the sander. As the bearing continues to wear, it will begin to lock up (or seize completely), and you'll notice a considerable loss of power from the sander.
This article provides step-by-step instructions for removing and installing the lower motor bearing on a Porter Cable Quicksand 333 series sander.
Let's get started.

REMOVING THE LOWER BEARING [top]
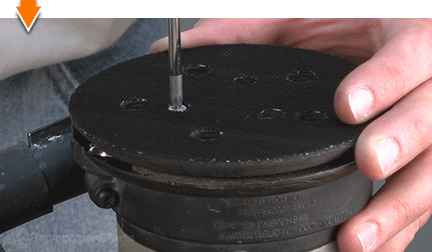
1. Remove the sanding pad.
Remove the (3) screws from the sander pad.

Remove the sanding pad from the sander.

2. Remove the clutch belt.
Remove the clutch belt from the fixed pulley and the pad support pulley.

3. Remove the pad housing.
Remove the (2) screws from the pad housing.

Separate the two halves of the pad housing.

Separate the sander from the pad housing.

4. Remove the dust pad housing O-ring.
Use a screwdriver to pry the O-ring out of the groove in the housing.

Work around the edges of the O-ring; stretching / removing it as you move.

Remove the O-ring from the sander.

5. Remove the pad support.
Grasp the fan to prevent the pad support from rotating.

Remove the (1) screw from the pad support.

Remove the pad support (and washer) from the sander.

6. Remove the fan.
Slide the fan assembly off the spindle and away from the sander.

7. Split the motor housing.
Remove the (4) screws from the motor housing.

Remove the top half of the motor housing.

8. Disengage the motor brushes.
Pull the brush holders (containing the motor brushes) away from the armature. (There are two motor brushes on this unit.)

9. Remove the armature.
Lift the armature assembly to disengage the two bearings (upper and lower) from the motor housing.

Slide the armature assembly out of the field and away from the sander.

10. Remove the lower bearing.
The simplest way to remove the bearing is to use a bearing puller. However, certain pullers will not work on this particular model (due to limited space between the bearing and the counterweight). In such cases, it will be necessary to use a bearing separator to remove the lower bearing. [This article describes the process for removing the bearing with a separator.]

Position the bearing separator beneath the lower bearing.

Tighten the bearing separator bolts.

Place the bearing separator (and armature assembly) in the vise. The jaws of the vise should be opened wide enough to accommodate the plastic fan on the armature.

Thread the pad support screw into the end of the spindle (this will prevent damage to the spindle during removal).

Use a hammer to tap the end of the shaft (containing the pad support screw) until the armature breaks free from the bearing.

Remove the lower bearing from the armature.

INSTALLING THE NEW LOWER BEARING [top]
11. Install the lower bearing.
Verify that the washer is in place on the armature spindle. (The washer may have fallen off during the removal process.) The washer must be installed before the new bearing.

Slide the new bearing onto the armature shaft.

Locate a socket that is approximately the same diameter as the inner race of the new lower bearing.

Position the socket squarely against the new bearing (on the shaft).

Tap the socket with a hammer to press the new bearing onto the spindle.

Continue tapping the socket until the bearing is positioned firmly against the washer.

REASSEMBLING THE UNIT [top]
12. Reinstall the armature.
(Re)Install the O-ring onto the upper bearing.

Slide the armature through the field.

Ensure that both armature bearings (upper and lower) are seated within the recesses in the motor housing. (The armature should rotate freely when correctly installed).

13. Reinstall the motor brushes.
Press the motor brush against the armature to compress the spring within the brush holder.

Position the brush holder in the slot on the motor housing.

Repeat this step for the second motor brush.

14. Reinstall the top half of the motor housing.
Install the rubber bumper into the recess on the motor housing.

Visually inspect the wires for potential pinch-points; adjust the wires as necessary.

Install the top half of the motor housing.

Secure the motor housing with the (4) screws.

15. Reinstall the fan.
Slide the fan onto the spindle.

16. Reinstall the pad support.
Install the pad support onto the sander.

Install the washer onto the pad support. (The side with the recess should be facing away from the bearing).

Secure the pad support with the (1) screw.

17. Reinstall the dust pad housing O-ring.
Install the pad housing O-ring into the groove on the motor housing.

18. Reinstall the pad housing.
Install one half of the pad housing onto the sander (the seam should align with the seam on the motor housing).

Install the second half of the pad housing onto the sander.

Secure the pad housing with the (2) screws.

19. Reinstall the clutch belt.
Install the clutch belt onto the fixed (small) pulley.

Stretch the clutch belt onto one side of the pad support.

Rotate the pad support to seat the clutch belt.

20. Reinstall the sanding pad.
For easy alignment: Pass a small screwdriver through one of the screw holes on the sander pad; then insert the end of the screwdriver into one of the holes on the pad support.

Install the sanding pad.

Secure the sander pad with the (3) screws.

Sanding can be a demanding task. But you don't have to rough-up your accountant to smooth-out your countertops. As you just learned, repairing your own power tools is simple when you follow our step-by-step guides. Not only did you expand sander functionality at a fraction of the cost of replacement; you have taken the edge off all future repairs.
Find your next fix here.