

How to Replace the Carburetor on a Tiller
Finish Nailer Repair - Replacing the Driver Guide (Ridgid Part # 79004001022)
Over time the carburetor on your small engine can become defective, causing sluggish performance and poor fuel economy. To prolong the life of your tiller it is necessary to replace your carburetor when these problems arise. The steps shown below will help anyone with a few common tools to perform this repair themselves.

Find replacement parts for your Powermate tiller here.
Removing the carburetor
1. Remove the air filter
Pull the tabs at the top of the air filter cover to detach it from the air box, then remove the air filter.

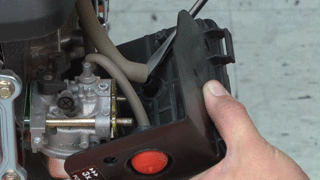
2. Remove the air filter base
Remove the two nuts using a socket wrench or socket driver and pull the air filter base away from the tiller.

3. Detach the primer line and crank case vent line
Loosen the hose clamp(s) and use a flat-head screwdriver to pry the primer and crank case vent line off of the carburetor. Once all of the lines are removed, the air filter base can be set aside.
4. Remove the fuel line
Clamp the fuel line with a fuel line clamp, then pull the fuel line off of the carburetor.

5. Pull the carburetor away from engine
Slide the carburetor and gasket off of the two mounting bolts.

6. Remove the throttle linkage
Pull the throttle linkage cable out of the carburetor and set gently aside.

Installing the new carburetor
1. Replace the throttle linkage
Carefully thread the throttle linkage cable back into the carburetor.

2. Slide the carburetor back onto the mounting bolts
Mount the carburetor back onto the bolts and make sure it rests snugly against the back-rest.

3. Re-install the fuel line and gasket on the carburetor
Push the fuel line back onto the carburetor and remove the clamp from the fuel line. Next, push the carburetor gasket back onto the mounting bolts, into its original position.

4. Reattach primer line and crank case vent line
You're now ready to reinstall the air box.
First, reattach the primer and crank case vent lines back onto the carburetor, then slide the hose clamp(s) back onto their grommets.

5. Replace the air filter base
Mount the air filter base back onto the bolts and secure it using the two nuts.

6. Replace the air filter and air filter cover
Push the air filter back into the air filter base and snap the filter cover back onto the filter base.

Conclusion
By following the steps outlines above, replacing a carburetor can be performed by anyone in the comfort of their own garage in a matter of minutes.
Don't forget to browse our entire selection of lawn equipment parts.