

How to Install a Tune-Up Kit on an Echo Trimmer (Model SRM-225)
Finish Nailer Repair - Replacing the Driver Guide (Ridgid Part # 79004001022)


String trimmer out of whack? It's time to face the fix. Whether you are a legendary landscaper or a weekend weed whacker, eReplacementParts.com provides the parts, procedures and facts you need to fearlessly fix what fails you.
If you want your powered equipment to last through multiple seasons, you must maintain it. The repower tune-up kit makes it easy to perform maintenance in three vital areas on your trimmer, including the fuel, air and ignition systems.
The tune-up kit includes a new fuel filter, which prevents tiny particles in the fuel tank from reaching the carburetor; a new air filter, which helps keep dirt and debris out of air intake components; and a new spark plug, which helps ensure clean, consistent combustion in the cylinder.
This article provides step-by-step instructions for installing a tune-up kit on an Echo SRM-225 trimmer.
Let's get started.

REPLACING THE FUEL FILTER [top]
1. Drain the fuel.
Drain any excess fuel from the tank before servicing the unit.

2. Remove the fuel cap.
Unscrew and remove the fuel cap from the fuel tank.
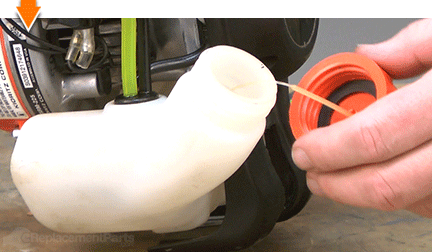
3. Remove the fuel filter from the fuel line.
To make your own fuel line retriever; curve the end of a sturdy length of wire into the shape of a hook.

Insert the wire hook into the fuel tank and retrieve the line containing the fuel filter.

Remove the fuel filter from the fuel line with a twisting and pulling motion.

Remove the fuel line clip.

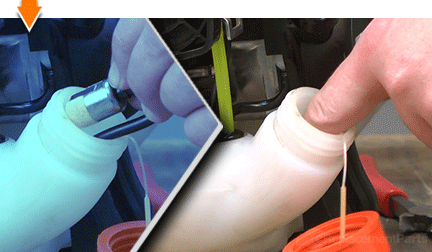
4. Install the fuel filter.
Slide the fuel line clip over the fuel tube and hold the clip approximately 1/4 of an inch from the end of the tube.

Install the new fuel filter onto the end of the fuel tube. The clip should expand slightly to accommodate the flared connection, and then tighten around the narrow portion of the fitting. Perform this step in one continuous motion. If the clip slides backwards (further onto the onto the fuel tube), reposition the clip and start again.

5. Reinstall the fuel filter into the fuel tank.
Insert the fuel filter (and fuel line) into the fuel tank.
6. Reinstall the fuel cap.
Reinstall the fuel cap onto the fuel tank.

REPLACING THE AIR FILTER [top]
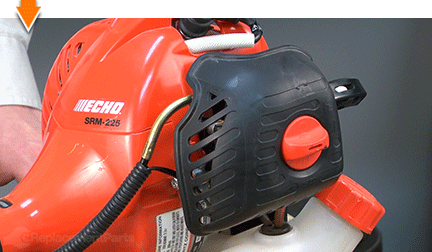
7. Remove the air cleaner lid.
Loosen the thumb screw.
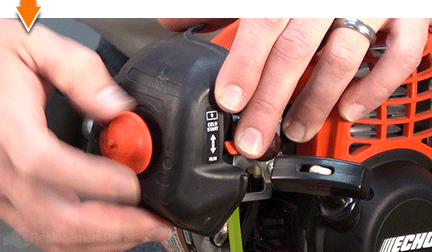
Remove the air cleaner lid.

8. Remove the air filter.
Remove the air filter.

9. Install the new air filter.
Install the air filter into the air cleaner lid (or onto the air cleaner case).

10. Reinstall the air cleaner lid.
Install the air cleaner lid onto the air cleaner case.
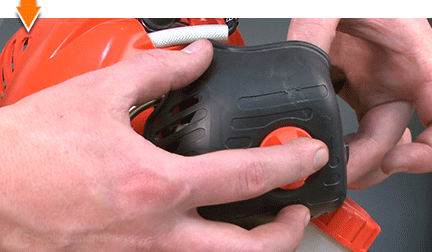
Secure the air cleaner lid with the thumbscrew.
REPLACING THE SPARK PLUG [top]
11. Remove the spark plug.
Remove the spark plug boot from the spark plug.
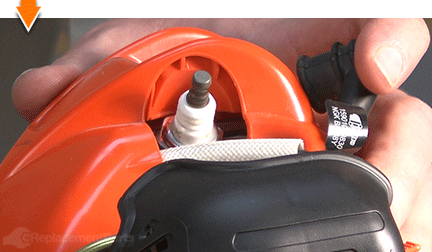
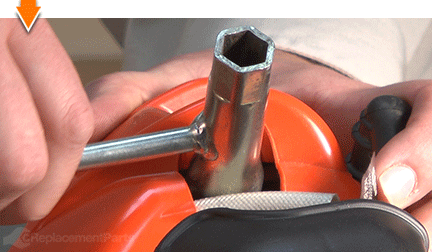
Use a spark plug wrench (or socket) to loosen the spark plug.

Remove the spark plug from the cylinder head.

12. Set the gap on the new spark plug.
The “gap” is the distance between the ground electrode (metal strap) and the center electrode. This distance is measured (and adjusted) with a spark plug gapping tool. Adjustments are made by moving the strap closer to (or farther from) the center electrode.

Measure and adjust the gap (as necessary) to twenty-five thousandths of an inch. (0.025).

13. Install the new spark plug.
Thread the new spark plug into the cylinder head.

Secure the spark plug with a wrench.
Replace the spark plug boot.


You don't have to leverage your savings to level your lawns. As you just learned, repairing your own equipment is easy when you follow our step-by-step guides. Not only did you restore trimmer functionality at a fraction of the cost of replacement; you have taken the edge off of future repairs, wherever you may find them.
Find your next fix here.