

Hammer Drill: Drill Spins but Chuck Doesn't
Does the drill spin but the chuck doesn't on your hammer drill? This is a common symptom that can be fixed yourself. First, check these parts that are commonly associated with this issue: the drill chuck, gears, knobs, spindle, transmission, and gear case. Now that you know the part that needs to be fixed, read our repair instructions for how to fix it yourself. Reference your owner's manual for advice tailored to your model.

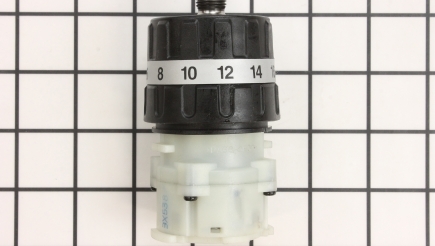
Chucks
If the internals of the chuck are damaged, they will not be able to grip the drill bits tightly and will spin on the drill bit itself. When this occurs, the drill chuck is worn and needs to be replaced. Remove the chuck by inserting the proper screwdriver into the chuck to remove the chuck screw at the bottom (this screw is reverse thread). Insert an allen wrench into the chuck and snug the chuck onto the allen wrench, hitting the allen wrench with a hammer to loosen the chuck. The chuck is reversed thread. Once loosen, continue to remove. Install the new chuck into the spindle hand tight. Insert the allen wrench into the chuck and clamp it tight on the allen wrench. Continue to tighten the chuck with the allen wrench hand tight. Once completed, remove the allen wrench. ... Read more

Gear Cases
The gear case consists of the transmission and the clutch. Symptoms of a worn gear case is when the motor spins and the chuck does not. It is also usually accompanied by a grinding sound if the clutch slips or the hammer function stops working. Any of these symptoms requires the gear case to be replaced.
To replace a gear case, you will have to take apart the drill case – this will vary on models as they are slightly different. Remove the handle and then the chuck by inserting the proper screwdriver into the chuck to take out the chuck screws at the bottom (it is reverse thread). Insert an allen wrench into the chuck and snug the chuck on to the allen wrench then hit it the wrench with a hammer to loosen the chuck on the spindle. Remove the rear cover and take off the tension of the brushes by moving the springs to the side. Separate the two halves of the drill by removing the screws. On some models, you will be required to separate the gear case assembly from the front of the hammer drill.
With the case open, pull the motor and gear case assembly out of the drill case. Pull the gear case away from the motor and remove the gear selector. Install the gear selector onto the new gear case and assemble the gear case to the motor. Place the motor and gear case assembly into the drill case and reassemble it back together. Ensure to reapply the tension to the brushes before installing the rear cover. Thread the drill chuck back on the hammer drill hand tight. Insert an allen wrench into the chuck and tighten the chuck down. Tighten the chuck hand tight with the allen wrench, then remove the wrench. Attach the handle. ... Read more
Gears
A broken or stripped gear will not be able to transfer power to the chuck. Some models house the gears in the front, inside of a gear housing. To replace a worn or broken gear, remove the screws securing the gear housing cover to the front of the drill. Then, take off the cover. Inspect all gears for broken or missing teeth or any other damage, such as chips in the teeth.
Depending on your model, your gear may be an all-in-one unit on a small shaft or it can be removed from the shaft. To remove the gear on a shaft, pull the shaft out of the case. Install a bearing separator on the bearing then place the separator on top of a bench vice. Tap on the shaft with a punch and a hammer to free the bearing. Remove the retaining ring, wave washer, the broken gear and keyway. Install the keyway and new gear on the shaft along with the wave washer an retaining ring. Now, reinstall the bearing on to the shaft, using a socket placed on the race of the bearing and tap it into place using a hammer. Install back into the case. Clean and re-grease the gears inside the housing and reattach the gear housing cover.
Some models do not have a gear case in the front and house all of the gears inside the drill housing. Remove the handle and open the drill case (this will vary between models). Separate the two halves of the drill case to access the gears. Turn the gears as you look for broken or missing teeth, or any other damage to the gear or gears. The following repair procedure will vary between makes and models. Remove the spindle/chuck assembly and take out the cam plate, leaf spring, change plate, steel ball and gear with the keyway. Some models have more than one gear here. Remove and install the new gear with the keyway, ensuring the keyway stays in place during installation. Reinstall the steel ball, change plate, leaf spring and cam plate. Reinstall the spindle assembly in the drill case and fasten the case back together and reattach the handle back on the case.
Some models may have secondary shafts, with gears. To replace gears on this shaft, remove it from the drill case and take out the bearings with a separator or puller. Remove any retaining rings and then the gear or gears with the keyway. Install the new gears on the shaft with the keyway, ensuring the keyway stays in place. Reinstall any retaining rings and reinstall the bearings. When installing bearings, use a socket that makes contact with the bearings inner race to avoid damage. Tap it into place with a hammer. Reinstall the secondary shaft into the drill case. ... Read more

Knobs
If the hammer drill/drill-mode knob is stuck in the middle of the two, it will prevent the power from flowing from the motor to the drill chuck. Ensure it is not in the middle.

Spindles
Spindles can break over time with use and will no longer transfer power to the chuck. To check for a broken spindle, spin the chuck around by hand. If it spins freely, then spindle is broken. You probably will not be able to remove the drill chuck since it spins freely. To free it from the spindle, you will have to lock it into a vice.
To check and replace it, remove the handle and open the case of the drill to inspect the spindle. This will vary on all models, as they are different. If it is broken, remove it from the drill case. The following parts on the spindle will vary between models. Remove the cam plate, leaf spring, change plate, steel ball, gear and the retaining ring. Use a bearing separator, or puller, to remove the bearing from the spindle. Remove the compression spring. With all the parts now removed, place the spindle into a vice, if possible, to remove the drill chuck. Use a screwdriver to remove the chuck screws (this is reversed thread). Next, insert an allen wrench into the chuck and tighten (also reversed thread). Hit the allen wrench with a hammer to loosen the drill chuck off the spindle. Install the compression spring, retaining ring, gear, steel ball, change plate, leaf spring and cam plate onto the new spindle.
Reinstall the spindle assembly in the drill case and reassemble the case back together. Thread the drill chuck onto the spindle, hand tight. Insert an allen wrench in the chuck and tighten the chuck down. Tighten the chuck hand tight with the allen wrench and then remove the wrench. Reattach the handle. ... Read more

Transmissions
The transmission transfers power from the motor to the drill chuck. The transmission reduces high RPMs to a lower RPM, giving it more torque. Over time, and with use, the transmission can wear out or the internal components may break. If the motor spins and the chuck does not, this is usually a sign the transmission has stopped working. If the transmission works in certain gears but not in others, this is a guaranteed transmission failure. Ensure the gear selector knob is not stuck between gears as this will cause the transmission not to operate.
To replace the transmission, remove the battery and any handles. Remove the rear cover and then take out the clutch/chuck assembly. Separate the drill housing. Once the housing is open, you will have access to all the internal parts. Pull the transmission away from the motor and install a new one. Line up the gears on the transmission with the gear on the motor, ensure the transmission locks in place on the drill housing. Reassemble the two halves of the drill housing back together. Reinstall the clutch/chuck assembly back on the drill and reinstall the rear cover. Reinstall any handles. Install the battery and test. ... Read more
To replace the transmission, remove the battery and any handles. Remove the rear cover and then take out the clutch/chuck assembly. Separate the drill housing. Once the housing is open, you will have access to all the internal parts. Pull the transmission away from the motor and install a new one. Line up the gears on the transmission with the gear on the motor, ensure the transmission locks in place on the drill housing. Reassemble the two halves of the drill housing back together. Reinstall the clutch/chuck assembly back on the drill and reinstall the rear cover. Reinstall any handles. Install the battery and test. ... Read more