

Trimmer Parts: Won't start
If your trimmer is not working and does not start, some of the following parts might be causing this problem: the ignition module, fuel filter, fuel lines, primer bulb, and carburetor. We can help you find the right part to replace. Our repair information is a general guide to help you, but for more specific repair information related to your model, check your owner's manual.
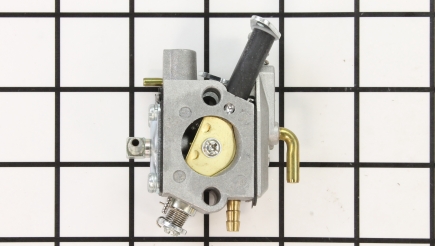
Carburetors
A carburetor is responsible for mixing air and fuel together at the perfect level for combustion to occur. If it is adjusted incorrectly, it can cause the engine to not start. Locate the carburetor underneath the air filter. Remove the covers to gain access to the carburetor. Remove the air cleaner cap and air filter; look for any obstructions in the way that could block air flow, starving the engine of oxygen. Make sure the choke functions properly as it should be closed for start ups. If it is open, it’s possible the cable is too stretched and should be replaced. Unhook the cable at each end and install a new one. Next, locate the adjustment screws. To adjust the carburetor, start with both screws backed out 2 turns from the closed position. One should be idle mix and the other should be high speed. Start the engine and let it warm up for 5 minutes to bring the engine up to operating temperature. You may have to keep the throttle open a bit. Slowly turn in the low speed jet, until it starts to die, then back it out another 1/4 to 1/2 turn. Next, hold the throttle wide open, and slowly turn in the high speed, until it starts to smooth out and rev high, and scream, then back this out until it starts to run rough or slows down, then turn it back in to midway between these two positions. Keep playing with the low speed needle until you get a quick response from the throttle, and good idle with the idle adjustment. Next, play with the high-speed needle, but always back it out from the setting about 1/4 turn or so, from where it runs the smoothest. Backing it out will allow more fuel when under a load, and keep your 2-cycle motor from running too lean. Put a load on it and adjust the settings a hair at a time. It’s also important to ensure your oil/gas is mixed correctly. Most will start and run with both screws open 2 turns. Do not close the high speed off any more than necessary, no matter how well it runs. Some types of carburetors are considered “fixed”, which means it’s not possible to adjust them.
While you’re doing all this, you should probably clean out your carburetor with carburetor cleaner. Carbs can become gummed up easily in 2-stroke engines and this can cause a no start situation if it’s bad enough. Use a soft small bristle brush to reach the inside making sure to get into the small ports. ... Read more

Air Filters
The air filter is located on top of the carburetor. It filters the incoming air, providing clean air for the engine and preventing small particles, dirt, and debris from entering and causing damage. Over time the air filter will need to be replaced as it becomes clogged with small particles and debris, starving the engine of air. When the air filter becomes clogged, it will limit the amount of air passing through, causing the engine not to start. Locate the air filter cover on top of the carburetor and remove it. It may be attached by screws or just a tab. Once off, remove filter, replace, and re-assemble. This should be done regularly to prevent problems. ... Read more

Fuel Filters
The fuel filter is located inside the tank and prevents debris from entering the carburetor and fuel lines. Blockages will starve the engine of much-needed fuel, preventing it from starting. You can remove the fuel filter by inserting a hook and pulling it out of the fuel tank. Visually inspect the fuel filter to see if it is partially clogged as it can limit the flow of fuel to the engine. Remove the fuel filter and install a new one. Fuel filters are inexpensive and need to be replaced regularly. If your unit does not have an internal fuel filter, follow the fuel line from the tank leading to the carburetor and locate the filter. Remove the filter by twisting and gently pulling the lines free. Install the new filter. Make sure you check for an ar on the fuel filter indicating the direction of flow. The ar should point towards the carburetor. ... Read more
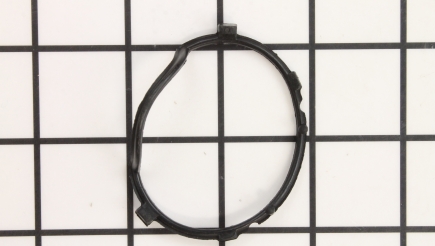
Gaskets
The purpose of a gasket is to keep excess air out of the engine, which would make the mixture too lean. This can cause a no start situation, as you need a rich mixture for cold start ups. To check this, start by removing the air filter then loosen carburetor bolts. Disconnect the fuel line and remove any linkages depending on your clearance to remove the gasket. Check the condition of gasket; look for tears, rips, or any indications of leaks. Clean off both mounting surfaces. The gasket will need to be replaced regardless of condition as they can only achieve their perfect seal once. Re-install the carburetor, hook up any linkages you removed, and reconnect the fuel line. Re-install the air filter housing and the air filter. ... Read more
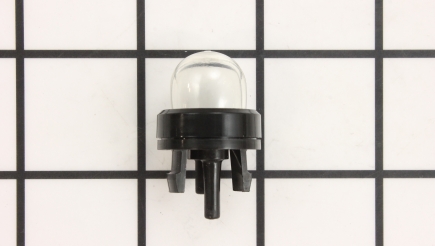
Primer Bulbs
This bulb draws fuel into the carburetor with a press of your finger, which assists with easier cold start ups to get the engine running. If there is a crack in the primer bulb it can draw air into the fuel, causing an improper air/fuel ratio. If the primer bulb is leaking, it may not be able to supply enough fuel to the engine for start up. Both of these conditions can cause the engine not to start or take a very long time to start. Leaking gas is a good indicator as well as hearing air rush in when pushing on the bulb. To replace it, simply pull it off with a pair of pliers. Next, reach back into where the bulb came off, grab the clip and pull out. Clean out the housing. Put the new clip on the primer bulb with tabs facing out. Then use a socket that fits over the primer bulb and push it into the housing, tapping gently with a rubber mallet if necessary. Make sure the metal clip is as far as it can go without damaging the primer bulb. This could vary on different models. ... Read more

Carb Kits
A carburetor kit has everything you need to rebuild your carburetor and restore it to new condition, keeping the engine running at peak performance. This kit obviously isn’t a cause of the won’t-start symptom; but the carburetor can be. Here’s how to use your carburetor kit to perform a full restoration of your carb.
Fuel and oil that sit stagnant for a long time can gum up the inside of a carburetor, making it hard to deliver the required fuel. It is a good idea to take photos as you dismantle the carburetor making it easier for re-assembly.
Remove the air filter housing and air filter, then remove the bolts holding down the carburetor and gasket. Next, pinch off the fuel line to stop a fuel spill, gently remove the fuel lines by twisting them and pulling them off the carburetor, then remove the carburetor linkage. Remove the carburetor. Next, remove the screws on the bottom of the carburetor and pull the bottom off. Remove the gasket and the diaphragm. Remove the primer bulb and the cover. On the bottom of the carburetor, notice how the lever, spring, and hinge pin fit together inside the carburetor. Remove the screw and pull these parts out of the carburetor.
Clean the carburetor with carburetor cleaner, making sure to get inside all the ports. Use a soft bristle brush if needed. If you notice any corrosion on the inside you must install a new carburetor as it is no longer viable. Install the needle and lever on the bottom of the carburetor and re-install the screw to secure them in place. Install the gasket, diaphragm, and cover. Make sure to install them in the correct order by referring to your photos. Install the top cover and primer bulb. Re-install the carburetor back onto the engine with a new gasket under the carburetor. Hook the linkages and fuel lines back up. Re-install the air filter housing and filter. Re-install any covers you removed.
If you’d like to adjust your carburetor, please read our complete guide to this process under the “Carburetor” heading elsewhere on this page. ... Read more
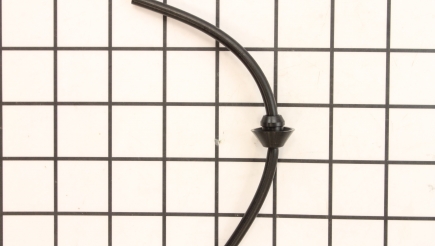
Fuel Lines
Fuel lines supply fuel from the tank to the carburetor, where it is then mixed with air for combustion. Check the fuel lines for cracks, as time can take its toll on them and cause them to become damaged and leak. This can reduce the amount of fuel to the carburetor. If the engine cannot receive enough fuel it will not start. Pull the fuel line off the carburetor gently, in a twisting motion, and do the same on the fuel tank. Some models may require you to remove a rubber grommet on the side of the tank first, where the fuel line feeds into. You can simply blow through the lines looking for anything unusual coming out or any blockages. If you notice anything unusual, replace the line or lines. A partially blocked line will allow some fuel to flow, but may not be sufficient enough. ... Read more

Ignition Modules
The ignition module creates the electrical current to provide the spark plug with the electrical charge to ignite the air fuel mixture. Remove the engine cover to locate the ignition module by following the spark plug wire. Disconnect the two smaller wires to check the on/off switch operation. Check with ohmmeter and turn the switch off and on; if you see the ohmmeter change, then the switch is good. Check the spark plug with a spark plug tester or by removing the spark plug and grounding out the end on the engine block, then pull the starter rope to look for a spark. If there is no spark, remove the bolts holding the module in place. Replace with new module. Next, you will need to set the gap between the module and the magnets on the flywheel, you will need a feeler gauge for this as well as the manufacturer specs for your machine. If you do not have these specs then a general rule of thumb is to use a business card as it is the appropriate thickness in most cases. Insert the business card in between the module and flywheel, then spin the flywheel around so that the magnets are in the direction of the module and allow the magnets to pull the module into place. Tighten the bolts down on the module and remove the business card. Hook wires back up, including the spark plug wire, and re-install the engine cover. ... Read more