

Trimmer Parts: Runs for a while then dies
Check the fuel vent, fuel lines, and carburetor if the engine in your trimmer will not stay running. Our repair and symptom guide can help you find the right part to replace to fix this problem. Our repair information is a general guide to help you, but for more specific repair information related to your model, check your owner's manual.
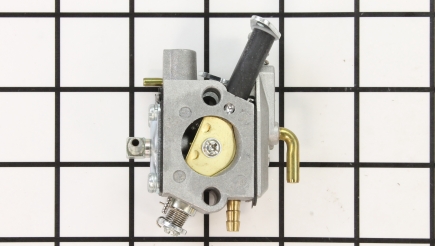
Carburetors
The job of the carburetor is blend air and fuel together to achieve the proper ratio for combustion. If the settings are maladjusted, they will need to be reset to keep the engine running after it starts. Locate the carburetor underneath the air filter. Remove any covers you may need to gain access to the carburetor. Remove the air cleaner housing and filter, first checking the operation of the choke. The choke should be closed for start up and for the first few minutes as the engine warms up. If the choke comes off too soon, it will cause the engine to die. If the cable is stretched, replace it by disconnecting it at both ends and installing a new one. This ought to solve choke problems. Next we'll be adjusting the carburetor, and to start this process, you must first locate the adjustment screws.
To adjust the carburetor, start with both screws backed out 2 turns from the closed position. One should be idle mix and the other should be high speed. Turn the engine on and let it warm up for 5 minutes. You may have to leave the throttle open slightly. Slowly turn in the low speed jet, until it starts to die, then back it out another 1/4 to 1/2 turn. Now open the throttle wide, and slowly turn in the high speed until it smooths out and revs high. Back this out until it starts to run rough or slows down, turning it back in to midway between these two positions. Continue to fiddle with the low speed needle until you get rapid immediate response from the throttle, and good idle with the idle adjustment. Next, play with the high-speed needle, but always back it out from the setting about 1/4 turn or so, from where it runs the smoothest. This setting of backing it out will allow more fuel when under a load, and keep your 2-cycle motor from running too lean. Next, put a load on it and tweak the settings in small increments at a time. Also make sure the oil/fuel is mixed at the proper ratio. Most will start and run with both screws open 2 turns initially. Don't close the high speed off excessively, even if it runs really well. There are types of carbs that are termed “fixed, which means they cannot be adjusted. Whilst you're undergoing this adjustment procedure, take the opportunity to clean your carburetor with carburetor cleaner; they can become gummed up easily in 2 stroke engines and regular cleaning is a great idea to prevent future issues. ... Read more

Air Filters
The air filter cleans the air entering the carburetor. The air filter is not likely to stop the engine from running on its own, but it can contribute in very poorly maintained engines. Replace filters regularly to prevent any issues. It is likely that this could be a contributing factor on top of additional factors on this page.

Fuel Filters
The fuel filter keeps contaminants out of the fuel. Insert a hook inside the tank and pull up the filter, checking for blockages. Fuel filters should always be replaced as a part of your regular maintenance schedule.
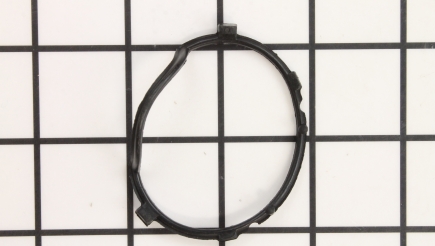
Gaskets
The gasket under the carburetor seals off excess air from entering and causing the engine to run lean. As the engine warms up, the carburetor leans out the mixture for proper combustion. If the engine is already running too lean, it will get leaner when the engine is at operating temperature, causing the engine to die. Locate the carburetor and remove any covers to gain access to it. Remove the air cleaner housing and air cleaner. Pinch off the fuel line to prevent a spill. Remove the fuel line and linkage and unbolt the carburetor. Inspect the gasket for damage. The gasket must be replaced at this time. Clean both surfaces where the gasket forms the seal. Install a new gasket, then re-assemble the carburetor. Re-install the fuel line and linkage. Un-pinch the fuel line and re-install air filter housing and filter. ... Read more

Spark Plugs
The spark plug is what causes combustion of the air/fuel mixture. A malfunctioning plug can stop the engine from running. To check the spark plug, remove the wire from the spark plug and be careful doing so, as they are fragile. Remove the spark plug and check its condition. Sometimes a 2-stroke engine can get oily buildup from improper oil/gas mixture, causing the spark not to jump. Clean the plug and re-gap to the manufacturer's specs. Check for any deposit, breakage, melting, or corrosion. If you see any of these symptoms replace plug and gap to the manufacturer's specs. Make sure your oil and fuel are mixed to the proper ratio, as this can impact the operation of the spark plug. If your engine spends most of the time running at high RPMs, try installing a cooler running plug for quicker heat dissipation. A hotter running plug can cause the spark plug to foul, preventing the engine from running. ... Read more

Fuel Tank
The tank houses the fuel. The fuel tank will not cause the engine to run and then die, unless it is out of fuel. This should be the first thing you check if your trimmer dies under operation.
If there is a vacuum inside the tank, however, it will disrupt the flow of fuel, causing the engine to die. See the section on fuel vent for further diagnostic information.

Carb Kits
A carburetor kit has everything you need to rebuild your carburetor and restore it to new condition. When fuel sits stagnant for a big chunk of time, especially mixed with oil, it can cause the inside of a carb to become gummed up, making it hard to deliver fuel.
Here is how to break down your carburetor using a carb kit. It is a good idea to take photos as you dismantle in order to make it easier for reassembly. Remove the air filter housing and air filter, then take out the bolts holding down the carb and also the gasket. Next, take out the fuel lines by gently twisting them and tugging lightly, then remove the carburetor linkage. Take out the carburetor. Next, remove the screws on the underside of the carb, and pull the bottom off. You're now going to take out the gasket and the diaphragm. Remove the primer bulb and the cover. On the bottom of the carburetor, take note of how the lever, spring, and hinge pin fit together inside the carburetor. Remove the screw and pull these parts out of the carburetor.
Take this opportunity to clean the carburetor with carburetor cleaner, making sure to get inside all the ports. Use a soft bristle brush if needed. If you notice any corrosion on the inside, you must install a new carburetor right away, as your carburetor is beyond repair at this point. Install the needle and lever on the bottom of the carburetor and re-install the screw to secure them in place. Install the gasket, diaphragm, and cover. Make sure to install them in the correct order, referring to your photos. Install the top cover and primer bulb. Re-install the carburetor back onto the engine with a new gasket under the carburetor on the engine, hook back up the linkages and fuel lines. Re-install the air filter housing and filter. Re-install any covers you removed from the unit.
For tips on adjusting your carburetor, another recommended repair procedure for ensuring your carb is not contributing to a “runs for a while then dies†symptom, check out our “Carburetor†section, elsewhere on this page. ... Read more
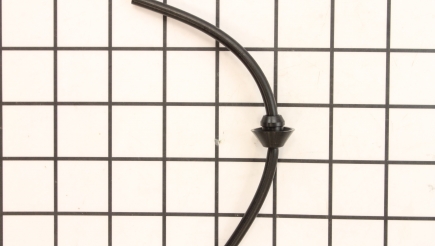
Fuel Lines
The fuel line carries the fuel from the tank to the carburetor, where it is combined with air for combustion. In most cases a fuel line will not cause the engine to die after it's been running for a while, but if the machine has been poorly maintained and the fuel lines have been deteriorating over time, it can lead to many problems. Check the condition of the fuel lines. If they are badly weather-cracked, they will need immediate attention as they can start leaking and become a fire hazard. The inside of the lines could be breaking down as well. Check the lines for a blockage by removing the line and looking for fuel to flow out. Check the condition of fuel flowing out as well, if it is discolored or has any debris coming out, replace the lines. ... Read more