

Trimmer Parts: Only runs with the choke on
A rare trimmer symptom is when it works, but only when the choke is on. If this occurs, there are multiple parts to check, such as gas cap, carburetor, fuel filter, fuel lines, and gasket. Follow our repair guide to help you better identify and fix your problem accurately. Our repair information is a general guide to help you, but for more specific repair information related to your model, check your owner's manual.
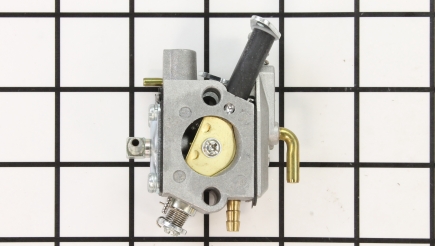
Carburetors
A working carburetor blends the air and fuel together to the right ratio for combustion. If it has gone out of adjustment, it can cause the engine to run with the choke on all the time. Locate the carburetor underneath the air filter. Remove the covers to gain access to the carburetor. Remove the air cleaner housing and air filter. Make sure the choke functions properly, as it should be closed for start ups. If it is not, the cable may be stretched and should be replaced. Disconnect the cable at each end and install a new one. Next locate the adjustment screws. To adjust the carburetor, start with both screws backed out 2 turns from the closed position. One should be idle mix and the other should be high speed. Start the engine and let it warm up for 5 minutes to bring the engine up to operating temperature. You may have to keep the throttle open a bit. Slowly turn in the low speed jet, until it starts to die, then back it out another 1/4 to 1/2 turn. Next, hold the throttle wide open, and slowly turn in the high speed, until it starts to smooth out and rev high, and starts screaming, then back this out until it starts to run rough or slows down. Turn it back in to midway between these two positions. Keep playing with the low speed needle until you get rapid immediate response from the throttle, and good idle with the idle adjustment. Next, play with the high-speed needle, but always back it out from the setting about 1/4 turn or so, from where it runs the smoothest. This setting of backing it out will allow more fuel when under a load, and keep your 2-cycle motor from running too lean. Put a load on it and adjust the settings a hair at a time. Make sure your oil/gas is mixed to the correct ratio. Most will start and run with both screws open 2 turns. Do not close the high speed off any more than necessary no matter how well it runs. Some carburetors are fixed, meaning they have no adjustments. Take this opportunity to clean out the carburetor with carburetor cleaner. They can become gummed up easily in 2-stroke engines. Use a soft small bristle brush to reach the inside, making sure to get into the small ports. This is preventative maintenance and should be done regularly or it can lead to engine running problems. ... Read more

Fuel Filters
The fuel filter keeps contaminants from getting into the fuel. If the fuel filter becomes plugged it can starve the flow of fuel to the engine, causing the engine to run with the choke on. Insert a hook into the fuel tank to grab and remove the fuel filter from the tank, and inspect it for blockages. You can remove the filter from the fuel line and blow through it looking for a partial blockage. Fuel filters are inexpensive, so it is best to replace it, as part of your regular maintenance schedule. It will allow you to eliminate the fuel filter as the source of this issue. ... Read more
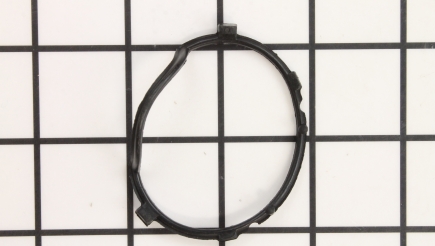
Gaskets
The gasket under the carburetor seals off excess air from the engine, causing the engine to run lean. If this gasket is in really bad condition, it can cause the engine to only run with the choke on. To check this gasket, first remove any covers around the engine so you can access the carburetor. Remove the air cleaner housing and filter. Pinch off fuel lines to prevent a spill. Remove the fuel line and disconnect the linkage at the carburetor. Remove the bolts holding the carburetor down and pull off the carburetor. Inspect the gasket for signs of deterioration. The gasket has to be replaced regardless of condition at this time, as they are a onetime use. Clean both mounting surfaces and install the new gasket. Re-install the carburetor, hooking the linkage and fuel line back up. Un-pinch the fuel line to allow fuel to flow again. Re-install the air cleaner housing and filter, and any covers you removed to gain access to the carburetor. ... Read more
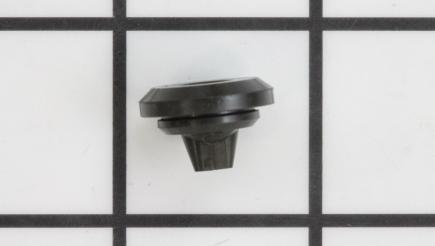
Vents
The fuel vent allows air to enter the tank, preventing a vacuum inside the tank as the fuel level drops. Locate the fuel vent valve coming out of the tank, attached to a fuel line and grommet on the tank. Start the engine and let it run with the choke on. Pull the fuel vent off the line and take the choke off. If the engine continues to run, the fuel vent is plugged. Install a new vent valve.
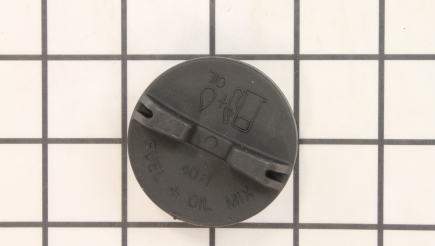
Caps
The gas cap stops fuel from spilling out and debris from entering the fuel tank. Some models have gas caps with a built-in check valve to allow air to enter the tank, to prevent a vacuum inside the tank which would restrict the flow of fuel. Start the trimmer and let it run with the choke on. Unscrew the gas cap about halfway and take the choke off. If the engine continues to run, then the check valve on the gas cap is plugged. Take the cap off and clean it with a brush, using warm, soapy water. Replace it if it's too dirty to clean. ... Read more

Carb Kits
Some small carburetors use a flexible diaphragm as a pump. Over time it can stretch out, causing it not to pump enough fuel to the engine. This can result in the choke having to remain on in order for the engine to run. Before beginning this repair, take photos of the carburetor so you can easily reassemble it. Remove the covers in order to access the air filter. Remove air filter housing and air filter, then remove the bolts holding down the carburetor and gasket. Next, gently remove the fuel lines by twisting them and pulling, then remove the carburetor linkage and carburetor. Next, remove the screws on the bottom of the carburetor and pull the bottom off. Remove the gasket and the diaphragm. Remove the primer bulb and the cover. On the bottom of the carburetor, keep track of how the lever, spring, and hinge pin fit together inside the carburetor. Remove the screw and pull these parts out of the carburetor.
Clean the carburetor with carburetor cleaner, making sure to get inside all the ports. Use a soft bristle brush if needed. If you notice any corrosion on the inside, you must install a new carburetor as it is no longer viable. Install the new needle and lever on the bottom of the carburetor and reinstall the screw to secure them in place. Install the new gasket, diaphragm and cover. Make sure to install them in the correct order. Install the top cover and primer bulb. Reinstall the carburetor back onto the engine with a new gasket under the carburetor on the engine, hook back up the linkages and fuel lines. Reinstall the air filter housing and filter. Reinstall any covers you removed.
For a step-by-step guide to adjusting the carburetor, see the “Carburetor” section elsewhere on this page. ... Read more
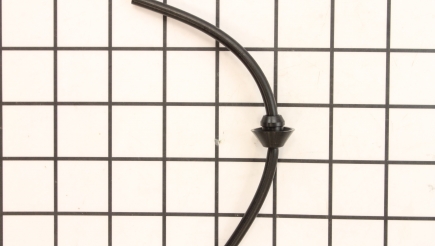
Fuel Lines
Fuel lines take fuel from the tank to the carburetor. If there is a crack in the fuel line, it can be drawing in air, which can cause the engine to run only with the choke on. Check your fuel lines for cracks and replace them if necessary. Fuel lines tend to become weather-cracked over time. Cracked fuel lines can also become a fire hazard.