

Engine Parts: Leaks gas
If your engine is leaking gas, check the following parts: the needle, valve, fuel lines, tubes, cap, fuel tank, O-ring, and primer bulb. Refer to our symptom and repair guide to help you replace the appropriate part causing this problem. Check the manual related to your model for more specific repair instructions. Our instructions are a general guide.

Valves
Some engines have fuel shut-off valves. Inspect these valves for leaks as they contain rubber O-rings that can leak over time. Pinch off the fuel line coming from the tank to prevent a fuel leak. Remove the shut off valve by removing the fuel clamp then twisting and pulling the fuel lines off. Once removed, you can simply reinstall a new fuel valve, hook the fuel lines back up and reinstall the clamps. Some fuel valves can be pulled apart and once the O-rings are replaced, pushed back together.

O-Rings
There is usually an O-Ring located on the inside of the cap at the top of the threads, sealing in the fuel. This O-ring can begin to leak over time. If the O-ring is leaking, you will notice the leak coming from the bottom of the cap as the fuel runs down the threads. To replace the O-ring, remove the cap and use a small screwdriver or a pick and pull it off. Install a new O-ring of identical size. Reinstall the cap onto the tank.
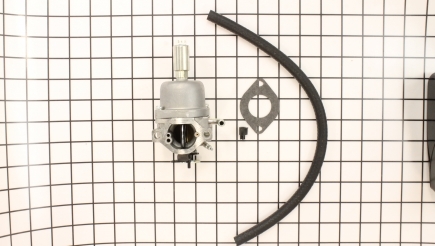
Carburetors
The carburetor creates the proper air/fuel mix for combustion. Inspect where the bowl attaches to the carburetor housing for a leak; you may even want to check for dampness. The bowl is usually sealed to the carburetor with an O-ring. To replace your bowl O-ring, simply remove the bolt at the bottom of the bowl, pull off and replace O-ring, and reassemble. The needle valve inside the carburetor can also leak. To check the needle valve, check the oil on the dip stick. If it is higher and looks clearer than oil, and not as thick as oil with an odor of gas, it's your needle valve. For further needle valve diagnostics and replacements, see the “Needle Valve†section on this page. ... Read more

Gaskets
Some carburetors do not have a bowl with an O-ring but instead have a cover that is sealed with a gasket and a diaphragm. Check the bottom of the carburetor for leaks coming from this cover. If the cover is leaking, it will need to be replaced. Remove the air filter assembly. Remove the bolts securing the carburetor to the engine. Pinch the fuel line to prevent a fuel spill, and remove any linkages. Remove the screws on the bottom of the carburetor and discard the old gasket and diaphragm. Clean off the surface where the new gasket will mount to. Install a new gasket and diaphragm, and secure the cover back onto the carburetor. Install a new gasket under the carburetor for a proper seal, then reinstall the carburetor back onto the engine, hooking the linkages back up and remembering to un-pinch the fuel line so the fuel can flow. Reinstall the air filter housing. ... Read more

Primer Bulbs
The primer bulb pulls fuel through the fuel line into the carburetor by creating a vacuum when you push on it. This allows the engine to start easier when cold. Pressing it two times should be sufficient. When the rubber dries out over time it can crack, causing the primer bulb to leak fuel. Check the primer bulb for any leaks. If you notice the smell of fuel, or fuel dripping from it, you must replace it. It can also pull air in if cracked. To replace it, simply pull it off with a pair of pliers. Next, grab a small pick, reach back into where the bulb came off, grab the clip and pull out. Clean out the housing. Put the new clip on the primer bulb with tabs facing out. Use a socket that fits over the primer bulb and push into the housing, giving it a gentle tap with a rubber mallet. Make sure the metal clip is as far as it can go without damaging the primer bulb. This could vary on different models, but all are similar. Other primer bulbs require you to pry the rubber bulb off with a small blade screwdriver, then install the new one with a much larger flat-blade screwdriver by pushing the sides into place, being careful not to tear it. ... Read more

Fuel Tank
The fuel tank holds all the fuel for the engine. Inspect the fuel tank for any leaks, especially at the seams. To replace the tank, remove the bolts securing it in place. Remove the fuel line and drain the fuel into a bucket. Install the new tank, securing it down with the bolts, and reattach the fuel line.

Caps
The cap stops the fuel from spilling and splashing out of the tank, and stops debris from entering the tank. If the cap is leaking, replace it.

Tubes
Tubes help carry the flow of fuel just like a fuel line, and are made of plastic. Follow your fuel delivery system and inspect the tubes for any leaks. Replace any leaking tubes by first pinching off the fuel line to prevent a fuel spill, then removing the fuel line and reinstalling a new tube. Remember to un-pinch the fuel line to allow the flow of fuel.

Grommets
The grommet provides a seal for the fuel line and vent line to enter the tank. A quick visual inspection will tell you if the grommet is leaking. Over time, the fuel will break down the rubber grommet and you will need to replace the grommet. If you notice a leak or feel dampness around the grommet, replace it. First drain the tank. Insert a flat screwdriver under the lip of the grommet on the tank and pull up. Remove the gas cap, insert a hook into the tank, and pull the fuel line up. Remove the fuel filter, then pull the fuel line and fuel vent line out of grommet, and replace the grommet by pushing a new one into place. Spray the inside of the grommet with a lubricant to allow easier assembly of the fuel lines. Install the new grommet into the tank by pushing it into place. Reinstall the fuel filter and add fuel. ... Read more

Needle
The needle valve controls the amount of fuel flow in the carburetor. If it is leaking, you will find fuel in the oil and it may even be dripping onto the floor. It can also cause hydro lock by leaking into the cylinder. First, remove the carburetor. Remove the solenoid at the bottom of carburetor, the bowl, and the pin holding the float in. Then just flip it over and the needle valve will pop out with the float. Remove the screw on the jet. Next, using a quarter inch tap and cutting oil, lube the inside of the needle seat, and blow any shavings out of seat. Using your tap, thread inside the seat straight, next by using a spacer (like a socket) insert a quarter-inch by an inch-long bolt with a washer and screw in tight into the seat, pull the spacer out. You are going to want to replace both valve and seat together. Place the new seat into place. Using a bolt with a nut on the end of it, simply place the nut on the seat and gently tap the top of the bolt to push seat down into place. The seat should be tight but not flush with the top. Reinstall the needle valve into the float, line it up over the seat, reinstall the float pin, reinstall the jet screw, replace O-ring on the bowl, and finally reinstall bowl and solenoid. Now you can reinstall the carburetor and make sure to replace the gasket between the carburetor and intake housing. ... Read more

Fuel Lines
The fuel lines supply the fuel from the tank to the carburetor. Over time, fuel lines can become weather-cracked and start to leak. Inspect all lines for a leak. Replace any leaky lines or badly cracked lines, as they will begin to leak. To replace, remove any clamps on the lines with pliers, then gently twist and pull off. Slide the new line over and clamp it back down.