

Engine Parts: Engine misfires
If your engine misfires, refer to our repair and symptom guide to help identify the problem with the engine and how to best fix it. You might need to replace the rod, key, spark plug, or more. Check the manual related to your model for more specific repair instructions. Our instructions are a general guide.
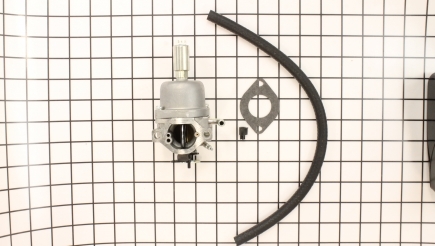
Carburetors
The carburetor has the job of blending the air and fuel together in the right ratio to achieve combustion. Fuel that sits for a long period of time can gum up the inside of a carburetor, which will restrict the flow of fuel, resulting in an engine that is burning too lean. This can trigger a misfire. You can disassemble the carburetor and clean the internal parts on the inside or purchase a carburetor kit and replace all the internal parts, restoring your carburetor to optimal performance.
To start, remove the air filter housing and air filter, then remove the bolts holding down the carburetor and gasket. Next, pinch off the fuel line to prevent a fuel spill. Remove the fuel lines by twisting them and pulling them off. Next, remove the carburetor and disconnect the linkage. Start disassembly by removing the nut on the bowl, then remove the bowl and gasket. Next, remove the float pin and the needle valve. Unscrew the main jet screw and dump it out with the emulsion tube, then remove the plastic throttle stop and the metering plug from the carburetor. Spray the carburetor, fuel bowl, and all the small orifices with carburetor cleaner, then wipe clean. If you notice any corrosion inside the carburetor or the bowl, that is a sign the carburetor needs to be replaced.
Reinstall the new emulsion tube and new main jet and tighten. Install the new metering plug tightly, and reinstall the throttle stop screw, threading it in until it sticks out the other side about 1/16 of an inch. Next, install the new spring on the needle valve. Snap the new needle valve into the new float and reattach the float into the carburetor by sliding the new pin in. Install the new bowl O-ring, and reinstall the bowl and tighten down. Reinstall the carburetor with a new intake gasket back onto the engine, reattach the linkage and fuel line, remembering to un-pinch the fuel line. Reassemble the air filter housing with the air filter back onto the engine.
Next, you have to adjust the carburetor settings. Locate both idle screws on carburetor, one marked L (low) and one marked H (high). Turn both screws in to shut off fuel, then back off two turns. Next, start engine; it may not run well, these settings should allow it to start. Let it idle for a few minutes to get it to the right temperature for operation. Start by turning the L screw clockwise until the engine starts to slow, then turn it in the opposite direction until it once again starts to slow, then bring it to the midpoint of these two spots. Using a tachometer to gauge engine speed, set the idle speed screw to bring the engine to 1750 RPM for aluminum-cylinder engine or 1200 RPM for an engine with a cast-iron cylinder sleeve. At full throttle, turn the high speed or main jet screw clockwise until the engine begins to slow. Then, turn the screw the other way until the engine begins to slow. Turn the screw back to the midpoint. Once adjusted, check the engine acceleration by moving the throttle from idle to fast. The engine should accelerate smoothly. If necessary readjust mixture screws. ... Read more
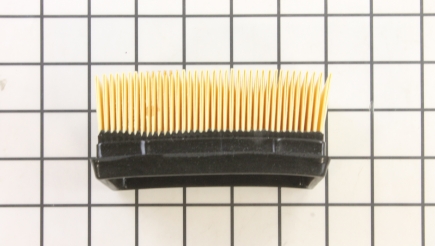
Air Filters
The air filter provides clean air for the engine to breathe. A clogged air filter could impact the engine and cause a misfire. Replace the air filter regularly.

Gaskets
The purpose of a gasket is to create a seal between two joining surfaces to prevent leaks. A leak in the intake gasket or head gasket can cause an engine to misfire. Leaky intake gaskets can be hard to diagnose since the smallest leak here can affect the engine so much. They are difficult to check for leaks by listening for air, and not visible until you dismantle the engine. First, remove the air filter housing and filter. Drain the fuel or pinch off the fuel line and remove the fuel line at the carburetor. Next, remove the bolts fastening the carburetor down and disconnect the linkage. Remove the intake gasket, and inspect for damage or any signs off air leakage. This gasket will have to be replaced regardless of its condition, because it is a one-time use part. Clean off the mounting surfaces for the new gasket to get a tight seal. Reinstall the linkage back onto the carburetor, reinstall the carburetor, and reconnect the fuel lines. Reinstall the air filter assembly.
A bad head gasket can also cause a misfire. The head gasket provides a tight seal between the engine block and cylinder head. If a head gasket fails, it can cause a misfire, as it can allow fluids to enter the combustion chamber. Pull the spark plugs for inspection. A bright, shiny spark plug indicates antifreeze is entering the combustion chamber. If engine is air cooled, check the outside of the engine first for an oil leak at the head gasket, and pull the oil dip stick and check for exhaust coming out. A blown head gasket can increase the pressure inside the engine, forcing the oil out in these areas; check the vent on the fuel pump to see if oil is coming out as well. Oil in the air filter is another indication. If you see any of these signs, you have a leaky head gasket and it has to be replaced. First, remove the fuel pump if your engine has one. Remove the air filter assembly with the filter. Pinch off the fuel line to the carburetor and remove. Remove the bolts securing the carburetor to the cylinder head, disconnect the linkage, and set the carburetor aside. Remove the muffler from the cylinder head. Pull the valve cover off with the gasket. If you see exhaust smoke when removing the cover, that is another indication of a blown head gasket. Remove all the bolts holding the cylinder head to the engine block in a diagonal pattern, to prevent warping of the head, and pull the head off with the gasket. Clean both the surfaces of the engine block and cylinder head with a soft cloth. You do not want to damage this area, as you want a tight seal. Install the new gasket and reassemble.
It is best to replace all the cylinder head bolts with new ones, as these parts should be a one-time use, because of the pressure and abuse they take. Check manufacturer specs for the bolt-tightening sequence of the head bolts, to provide an even compression of this gasket. These bolts must be torqued for a proper seal. Reinstall the valve cover with a new gasket and tighten it down in an alternating pattern to prevent warping to manufacturer specs. Reinstall the linkage to the carburetor, then reinstall the carburetor to the cylinder head with a new intake gasket underneath, hooking the fuel line back up and remembering to un-pinch the fuel line. Reinstall the air filter housing, air filter, and muffler. ... Read more
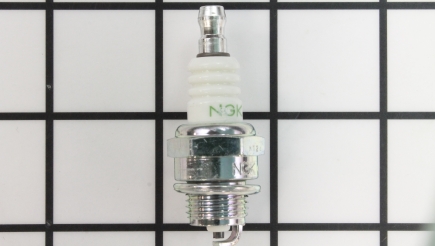
Spark Plugs
The job of the spark plug is to ignite the mixture of air and fuel in the combustion chamber. Any buildup on a spark plug will cause the spark plug to misfire. Oily buildups are very common on 2-stroke engines from improper mixture of the oil and fuel. To check for this, remove the spark plug, clean it off, gap it, and reinstall. If the spark plug has deposits, corrosion, erosion, melting, or oxidization, then replace it as these can impact the operation of the spark plug, leading to misfires. If the engine spends most of its time revving high, install a cooler running plug to dissipate heat more quickly. ... Read more

Rods
The push rod rides off lobes on the camshaft, which is driven by the crankshaft. It transfers power from a rotary motion to a reciprocating motion. The top of the push rod depresses the rocker arm. The rocker arm pivots and the other end of the rocker arm pushes on the top of the valve, opening the valve up to allow the air/fuel mixture into the combustion chamber and the exhaust to leave the combustion chamber. Springs then force these valves shut. If a push rod becomes bent, it will impact how much these valves open. The less they open, the poorer the engine performance. If a push rod is bent, you will usually hear a ticking noise. If bent badly enough, the engine will have a misfire. To diagnose, remove the engine valve cover and valve cover gasket. Remove the jam nuts and loosen the pivots. Rotate the rocker arms to the side. Now you can remove the push rods. A bent rod will be noticeable. Replace with new rods, adding some engine oil to them before installing. Rotate the rocker arm back into position, hand-tighten the pivots, then set the gap with the pivots between the rocker arm and valve tip from 3 to 5 thousandths of an inch and tighten the jam nuts down. Replace the valve cover gasket with a new one, and reinstall the valve cover. ... Read more

Ignition Modules
This part produces the current for the spark plug to ignite the air/fuel mixture inside the combustion chamber. When the magnets pass by on the flywheel, they create an electrical charge. If the timing of these magnets passing by is off, it can cause a misfire and you will need to set the gap in between the module and flywheel. To set the gap in between the magnets on the flywheel and the module, loosen the bolts holding the module in place. Insert a business card in between the module and the flywheel, then spin the flywheel around so that the magnets are in the direction of the module, and allow the magnets to pull the module into place. Tighten the bolts down on the module and remove the business card, hook the wires back up, including the spark plug wire, and check the engine. ... Read more