

Engine Parts: Engine lacks power
Our repair and troubleshooting guide can help repair your engine if it is lacking power. Some of the parts you might need to replace are the spark plug, rod, springs, gasket, and valve. This is a general guide for your repair; for more detailed information on your model, refer to the owner's manual.

Springs
The springs are located on top of the valves, under the valve cover. Their main purpose is to provide tension on the valves and keep a tight seal on them inside the combustion chamber. If a spring is weak or broken, the combustion chamber will not have enough compression, and this will result in a loss of power. Weak valve springs will typically cause a misfire and a loss of power as engine speed increases. The engine may start, and run effectively up to 4000 RPMs, but at higher speeds it may misfire. This will result in a loss of power, as the valves are floating because of weak springs, and they are unable to keep up with the speed of the valve train. To check the condition of these springs, remove the valve cover and inspect the springs. If you notice a broken spring, then you will have to remove and replace it. To replace a broken or weak spring you will need to remove the carburetor, muffler and valve cover from the engine, and remove the spark plug from the cylinder head. Rotate the piston to top dead center making sure the magnets on the flywheel are in line with the ignition coil. Next, remove the jam nuts securing the rocker arms, and disconnect the rocker arm pivots and the arms. Remove the push rods and the rocker arm studs, then pull out the guide plate. Next, remove the cylinder head bolts in a diagonal pattern so you do not warp the cylinder head, then place the cylinder head on a bench. Use pliers to remove the valve spring retainers and the springs. Take some fine valve lapping compound and apply it to the valve seat and cylinder head. This will help them seat properly. Insert the valves into the head and use a lapping tool to seat them by rotating the lapping tool in your hands. Next, remove the valves and clean the lapping compound off the valve and cylinder head. Lubricate the valve stems with clean engine oil and insert them into the cylinder head. Install the new seal on valve then install the spring and retainer locking it into position on the valve. Clean the surfaces for the new head gasket and re-install the cylinder head back onto the engine. Tighten the bolts down in an alternating pattern to avoid warping the cylinder head. Next, re-install the guide plate and rocker arms studs, then torque down to manufacturer’s specifications. Then, insert the push rod, slide on the rocker arms, and thread the pivots loosely. Use a feeler gauge to gap the rocker arms 3 to 5 thousandths of an inch from the valves. Thread the jam nuts and tighten them down, then re-install the spark plug. Reinstall the carburetor, muffler, and valve cover gasket, then re-install the valve cover. Tighten the bolts in an alternating pattern to manufacturer’s specifications. ... Read more

Valves
The purpose of your engine’s valves, is to open and close at the exact right time to allow the air/fuel mixture to enter the combustion chamber, and vent the exhaust out of the combustion chamber as well. If these valves do not close tightly, then there will be lower compression inside the combustion chamber, resulting in a loss of power. If the valves are sticky, they can cause a misfire and result in a loss of power as well. You may hear a popping sound through the exhaust, and this indicates that you have a sticky valve. To remove and install new valves on an OHV engine, first remove the carburetor, exhaust, and valve cover from the engine. Then remove the spark plug from the cylinder head. Rotate the piston to top dead-center, and line up the magnets on the flywheel with the ignition coil. Remove the jam nuts securing the rocker arms, remove the rocker arm pivots the arms themselves. Next, remove the push rods and the rocker arm studs, then pull out the guide plate. Next, remove the cylinder head bolts in a diagonal pattern and place it on a bench. Use pliers to remove the valve spring retainers, then the springs, and then remove the valve from the cylinder head. Use some fine valve lapping compound on the valve seat and cylinder head to get the new valves to seat properly. Insert the valves into the head and use a lapping tool to seat them by rotating the lapping tool in your hands. Remove the valves and clean the lapping compound off the valve and cylinder head, lubricate the valve stems with oil, and insert them into the cylinder head. Install the new seal and install the spring and retainer, locking the retainer into position on the valve. Clean off the surfaces for the new head gasket and re-install the cylinder head back onto the engine. Do this by tightening the bolts down in an alternating pattern to avoid warping the cylinder head. Re-install the guide plate and rocker arm studs, then torque down. Insert the push rod, slide on the rocker arms and thread the pivots loosely. Use a feeler gauge to gap the rocker arms 3 to 5 thousandths of an inch from the valves, then thread the jam nuts and tighten them down. Re-install the spark plug and install a new valve cover gasket. Then, you can re-install the valve cover. Tighten the bolts in an alternating pattern, then re-install the muffler, the carburetor and the air filter housing and filter. ... Read more
Carburetors
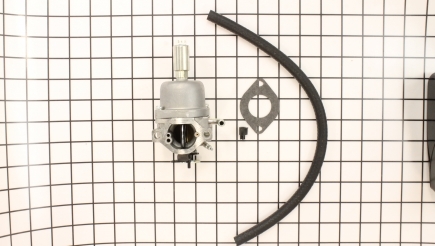
The purpose of the carburetor is to mix air and fuel to the proper ratio for combustion. Carburetors tend to gum up, especially if fuel is left in them for a while, and they may require cleaning. You should clean them with carburetor cleaner and a soft brush on the inside. A quick way to do this is run the engine, rev it up, and spray the inside with carburetor cleaner. Check for any malfunctioning springs. You will also want to look for missing or weak springs that control the carburetor's butterfly valves. Any damaged springs should be replaced. This is an easy repair, as all you will need to do is take a pair of pliers to pull them off and on. Make note of how they come off, as you do not install them backwards. This can cause the carburetor to malfunction. ... Read more
Air Filters
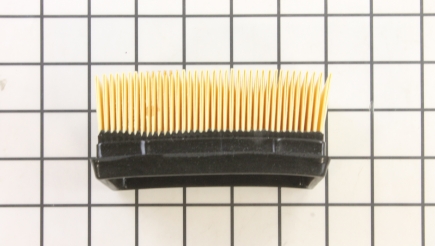
The air filter is located on top of the carburetor. Its main function is to filter out debris and small particles from entering the engine and causing damaging to internal engine parts. Over time, the air filter will need to be replaced as it becomes clogged with debris, and starves the engine of air. To replace it, locate the air filter cover and remove. It may be attached by screws or just a tab. To complete this repair, simply remove the filter, replace it with a new one, and re-assemble.

Gaskets
A tear, rip, or worn section in the gasket below the carburetor will pull excess air into the engine causing the air fuel mixture to be incorrect, and resulting in a loss in power. To replace the gasket, remove the air filter and bolts holding down the carburetor. If necessary, pinch off the fuel line to avoid a skill, then remove the fuel line and disconnect any levers. Now, check the gasket for damage or leaks. At this point the gasket will need to be replaced as they can only be used once. Install a new gasket, then re-assemble the carburetor back onto the engine. A damaged head gasket can also cause poor engine performance. The head gasket provides a tight seal between the engine block and the cylinder head. If the head gasket fails, it can cause very poor engine performance and it some cases internal damage. Black or blue smoke is a good indicator of a blown head gasket, as well as white smoke if your engine is liquid cooled. To check for a blown head gasket, first pull out the spark plug and inspect. A bright or shiny spark plug indicates an internal leak if you have a liquid cooled engine. Next, pull the oil dip stick and check for exhaust coming out. This is another indicator of a blown head gasket. Check the vent on the fuel pump to see if oil is coming out, and check the air filter for oil as these are also signs of a bad head gasket. A blown head gasket can increase the pressure inside the engine and force the oil out in these areas. If you have any of these symptoms, the head gasket must be replaced. To do so, remove the carburetor and muffler from the cylinder head. Pull the valve cover off and remove the valve cover gasket. If you see more signs of exhaust smoke when removing the valve cover, it is another indication of a blown head gasket. Remove all the bolts holding the cylinder head to the engine block in a diagonal pattern, and remove the head. Now you can pull off the old head gasket. Clean both the surfaces of the engine block and cylinder head with a soft brush. You do not want to damage this area as you will need tight seal, and any damage can impact the performance of the new head gasket. Install the new gasket and re-assemble the engine. ... Read more
Spark Plugs
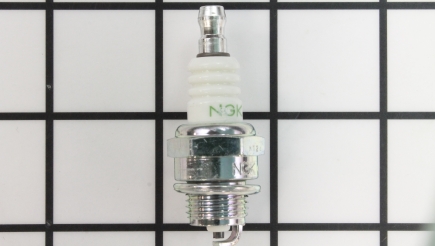
The purpose of the spark plug is to ignite the air/fuel mixture in the combustion chamber. A worn, dirty, oily, or a poorly gapped spark plug can cause a weak spark, which can cause a misfire, detonation or a dead cylinder, and result in a loss of power. Detonation can cause severe internal engine damage as well. If your spark plug is experiencing these symptoms, replace it and gap to manufacturer's specifications. Do not over-tighten the spark plug, as they are fragile.

Rods
The push rod rides on the camshaft and transfers power from a rotary motion to a reciprocating motion. The top of the rod pushes on the rocker arm which opens and closes the valves in the cylinder head, allowing fuel to enter and exhaust to escape. If a push rod becomes bent, it will impact how much these valves open. The less they open the poorer the engine performance. If a push rod is bent you will usually hear a ticking noise, if badly bent or broken the engine will have a misfire. To diagnose the push rod, remove the valve cover and the jam nuts and loosen the pivots. Then, slide the rocker out of the way. Keep in mind, you do not have to remove the hold-down nuts completely. Now, pull out the push rods and inspect them; a bent rod will be noticeable. Replace a damaged rod with a new, and add some engine oil to it before installing. Then, rotate the rocker arm back into place and gap the pivots to 3-5 thousandths of an inch for the intake valve, and 5-7 thousandths of an inch for the exhaust valve. Finally, re-install the jam nuts, replace the valve cover gasket with a new one, and re-install the valve cover. ... Read more