

How to Sharpen Hedgetrimmer Blades
Finish Nailer Repair - Replacing the Driver Guide (Ridgid Part # 79004001022)
Hedgetrimmers work hard to significantly reduce the work of maintaining impressive yards and landscapes, and keeping their blades sharp helps them do their jobs at top performance.
Because of this, blade sharpening is one of the most important maintenance issues for hedge clippers, and it also reduces repair costs by extending the life of the blades.

Hedgetrimmer owners can save money at the shop by performing their own blade sharpenings at home.
Read this article's professional steps and instructions below to learn two easy methods for how to sharpen hedgetrimmer blades with a file, and how to sharpen hedgetrimmers with a power grinder.
General Steps to Sharpen Hedgetrimmer Blades
Regardless of the method you choose to sharpen your hedgetrimmer blades (file or grinder), aligning the blades to each other is the first step in the procedure.

We explain the steps to align hedgetrimmer blades in this section, as well as some general principles that apply to all sharpening methods.
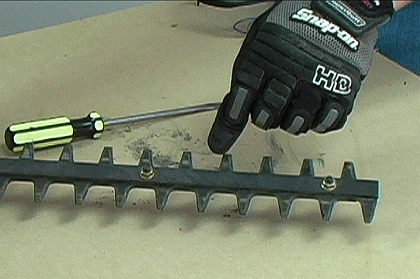
1. Align the hedgetrimmer blades by hand.
Get a heavy pair of work gloves on and begin aligning the trimmer blades by pressing them together with your fingers.

The blades will not completely align by hand, but they should be nearly there when you're done.
2. Use an object to precisely align the blades the rest of the way.
We prefer to use the end of an old screwdriver for this step, but many objects will do just fine.
Just make sure the the object you use is hard enough to move the blades but soft enough that it won't damage them.

Using the screwdriver end as a pry bar, adjust the blades until they are perfectly aligned with one another.
The Six Hedgetrimmer Tooth Surfaces
When sharpening a hedgetrimmer with either a mill file or a power grinder, there are six surfaces on each tooth that must be filed or ground.
There are three surfaces that need to be sharpened on the top side of each blade tooth: the two side edges, and the flat point edge.
These same three surfaces must be sharped on the underside of each tooth, making six tooth surfaces total.
How to Sharpen a Hedgetrimmer with a File
Only begin sharpening after you have aligned the hedgetrimmer teeth to each other according to the steps listed above.
Remember that six surfaces must be sharpened on each tooth along the bar of the hedgetrimmer.
1. File the three top surfaces of each hedgetrimmer tooth.
Align the mill file along the same angle as the edge of the tooth.
Make several, long, smooth strokes downward with the file until the edge is sharpened.

The tooth edges will shine up as the file removes build-up and oxidation.
Repeat the same process for the topside of each tooth surface, always making downward stokes with the file at the same angle as the tooth edge.

2. File the three bottom surfaces of each hedgetrimmer tooth.
After sharpening the top surfaces of the teeth, turn the hedgetrimmer over and repeat the process for each of the three surfaces on each of the teeth along the bar.

Although over-sharpening the blades by hand is difficult--due to the labor involved--it is still possible to remove too much material from the blade edges.
To prevent over-sharpening, stick to a couple of extra strokes on each tooth surface after it has shined up.
How to Sharpen Hedgetrimmer Blades with a Power Grinder
Begin these steps after aligning the hedgetrimmer teeth according to the steps above.
Remember that six surfaces must be sharpened on each tooth along the bar of the hedgetrimmer.
1. Wear safety equipment.
Because you'll be using a power grinder, the first order of business should be equipping yourself with hearing and eye protection.

Also, be aware that sharpening your hedgetrimmer blades with a power grinder will generate a lot of sparks. Be careful to perform this procedure away from obvious fire hazards.
It is also a good idea to perform this and other spark-generating repairs earlier in the day to give you time to catch any potentially smoldering cinders left behind.
2. Secure the bar of the hedgetrimmer with a clamp.
The bar of the hedgetrimmer must be secure to prevent it from moving while sharpening its teeth with the grinder.

The bar and clamp will have to be repositioned several times to complete sharpening on each tooth.
3. Grind the top three surfaces of each tooth with the power grinder.
We recommend using a 60 or 80 grit, general purpose grinding wheel for sharpening hedgetrimmer blades. For more information about grinding wheel types and specifications, please read our article: "Abrasives: Cutting Wheels and Grinding Wheels"
Hold the surface of the grinding wheel against the surface of each tooth edge at the same angle as the tooth edge. Sharpen all three top surfaces of every hedgetrimmer tooth along the bar.
Holding the grinder accurately and with a steady hand in this manner can take a little practice.

Also, the power grinder will remove material from the hedgetrimmer teeth much more quickly than sharpening by hand. It is very important to not over-sharpen with the grinder.
The grinder wheel should only have to contact each cutting surface for a couple of seconds to sharpen it.
4. Grind the three bottom surfaces of each hedgetrimmer cutting tooth.
Turn the the trimmer over, re-clamp the bar, and repeat the same procedure for all three underside cutting surfaces of each tooth.

After just a little familiarity, completely sharpening all the teeth on a power hedgetrimmer like this takes only minutes.
Conclusion
If it weren't for power hedgetrimmers, managing yards and landscapes that have a lot of shrubs and bushes could take several times the work.
For this and other hedgetrimmer maintenance and repairs, take advantage of eReplacementParts.com's inventory of O.E.M. hedgetrimmer replacement parts at our Hedgetrimmer Parts page. Or, simply type the model number of your hedgetrimmer in the search field at the top of this page.
Enjoy the benefits of at-home repair with the eReplacementParts parts ordering and repair information service!