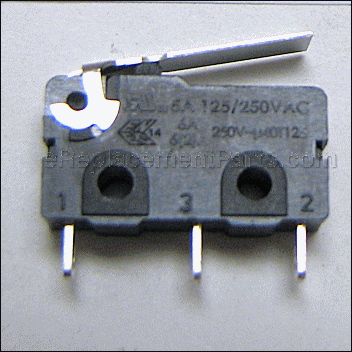

This is an original replacement part sourced directly from the manufacturer. The micro switch is found in a citrus press from Breville. This part is a complete switch made of high-quality plastic and metal, and it is placed to allow the user to control the machine settings. This item is sold as an individual replacement part.
Micro Switch SP0011048
OEM part for: Breville
Part Number: SP0011048
$4.99
Usually ships in 7 - 12 business days
7 - 12 business days
Compatibility
This part will fit the following 1 machine
Breville
800CPXL 800 Class Citrus Press View Diagrams & Manuals
This item works with the following types of products:
- Juicer Parts
This part replaces obsolete part #: 800CPXL/31, 800CPXL31
Questions & Answers ?
Our customer Service team is at the ready daily to answer your part and product questions.

Ask our Team
We have a dedicated staff with decades of collective experience in helping customers just like you purchase parts to repair their products.
Does this fit my product?Questions & Answers for Micro Switch
No questions have been asked yet
Customer Repair Instructions ?
All our customer repair instructions are solicited directly from other customers just like you who have purchased and replaced this exact part.
Our 800CPXL stopped working while juicing, it was the micro switch that works when ...
Marlene - October 25, 2023
Tool Type
Juicer
Difficulty
Medium
Time
15-30 minutes
Tools Used
Screwdriver, Pliers, Soldering Iron Kit
Parts Used
Our 800CPXL stopped working while juicing, it was the micro switch that works when you press down the arm to activate the squeezing rotation, is near the top.
1. Remove the "Base Cover" part A-58 it has 2 screws.
2. Once part A-58 is removed you have access to 3 screws that hold the internal mechanism. Remove these other 3 screws.
3. I recommend to take pictures of all before to know how it was before disassemble.
4. Take off upper Part 8 "Shaft Cap" (grey color), is just clipped in, so pull it up. Be careful with the remaining white plastic parts.
5. Now carefull lift the arm to have access to the internal parts. I was forced to removed a screw that hold the "grounding wire" to have better access.
6. You will see the upper micro switch. I used a multimeter to make sure my micro switch was bad (Continuity tests).
7. I waited to get the new one on the mail before doing this part. Remove the bad micro switch from two plastic pins supporting it, remove yellowish glue, and with a soldering iron remove the wires from the bad micro switch.
6. Once you have your new micro switch placed as the one before and sold it and clip it and use a hot glue (common one sold in crafting stores) to fix it more stable as the one before.
That's it put back everything as it was before. Note: we were 2 people working at some point to help screw the grounding screw back it was a little pain in the neck. and the motor support rubber Par A-53 came out of place but we positioned it back were it was.
Did you find this story helpful?
Thanks for voting and helping fellow customers!
micro switch went out
Joe - March 18, 2019
Tool Type
Juicer
Difficulty
Medium
Time
15-30 minutes
Tools Used
Screwdriver, soldering iron, wire dikes, box knife
Parts Used
1. Disassemble juicer
2. remove switch from two pins supporting it
3. clip off leads from old switch with wire dikes
4. strip wire ends with box knife
4. twist on wire ends to new switch leads
5. solder wire ends to switch lead - this was most difficult part. I couldn't get the wire/lead junction hot enough to melt the solder with my 25W or even my 30W soldering iron. I had to resort to heating the solder so it dribbled onto the cold wire/lead junction. Maybe my solder was old & oxidized? Not a very good job, but it works now.
6. press switch (which has two holes) into the two pins where it needed to be supported
7. Reassemble
Did you find this story helpful?
Thanks for voting and helping fellow customers!
OEM stands for Original Equipment Manufacturer and means the part you’re buying is sourced directly from the manufacturer who made your product. At eReplacementParts, we sell only genuine OEM parts, guaranteeing the part you’re purchasing is of better design and of higher quality than aftermarket parts.
Our product descriptions are a combination of data sourced directly from the manufacturers who made your product as well as content researched and curated by our content & customer service teams. This content is edited and reviewed internally before being made public to customers.
Our customer service team are at the ready daily to answer your part and product questions. We have a dedicated staff with decades of collective experience in helping customers just like you purchase parts to repair their products.
All our part reviews are solicited directly from other customers who have purchased this exact part. While we moderate these reviews for profanity, offensive language or personally identifiable information, these reviews are posted exactly as submitted and no alterations are made by our team.
All our customer repair instructions are solicited directly from other customers just like you who have purchased and replaced this exact part. While we moderate these reviews for profanity, offensive language or personally identifiable information, these reviews are posted exactly as submitted and no alterations are made by our team.
Based on data from past customer purchasing behaviors, these parts are most commonly purchased together along with the part you are viewing. These parts may be necessary or helpful to replace to complete your current repair.
All our installation videos are created and produced in collaboration with our in-house repair technician, Mark Sodja, who has helped millions of eReplacementParts customers over the last 13 years repair their products. Mark has years of experience in selling and repairing both commercial and residential products with a specialty in gas-powered equipment.
This data is collected from customers who submitted a repair instruction after replacing this exact part. Customers can rate how easy the repair was to complete and how long it took. We aggregate this data to provide a repair rating that allows customers to quickly determine the difficulty and time needed to perform their own repair.