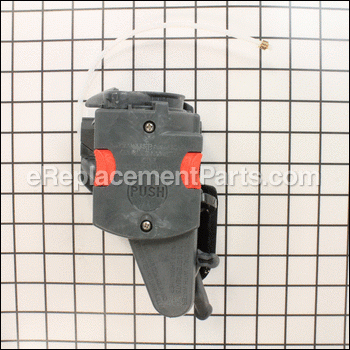
Infuser 7313251451
OEM part for: DeLonghi
Part Number: 7313251451
Jump To:
Frequently Purchased Together ?
Compatibility
This part will fit the following 19 machines
DeLonghi
This item works with the following types of products:
- Coffee Maker Parts
This part replaces obsolete part #: 5513227891, 7313232331, 7313218501
Customer Part Reviews ?
Questions & Answers ?
Our customer Service team is at the ready daily to answer your part and product questions.

Ask our Team
We have a dedicated staff with decades of collective experience in helping customers just like you purchase parts to repair their products.
Does this fit my product?Questions & Answers for Infuser
Customer Repair Instructions ?
All our customer repair instructions are solicited directly from other customers just like you who have purchased and replaced this exact part.
Machine was not making coffee. It would grind the beans but water would not go through the beans and spouts into the cup, but instead it would bypass directly into the tray.
Tool Type
Coffee Maker
Difficulty
Hard
Time
1-2 hours
Tools Used
Screwdriver, Torx Security Driver
Parts Used
2. Once I determined that valve was the problem and that diffuser could be an issue too I ordered both parts - you have to order the valve as that is the main cause of this issue, but you can probably get away with ordering some gaskets for the diffuser and cleaning it up and greasing it. However getting the gaskets and a screen and couple other recommended replaceable parts came out to be just $10 less than the cost of new diffuser kit, so I just ordered the whole thing. And it comes pre-greased and ready to go.
3. You will need to remove the back panel using the torx security driver and then remove all other panels. Top panel is the trickiest to do but there are couple good videos that describe how to do it. It also helps to not have any coffee in the bucket because when you pull the top panel off beans will go flying all over the place (or so I heard ;-) )
4. To replace the valve there are 4 screws that hold it in place. Once they are removed you will be able to wiggle it out, but first remember to remove all 3 tubing which are held in place with cotter pins
5. Once the new valve is in place and you put all the tubing back in and get the panels back in place you just need to replace the diffuser and you are set to go. It's a pretty tedious repair but it's not super hard - just takes time and patience but most importantly it fixes the problem so you can enjoy the good coffee again.
Diffiuser Banging and sticking/locking up
Tool Type
Coffee Maker
Difficulty
Easy
Time
Less than 15 minutes
Tools Used
, None
Parts Used
The espresso machine wouldn't put water through the grinds and make.coffee.
Tool Type
Coffee Maker
Difficulty
Medium
Time
More than 2 hours
Tools Used
Screwdriver, Anti tampering torx bit
Coffee machine was matching coffee once in a while, skipping the water passing thru the spout. Dry coffee grind was left behind.
Tool Type
Coffee Maker
Difficulty
Hard
Time
More than 2 hours
Tools Used
Screwdriver, Socket set
Parts Used
OEM stands for Original Equipment Manufacturer and means the part you’re buying is sourced directly from the manufacturer who made your product. At eReplacementParts, we sell only genuine OEM parts, guaranteeing the part you’re purchasing is of better design and of higher quality than aftermarket parts.
Our product descriptions are a combination of data sourced directly from the manufacturers who made your product as well as content researched and curated by our content & customer service teams. This content is edited and reviewed internally before being made public to customers.
Our customer service team are at the ready daily to answer your part and product questions. We have a dedicated staff with decades of collective experience in helping customers just like you purchase parts to repair their products.
All our part reviews are solicited directly from other customers who have purchased this exact part. While we moderate these reviews for profanity, offensive language or personally identifiable information, these reviews are posted exactly as submitted and no alterations are made by our team.
All our customer repair instructions are solicited directly from other customers just like you who have purchased and replaced this exact part. While we moderate these reviews for profanity, offensive language or personally identifiable information, these reviews are posted exactly as submitted and no alterations are made by our team.
Based on data from past customer purchasing behaviors, these parts are most commonly purchased together along with the part you are viewing. These parts may be necessary or helpful to replace to complete your current repair.
All our installation videos are created and produced in collaboration with our in-house repair technician, Mark Sodja, who has helped millions of eReplacementParts customers over the last 13 years repair their products. Mark has years of experience in selling and repairing both commercial and residential products with a specialty in gas-powered equipment.
This data is collected from customers who submitted a repair instruction after replacing this exact part. Customers can rate how easy the repair was to complete and how long it took. We aggregate this data to provide a repair rating that allows customers to quickly determine the difficulty and time needed to perform their own repair.


