eReplacementParts.com
877-346-4815
Black and Decker Parts
Repair Parts Home
  
Lawn Equipment Parts
  
Black and Decker Parts
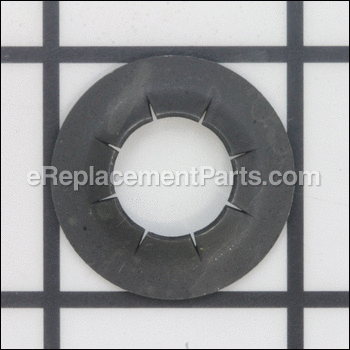
  624374-00 Lawn Mower Wheel Push Ring

Lawn Mower Wheel Push Ring 624374-00

OEM part for: Black and Decker

Part Number: 624374-00


Install
Videos!
Lawn Mower Wheel Push Ring - 624374-00:Black and Decker 360 View
Lawn Mower Wheel Push Ring - 624374-00:Black and DeckerLawn Mower Wheel Push Ring - 624374-00:Black and DeckerLawn Mower Wheel Push Ring - 624374-00:Black and Decker 360 View
In Stock
Order within the next 4 hours and your part ships today!
Easy 15-30 minutes (14 rated repairs)?
OEM: Original Equipment Manufacturer ?
Black and Decker
Does this d-block d-md-none fit my product?

Product Description ?

Genuine Black and Decker replacement part, this item is sold individually.
The 624374-00 Push Ring is used on the lawn mowers listed below to hold the wheels onto the axle.
One way to install this part is to use a socket just a little large than the axle, and tap it on with a hammer.

  • Classification: Part
  • Weight: 0.01 lbs.
  • Shipping: Ships Worldwide

Frequently Purchased Together ?

Compatibility

This part will fit the following 41 machines

Black and Decker

CMM1200 Type 1 24V Cordless Mulching Mower View Diagrams & Manuals
CMM1200 Type 2 24V Cordless Mulching Mower View Diagrams & Manuals
LM175 18" Electric Mower View Diagrams & Manuals
MM275 18" Electric Mulching Mower View Diagrams & Manuals
MM575 18" Electric LAWNHOG Mulching Mower View Diagrams & Manuals
MM675 Type 1 18" Electric "LAWNHOG&trade" Mulching Mower with Flip-Over Handle View Diagrams & Manuals
MM675 Type 2 18" Electric "LAWNHOG&trade" Mulching Mower with Flip-Over Handle View Diagrams & Manuals
MM875 Type 1 19" Electric LAWNHOG&trade Mulching Mower with Rear-Bag View Diagrams & Manuals
MM875 Type 2 19" Electric LAWNHOG&trade Mulching Mower with Rear-Bag View Diagrams & Manuals
37051 Type 1 19 Crafts Electric Mower View Diagrams & Manuals
37051 Type 2 19 Crafts Electric Mower View Diagrams & Manuals
37052 Type 1 19 Crafts Cordless Mower View Diagrams & Manuals
CMM1000 Type 1 19 Mulching Mower View Diagrams & Manuals
CMM1000 Type 2 19 Mulching Mower View Diagrams & Manuals
CMM1000 Type 2A 19 Mulching Mower View Diagrams & Manuals
CMM1000 Type 3 19 Mulching Mower View Diagrams & Manuals
CMM1000 Type 4 19 Mulching Mower View Diagrams & Manuals
CMM1000 Type 5 19 Mulching Mower View Diagrams & Manuals
MM850S Type 4 19 Electric Mower View Diagrams & Manuals
MM850 Type 1 19 Mulching Mower View Diagrams & Manuals
MM850 Type 2 19 Mulching Mower View Diagrams & Manuals
MM850 Type 3 19 Mulching Mower View Diagrams & Manuals
MM850 Type 4 19 Mulching Mower View Diagrams & Manuals
MM850 Type 5 19 Mulching Mower View Diagrams & Manuals
SPCM1936 36V 19 in. Mower View Diagrams & Manuals
MM1800 Type 1 18 Inch Mulching Mower View Diagrams & Manuals
CM1836 Type 1 36V 18in Mower View Diagrams & Manuals
CM1936 Type 1 36V 19in Mower View Diagrams & Manuals
CM1936 Type 2 36V 19in Mower View Diagrams & Manuals
CMM1200 Type 3 Lawn Mower View Diagrams & Manuals
MM875 Type 3 19 Mulching Mower View Diagrams & Manuals
CM1836 (Type 2) 18" Cordless Mulching Rear bag Mower View Diagrams & Manuals
CM1936Z (Type 1) 36v 19in Mower View Diagrams & Manuals
CMM1200 (Type 2A) 24v Lawn Mower Power Tool View Diagrams & Manuals
CMM1200 (Type 4) 24v Lawn Mower Power Tool View Diagrams & Manuals
LM175 (Type 1) 18-Inch 6.5a Mower Power Tool View Diagrams & Manuals
LM175 (Type 2) 18-Inch 6.5a Mower Power Tool View Diagrams & Manuals
MM1800 (Type 2) Diamond Core Drill Power Tool View Diagrams & Manuals
MM275 (Type 1) 18 Elect.Mower Power Tool View Diagrams & Manuals
MM575 (Type 1) 18 Elect.Mower Power Tool View Diagrams & Manuals
SPCM1936 (Type 1) Lawn Mower Power Tool View Diagrams & Manuals
Show More Compatible Models
Don't see yours? Try searching our site for :

This item works with the following types of products:

  • Lawn Mower Parts

Customer Part Reviews ?

4.4
Average Rating (out of 5):
10 Reviews
Click to filter by ratings:
5 stars
8
4 stars
0
3 stars
1
2 stars
0
1 stars
1
  • Highest Rating
  • Most Recent
< PREV
  • 1
NEXT >
  • Lawn Mower Wheel Push Ring
    I don’t know if I’m just lucky, or if you have every part that is impossible to find. But I took a risk and you came through. I spent less than $20.00 to fix my lawnmower this year, the part fit perfectly, came quickly and was very affordable. I just need to thank you so very very much. From: Jami
    Guest - September 5, 2023 Verified Purchase
    Washer for wheel axle
    It was easy to order got it very quick very easy to install will order again from you
    James - November 4, 2021 Verified Purchase
    Wheel Push Ring
    Fast shipping and part worked great. Easy to put on and lawn cart wheels works great again.
    Guest - December 19, 2020 Verified Purchase
    Worked out perfect
    Lawn mower push ring for wheel
    Guest - June 22, 2020 Verified Purchase
    Replacement part for mower
    Item was shipped fast and exactly what I needed..life tip..if you buy these buy at least 4 or more..you need 2 per tire on the black and decker 36v mower front tires
    Guest - September 21, 2019 Verified Purchase
    easy to find
    Easy to find my part and I appreciated the follow up. Thanks!
    Will - August 13, 2019 Verified Purchase
    Perfect fit!
    This push ring along with the wheel (ordered at the same time from same website) turned my disabled mower back into action.
    Guest - July 3, 2019 Verified Purchase
    WRONG PART
    I ordered the wrong part and am returning them. The push rings were too big for my application. My fault for ordering the wrong size. I really like doing business with your company. It is amazing the parts that you have available for repairing worn out things. Keep up the great inventory and service. Clint
    Guest - June 14, 2019 Verified Purchase
    Part worked great but...
    Instructions or tips to remove old push ring would be helpful. I used a Dremel tool to cut into the ring in order to pop the ring off. Also to put the new ring on I used a socket from my ratchet set, put the small extension into the back of the socket and used a hammer to tap the push ring onto the axel.
    Guest - May 18, 2019 Verified Purchase
    Broke
    the part broke as soon as I put it on
    Guest - May 21, 2020 Verified Purchase
    t
    t
    t - t days ago Verified Purchase
    eReplacementParts Team
    t

    Questions & Answers ?

    Our customer Service team is at the ready daily to answer your part and product questions.

    photo of team member
    Ask our Team

    We have a dedicated staff with decades of collective experience in helping customers just like you purchase parts to repair their products.

    Does this fit my product?

    Questions & Answers for Lawn Mower Wheel Push Ring


    No questions have been asked yet

    Customer Repair Instructions ?

    All our customer repair instructions are solicited directly from other customers just like you who have purchased and replaced this exact part.

    Easy 15-30 minutes (14 rated repairs)?

    Lawn mower wheel came off

    Linda - November 25, 2016
    👍 6 of 8 people found this instruction helpful
    Tool Type

    Lawn Mower

    Difficulty

    Easy

    Time

    Less than 15 minutes

    Tools Used

    , Mallet

    Use a socket the same size of the shaft, then tap the push ring on with a mallet
    Did you find this story helpful?
    Thanks for voting and helping fellow customers!

    Old ring came off and was lost in the lawn. Without ring, wheel came off.

    John - July 19, 2016
    👍 3 of 4 people found this instruction helpful
    Tool Type

    Lawn Mower

    Difficulty

    Medium

    Time

    30-60 minutes

    Tools Used

    Adjustable Wrench, Hammer

    Used an adjustable wrench and a hammer to pound the new ring onto the mower. Now the ring and wheel stays on and easier to mow lawn with 4 wheels and not 3 wheels.
    Did you find this story helpful?
    Thanks for voting and helping fellow customers!

    Handle knobs were cracked and push rings were stretched loose.

    John - November 29, 2019
    Tool Type

    Lawn Mower

    Difficulty

    Easy

    Time

    Less than 15 minutes

    Tools Used

    Screwdriver

    Replaced the knobs and push rings.
    Did you find this story helpful?
    Thanks for voting and helping fellow customers!

    Front wheel came off.

    Russel - September 10, 2019
    Tool Type

    Lawn Mower

    Difficulty

    Easy

    Time

    Less than 15 minutes

    Tools Used

    Screwdriver

    Put wheel on axes and secured new wheel push ring.
    Did you find this story helpful?
    Thanks for voting and helping fellow customers!

    Wheel had fallen off lawn mower.

    maryjean - December 14, 2017
    Tool Type

    Lawn Mower

    Difficulty

    Easy

    Time

    15-30 minutes

    Tools Used

    , Hammer, metal pipe

    I looked at the other wheels, I figured out the order of the parts and then placed the Ring (clamp/claw) over the axle and when I tried to push it on manually, it would not go on so I improvised by getting a metal pipe who's opening fit perfectly over the axle & Ring and hammered it on. I then finished it by putting on the hub cap.
    Did you find this story helpful?
    Thanks for voting and helping fellow customers!

    Wheels worn out after 13 years of service

    STEVEN - September 13, 2017
    👍 2 of 4 people found this instruction helpful
    Used hand tools, standard procedure, easy parts replacement.
    Push rings needed to be pressed onto shafts carefully - used a wrench socket as a push tool.
    Did you find this story helpful?
    Thanks for voting and helping fellow customers!

    Replaced wheel

    Barbara - September 10, 2017
    Tool Type

    Lawn Mower

    Difficulty

    Easy

    Time

    Less than 15 minutes

    Tools Used

    Pliers

    Remove the hub cap, remove the push ring and the old wheel
    Install the new wheel, push ring and hub cap
    Did you find this story helpful?
    Thanks for voting and helping fellow customers!

    Wheel tread worn / broken.

    Ronald - July 12, 2017
    👍 1 of 2 people found this instruction helpful
    Tool Type

    Lawn Mower

    Difficulty

    Easy

    Time

    1-2 hours

    Tools Used

    Screwdriver, Socket set, Hammer, grease gun

    1. Turn mower on its left side.
    2. Use a regular screwdriver to pry off the front right hubcap.
    3. Use the screwdriver to gradually pry off the front right push ring.
    4. Remove and discard the front right wheel. Leave the washer in place.
    5. Apply grease to the bearing surface of one 7" wheel.
    6. Apply grease to the outer surface of the wheel in the area that will be under the push ring.
    7. Slide the wheel onto the front right axle.
    8. Place a new push ring over the end of the axle.
    9. Position a large socket over the push ring. Hammer on the free end of the socket, so that the push ring slides down the axle and holds the wheel tightly enough that it doesn't wobble, but loosely enough that the wheel spins freely.
    10. Push a new hubcap into place on the wheel.
    11. Repeat steps 2 though 10 to remove the right rear wheel and replace it with an 8" wheel.
    12. Turn the mower onto its right side.
    13. Repeat steps 2 through 11 to remove and replace the left front (7") and rear (8") wheels.
    Did you find this story helpful?
    Thanks for voting and helping fellow customers!

    Lawn mower rear flap had torn off.

    Brian - July 3, 2017
    Tool Type

    Lawn Mower

    Difficulty

    Medium

    Time

    30-60 minutes

    Tools Used

    Screwdriver, Pliers, Socket set, Wrench Set, Hammer

    1. Removed wheel push ring
    2. Removed wheel
    3. Tore off flap trying to remove leftover flap.
    4. Added WD-40 to remove remainder of flap with pliers after pushing down plastic tab.
    5. Replaced with new flap.
    6. Replaced wheels
    7. Replaced, broken push rings.
    8. Push rings not flexible enough to be replaced, forced on with hammer, pliers, socket set, etc.
    9. Swore to get a new mower next time something breaks.
    Did you find this story helpful?
    Thanks for voting and helping fellow customers!

    Plastic of rear wheel hub broke

    Norman - April 12, 2017
    Tool Type

    Lawn Mower

    Difficulty

    Easy

    Time

    Less than 15 minutes

    Tools Used

    Screwdriver, Hammer

    Used screwdriver to pop of hub and pry off the push ring.
    Slid off the broken wheel.
    Put the new wheel on the axle.
    Replaced the push ring and tapped in place with hammer.
    Replaced the hub.
    Did you find this story helpful?
    Thanks for voting and helping fellow customers!

    OEM stands for Original Equipment Manufacturer and means the part you’re buying is sourced directly from the manufacturer who made your product. At eReplacementParts, we sell only genuine OEM parts, guaranteeing the part you’re purchasing is of better design and of higher quality than aftermarket parts.

    Our product descriptions are a combination of data sourced directly from the manufacturers who made your product as well as content researched and curated by our content & customer service teams. This content is edited and reviewed internally before being made public to customers.

    Our customer service team are at the ready daily to answer your part and product questions. We have a dedicated staff with decades of collective experience in helping customers just like you purchase parts to repair their products.

    All our part reviews are solicited directly from other customers who have purchased this exact part. While we moderate these reviews for profanity, offensive language or personally identifiable information, these reviews are posted exactly as submitted and no alterations are made by our team.

    All our customer repair instructions are solicited directly from other customers just like you who have purchased and replaced this exact part. While we moderate these reviews for profanity, offensive language or personally identifiable information, these reviews are posted exactly as submitted and no alterations are made by our team.

    Based on data from past customer purchasing behaviors, these parts are most commonly purchased together along with the part you are viewing. These parts may be necessary or helpful to replace to complete your current repair.

    All our installation videos are created and produced in collaboration with our in-house repair technician, Mark Sodja, who has helped millions of eReplacementParts customers over the last 13 years repair their products. Mark has years of experience in selling and repairing both commercial and residential products with a specialty in gas-powered equipment.

    This data is collected from customers who submitted a repair instruction after replacing this exact part. Customers can rate how easy the repair was to complete and how long it took. We aggregate this data to provide a repair rating that allows customers to quickly determine the difficulty and time needed to perform their own repair.

    eReplacementParts.com
    7174 South 400 West
    Suite 5
    Midvale, UT 84047
    visa mastercard discover american express PayPal