Product Information
Description:
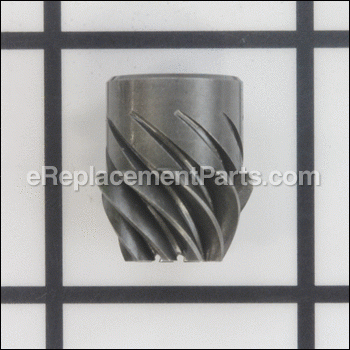
| Genuine Dewalt replacement part, this item is sold individually. This part is pressed on to the end of the armature and secured with the 604484-00 nut in the models listed below. The pinion drives the bevel gear in the gearcase. If the pinion gear ever gets damaged, chances are that the bevel gear is also damaged. |
Frequently Purchased With
Compatibility
the 53 compatible machines
This part is compatible with the following machines:
DeWALT
DC415 Type 1 Cut Off Tool
DC415 Type 1 Cut Off Tool
D28110 Type 1 Grinder
D28112 Type 1 Grinder
D28402 Type 1 Small Angle Grinder
D28402N Type 1 Small Angle Grinder
DC413 28V Cordless Cut Off Kit
DC413 28V Cordless Cut Off Kit
DC411 18V Cut Off Tool
DC411 18V Cut Off Tool
D28402K Type 1 4-1/2 Small Angle Grinder
DCG412B Type 1 20V Max Cut-Off Tool
DCG412B Type 1 20V Max Cut-Off Tool
DCG412L2 Type 1 20V Cut-Off Tool
DCG412L2 Type 1 20V Cut-Off Tool
DC411KA Type 1 18V Cut Off Tool
DC411KA Type 1 18V Cut Off Tool
DC411B (Type 1) Cordless Cut-Off Tool
DC411B (Type 2) Cordless Cut-Off Tool
DCG412P2 (Type 2) 20v Max Grdr-Cutoff
DCG412P2 (Type 3) 20v Max Grdr-Cutoff
D28110K (Type 1) 4-1/2 Sm.Ang.Grndr
DC415KL (Type 1) 36V Cordless Cut-Off Tool
DCG412M2 (Type 1) 20v Cut-Off Tool
DC413KL (Type 1) 28v Cordless Cut-Off Kit
DC411KA-AR (Type 1) Betterley Miter Fld Power Tool
DC411KA-AR (Type 2) Betterley Miter Fld Power Tool
D28111-AR (Type 2) 4-1/2 Small Angle Grinder Power Tool
D28111-B2 (Type 1) 4-1/2 Small Angle Grinder Power Tool
D28111-B2 (Type 2) 4-1/2 Small Angle Grinder Power Tool
D28111-B3 (Type 1) 4-1/2 Small Angle Grinder Power Tool
D28111-B3 (Type 2) 4-1/2 Small Angle Grinder Power Tool
D28111-BR (Type 2) 4-1/2 Small Angle Grinder Power Tool
D28111K-B2C (Type 2) 4-1/2 Small Angle Grinder Power Tool
D28111S-B3 (Type 1) 4-1/2 Angle Grinder Power Tool
D28111SK-B3 (Type 1) 4-1/2 Small Angle Grinder Power Tool
D28112-AR (Type 1) 4-1/2 Grinder Power Tool
D28112-AR (Type 2) 4-1/2 Grinder Power Tool
D28112-B2 (Type 1) 4-1/2 Grinder Power Tool
D28112-B2 (Type 2) 4-1/2 Grinder Power Tool
D28112-B3 (Type 2) 4-1/2 Grinder Power Tool
D28112-BR (Type 1) 4-1/2 Grinder Power Tool
D28112-BR (Type 2) 4-1/2 Grinder Power Tool
D28143-AR (Type 1) 4-1/2 Small Angle Grinder Power Tool
D28402-B3 (Type 1) 4 1/2 Small Angle Grinder Power Tool
DCG412M2-AR (Type 3) 20v Max Li-Ion Grinder To Power Tool
DCG412M2-B2 (Type 3) 20v Max Li-Ion Grinder To Power Tool
DCG412M2-B2C (Type 3) 20v Max Li-Ion Grinder To Power Tool
DCG412M2-B3 (Type 3) 20v Max Li-Ion Grinder To Power Tool
DCG412M2-BR (Type 3) 20v Max Li-Ion Grinder To Power Tool
DC411KA (Type 2) Betterley Miter Fld Power Tool
DCG412B (Type 2) 20v Max Cut-Off Tool (Too Power Tool
DCG412B (Type 3) 20v Max Cut-Off Tool (Too Power Tool
Products Compatibility
This item works with the following types of products:
- • Chop Saw
- • Grinder
- • Saw
Repair Guides
Articles:
|
Pinion problems? This article shows you how to quickly remove and install a new pinion gear on a dewalt angle grinder....
March 16, 2015
|
Questions & Answers for Pinion
No questions have been asked yet
Repair Instructions: Submitted by Customers Like You
3 of 3 people found this instruction helpful
Tool Type:
Grinder
Repair Difficulty:
Medium
Time Spent Repairing:
1-2 hours
Tools Used:
Screwdriver, Pliers, Socket set, Wrench Set, Bench Vice.
The Gear teeth were chewed to dust.(moter ran but grinding wheel didnt turn)
Here is what I did.First Unplugged the tool (Duu!:) Removed the grinding wheel and nut. Using a torx screwdriver removed the gear case cover,then removed the the gear case assembly from the motor body,and also removed the one side of the handle set from the motor body(take care that the switch paddle assembly doesn't fall out) .With one side of the handle set removed I could then remove the Separator/Fan from the motor shaft using a flat screw driver to jam the Fan blades while turning the motor shaft with a wrench on Pinion nut.(The Separator/Fan is threaded onto the motor shaft ...(reverse threaded if memory serves me). With the Separator/Fan loose I pulled the Armature Assembly out of the housing.With the Armature Assembly clamped firmly in a PADDED bench vice remove the nut holding the Pinion gear on (It was on there pretty good and was NOT reverse threaded!). With the nut removed replace the Pinion gear and re-tighten that nut down to your best judgment (If you have no judgment you probably shouldn't be doing this project;). Place the Armature Assembly back in the motor housing ( while holding the 2 spring loaded Brush assembly's apart ....I had to hold my mouth just right:). Spin the Separator/Fan back on ,put the handle set back to gather (carefully) and also make sure that the Bearing. Retainer is lined in the slots in the motor housing.
OK! Now for the other gear!
Remove the snap ring from the shaft with the appropriate pliers.
Pry the Flange off the shaft (ya is on there good ...just keep prying)
Now were going to need to press that shaft off the big gear and out of the gear case assembly.(uuuh ....wait a minute....how do we do that?! No really ,it is possible:)
Mount the gear case assembly in the bench vice using a large (deep?) socket as a spacer that holds the gear case assembly stationary but also makes room for the shaft as in gets pressed off the gear : using a small socket or bolt...(anything as long as it has a slightly smaller diameter than the shaft) as a spacer on the other end end of the shaft. Now Line this entire thing in the vice and start cranking HARD.the gear will start sliding off while emitting loud screeching noises.Stop and make sure that everything is still lined up right periodically and keep cranking....until the gear is off.(I hope these instructions makes some sense....I really suck at verbalizing what is pictured in my head).
Yippee! the gear is off! The shaft should now pass out of the gear housing with little effort. Now might be a good time to feel if those 2 shaft bearings are in need of attention/replacing.And now would also be a good time to thoroughly clean all that nasty grease out that most likely has little bits of metal suspended in it that used to be gear teeth.
With the shaft installed in the newly cleaned gear housing, start the new gear on the shaft and mount it in the vice with a spacer that will press on the gear but allow room for the shaft(A socket or large nut should do). Crank HARD again..same screeching noises... but this time the gear should be pressed on the shaft,until it is where the old gear used to be on the shaft (How far has that again?! Don't worry I think it bottoms out at the right depth;) .
The gear is ON!
Put the snap ring back on,mount the gear housing assembly back on the motor .Make sure the gears mesh good! Put a big blob (Time to use that judgment again:)of grease on the gears,and replace the cover. Push the Flange back on the shaft(that O ring right need to be replaced).
The moment of truth! Plug it in and press the trigger Hopefully every thing works fine!
You DID IT....Well done!
Did you find this story helpful?
Thanks for voting and helping fellow customers!
1 of 1 people found this instruction helpful
Tool Type:
Grinder
Parts Used:
Repair Difficulty:
Easy
Time Spent Repairing:
15-30 minutes
Tools Used:
, Torx bits
Transfer pinion stripped out
1. Removed outer casing using #15 and #20 torx bits.
2. Removed pinion and replaced with the new part.
3. Reassembled casing and returned to service.
2. Removed pinion and replaced with the new part.
3. Reassembled casing and returned to service.
Did you find this story helpful?
Thanks for voting and helping fellow customers!
Tool Type:
Grinder
Repair Difficulty:
Easy
Time Spent Repairing:
30-60 minutes
Tools Used:
Screwdriver, Wrench Set
The ring and pinion gears had wore out.
I ordered the assembly to replace the old one and when it came, I realized that the pinion gear was not included. So I ordered the pinion gear and being as how I would have it apart, I decided to go ahead and change the bearing also. Had I took the time to look at it closer beforehand, I would have just ordered the ring and pinion gears and saved some money. But now it's like new.
Did you find this story helpful?
Thanks for voting and helping fellow customers!
Tool Type:
Grinder
Repair Difficulty:
Easy
Time Spent Repairing:
30-60 minutes
Tools Used:
Screwdriver, Nutdriver
Pinion gear and intersecting gear worn
Watched ereplacement videos and followed directions. Made repairs easier than just blindly venturing into the job.
Did you find this story helpful?
Thanks for voting and helping fellow customers!
Tool Type:
Grinder
Repair Difficulty:
Easy
Time Spent Repairing:
15-30 minutes
Tools Used:
Screwdriver, Socket set
Damaged ring & pinion
Removed damaged gearbox and motor pinion. Installed replacement pinion and gearbox assembly. Added new lubricant, and away we go.
Did you find this story helpful?
Thanks for voting and helping fellow customers!
Tool Type:
Grinder
Repair Difficulty:
Easy
Time Spent Repairing:
15-30 minutes
Tools Used:
Screwdriver, Adjustable Wrench
Gears were worn slipped when in use
I removed the four screws from the gear housing case to view the ring and pinion gears. They were extremely worn and did not engage. I removed the nut locking the pinion onto the armature shaft. Then I removed the 4 screws from the housing and pulled the housing from the body of the grinder. I installed the new gear housing replaced the 4 screws to the grinder . I slid on the new pinion and securely tightened the holding nut. I greased the gears and replaced the gear case lid with the 4 securing screws, Don't forget the small rubber seal. Mine was fine so did not replace it just used the old one. I turned the unit on and put it to use. Works better then new.
Did you find this story helpful?
Thanks for voting and helping fellow customers!
Reviews
2 Reviews
Average Rating (out of 5):
Click to filter by ratings:
5 stars
2
4 stars
0
3 stars
0
2 stars
0
1 stars
0
< PREV
- 1
Work well
Worked well and saved me a lot of money.
Guest -
February 2, 2021
Verified Purchase
great part worked as expected
arrived quickly in proper condition and went right into place as it should
Gilbert -
August 21, 2019
Verified Purchase
Verified Purchase
eReplacementParts Team
< PREV
- 1
Product Information
Repair Guides
Articles:
|
Pinion problems? This article shows you how to quickly remove and install a new pinion gear on a dewalt angle grinder....
March 16, 2015
|


