eReplacementParts.com
877-346-4815
DeWALT Parts
Repair Parts Home
  
Power Tool Parts
  
DeWALT Parts
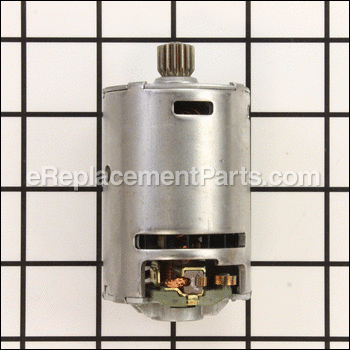
  396505-21SV Motor And Pinion

Motor And Pinion 396505-21SV

OEM part for: DeWALT

Part Number: 396505-21SV


Install
Videos!
Grid squares measure 1x1 inch
In Stock
Ships within 1 business day
Easy 15-30 minutes (4 rated repairs)?
OEM: Original Equipment Manufacturer ?
DeWALT
Does this d-block d-md-none fit my product?

Product Description ?

A genuine DeWALT item that is supplied directly from the original equipment manufacturer for use with cordless drills. It is an identical replacement for the motor that drives the chuck. Over time components may wear out and they may begin to fail eventually requiring a replacement. Keep in mind this high-quality motor and pinion is sold as an individual item. Check the appropriate diagrams for your model to ensure the correct repair procedure. A screwdriver and pliers will be needed to replace this motor and pinion.

  • Classification: Part
  • Weight: 1.10 lbs.
  • Shipping: Ships Worldwide

Compatibility

This part will fit the following 25 machines

DeWALT

DW983 Type 1 Cordless Drill View Diagrams & Manuals
DW984 Type 1 Cordless Hammer Drill View Diagrams & Manuals
DW985 Type 1 Cordless Hammer Drill View Diagrams & Manuals
DC985 Type 1 14.4V Cordless Hammer Drill View Diagrams & Manuals
DC984 Type 1 14.4V Cordless Hammer Drill View Diagrams & Manuals
DC984V Type 1 14.4V Cordless Hammer Drill View Diagrams & Manuals
DC983 Type 1 14.4V Cordless Drill View Diagrams & Manuals
DCD939 Type 1 14.4V HMRDR/Drill/Drive/Driver View Diagrams & Manuals
DC985KA (Type 1) Cordless Hammer Drill View Diagrams & Manuals
DCD939KX (Type 1) 1/2-In. Cordless Hammer Drill View Diagrams & Manuals
DCD939KX (Type 2) 1/2-In. Cordless Hammer Drill View Diagrams & Manuals
DCD939VX (Type 1) 14.4v Hammerdr/Drill/Driver View Diagrams & Manuals
DCD939VX (Type 2) 14.4v Hammerdr/Drill/Driver View Diagrams & Manuals
DW983K-2 (Type 1) 14.4v Adj Clutch Drill/Dri View Diagrams & Manuals
DW984K-2 (Type 1) 14.4v Hammerdrill/Drill/D View Diagrams & Manuals
DW984KV-2 (Type 1) 14.4v Hammerdrill Kit View Diagrams & Manuals
DW985K-2 (Type 1) 14.4v Hammerdrill/Drill/D View Diagrams & Manuals
DW985KV-2 (Type 1) 14.4v Hammerdrill Kit W/ View Diagrams & Manuals
DC983KA (Type 1) 14.4v Drill/Driver View Diagrams & Manuals
DC984KA (Type 1) 14.4v Hammerdrill View Diagrams & Manuals
DC984VA (Type 1) Drill/Driver View Diagrams & Manuals
DC985VA (Type 1) Hammer Drill View Diagrams & Manuals
DC984KA-AR (Type 1) Combination Unit Power Tool View Diagrams & Manuals
DC984KA-B2 (Type 1) Combination Unit Power Tool View Diagrams & Manuals
DC984KA-BR (Type 1) Combination Unit Power Tool View Diagrams & Manuals
Show More Compatible Models
Don't see yours? Try searching our site for :

This item works with the following types of products:

  • Cordless Drill Parts
  • Drill Parts
  • Hammer Drill Parts

This part replaces obsolete part #: 396505-21

Customer Part Reviews ?

5
Average Rating (out of 5):
2 Reviews
Click to filter by ratings:
5 stars
2
4 stars
0
3 stars
0
2 stars
0
1 stars
0
  • Highest Rating
  • Most Recent
< PREV
  • 1
NEXT >
  • Repair made easy
    I was pleased when I was able to find the part I needed on eReplacementParts. The part came without delay and it fit perfectly. My cordless drill is back in operation
    Guest - December 1, 2020 Verified Purchase
    Works as expected.
    Product was in perfect condition. Slightly complicated install, but all works well.
    Guest - November 18, 2019 Verified Purchase
    t
    t
    t - t days ago Verified Purchase
    eReplacementParts Team
    t

    Questions & Answers ?

    Our customer Service team is at the ready daily to answer your part and product questions.

    photo of team member
    Ask our Team

    We have a dedicated staff with decades of collective experience in helping customers just like you purchase parts to repair their products.

    Does this fit my product?

    Questions & Answers for Motor And Pinion


    No questions have been asked yet

    Customer Repair Instructions ?

    All our customer repair instructions are solicited directly from other customers just like you who have purchased and replaced this exact part.

    Easy 15-30 minutes (4 rated repairs)?

    The motor had failed due to a piece of wire getting jammed in it

    Paul - December 15, 2016
    👍 2 of 2 people found this instruction helpful
    Tool Type

    Cordless Drill

    Difficulty

    Easy

    Time

    30-60 minutes

    Tools Used

    Screwdriver, Pliers

    1. Checked excellent eReplacementparts video on YouTube first. Really excellent
    2. Opened the case
    3. Disconnecting brush wires
    4. Removed old motor
    5. Cleaned and repacked transmission while it was open
    6. Inserted new motor checking alignment as per video
    7. Closed case
    8. Attached brush wires
    9. Put end cover back on
    Tested
    Did you find this story helpful?
    Thanks for voting and helping fellow customers!

    Sparks from the motor

    James - December 15, 2015
    👍 2 of 2 people found this instruction helpful
    Tool Type

    Cordless Drill

    Difficulty

    Easy

    Time

    Less than 15 minutes

    Tools Used

    Screwdriver

    Remove the screws from the housing and the battery. Take one half of the housing off .Take a picture of the internal parts. Remove the defective motor and install the new motor, make sure all the internal part are place where they should be. Replace the screws in the housing. Done.
    Did you find this story helpful?
    Thanks for voting and helping fellow customers!

    Smoking during use

    John - March 6, 2018
    👍 1 of 1 people found this instruction helpful
    Tool Type

    Hammer Drill

    Difficulty

    Easy

    Time

    15-30 minutes

    Tools Used

    Screwdriver, Pliers, Torx driver

    Removed all torx screws from rear cover, then from transmission cover then remaining from handle. Separate halves
    Critical to note orientation of motor as viewed from back and orientation of transmission
    Remove wire connections and motor,
    Clean housing and old grease as needed.
    Install new motor with same wire holder and motor adaptor in back end of housing
    Connector wires in proper orientation green to positive side.
    Replace other half of housing.
    Install transmission to motor with tension pin in proper orientation, direction lever in forward Position and torque lever in the #2 position. Slide together.
    Reinstall torx screws in transmission housing
    Reinstall torx screws in handle halves
    Reinstall Motor cover onto back and reinstall torx screws


    Did you find this story helpful?
    Thanks for voting and helping fellow customers!

    Smoking and sparking drill

    Jim - May 22, 2016
    👍 1 of 1 people found this instruction helpful
    Tool Type

    Cordless Drill

    Difficulty

    Medium

    Time

    15-30 minutes

    Tools Used

    Screwdriver, Pliers

    Easy fix. I did not know the new motor already has the brush set in place ( I also ordered a set of brushes). Now I have a back up set of brushes. After taking the drill casing 1/2 off, I used my cell to take pictures just in case I had problems getting the drill back together. I will say this as a piece of advice for all: Any time you remove any screws from a plastic case, when you are putting the tool back together you should always first turn the screw backwards until you feel a slight click from the screw trying to seat itself. Then change direction to clockwise to drive the screw in. This will keep you from striping the plastic case screw hole.
    Did you find this story helpful?
    Thanks for voting and helping fellow customers!

    OEM stands for Original Equipment Manufacturer and means the part you’re buying is sourced directly from the manufacturer who made your product. At eReplacementParts, we sell only genuine OEM parts, guaranteeing the part you’re purchasing is of better design and of higher quality than aftermarket parts.

    Our product descriptions are a combination of data sourced directly from the manufacturers who made your product as well as content researched and curated by our content & customer service teams. This content is edited and reviewed internally before being made public to customers.

    Our customer service team are at the ready daily to answer your part and product questions. We have a dedicated staff with decades of collective experience in helping customers just like you purchase parts to repair their products.

    All our part reviews are solicited directly from other customers who have purchased this exact part. While we moderate these reviews for profanity, offensive language or personally identifiable information, these reviews are posted exactly as submitted and no alterations are made by our team.

    All our customer repair instructions are solicited directly from other customers just like you who have purchased and replaced this exact part. While we moderate these reviews for profanity, offensive language or personally identifiable information, these reviews are posted exactly as submitted and no alterations are made by our team.

    Based on data from past customer purchasing behaviors, these parts are most commonly purchased together along with the part you are viewing. These parts may be necessary or helpful to replace to complete your current repair.

    All our installation videos are created and produced in collaboration with our in-house repair technician, Mark Sodja, who has helped millions of eReplacementParts customers over the last 13 years repair their products. Mark has years of experience in selling and repairing both commercial and residential products with a specialty in gas-powered equipment.

    This data is collected from customers who submitted a repair instruction after replacing this exact part. Customers can rate how easy the repair was to complete and how long it took. We aggregate this data to provide a repair rating that allows customers to quickly determine the difficulty and time needed to perform their own repair.

    eReplacementParts.com
    7174 South 400 West
    Suite 5
    Midvale, UT 84047
    visa mastercard discover american express PayPal