


Genuine Hamilton Beach replacement kit.
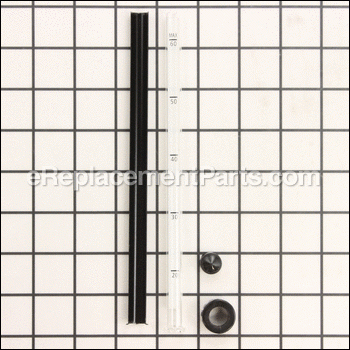
The purpose of this Gauge is to let you know how much water to pour into the Coffee Pot, it is gauged to let you know how many cups you want to make.
Once the Coffee is made it lets you know how much Coffee you have left in the pot.
Water Gauge 990044300
OEM part for: Hamilton Beach
Part Number: 990044300
$10.02
Usually ships in 7 - 12 business days
7 - 12 business days
Jump To:
Product Description ?
- Classification: Part
- Weight: 0.01 lbs.
- Shipping: Ships Worldwide
Frequently Purchased Together ?


Compatibility
This part will fit the following 2 machines
Hamilton Beach
D50065 (A-B) Commercial Coffee Pot View Diagrams & Manuals
D50065C (A-B) Commercial Coffee Pot View Diagrams & Manuals
This item works with the following types of products:
- Coffee Maker Parts
Customer Part Reviews ?
Average Rating (out of 5):
Click to filter by ratings:
5 stars
7
4 stars
1
3 stars
0
2 stars
0
1 stars
0
< PREV
- 1
Muy buena, excelente, estoy satisfecho.
La cafetera de 60 tazas con su pieza de remplazo de indicador de agua 360°, quedo nueva nuevamente y funcionando a perfección.
iGlobal -
September 12, 2023
Verified Purchase
Customer Service and part
Customer service is the most important quality I look for in a company! The service rep was knowledgeable, helpful and patient with my questions. The coffee urn part was shipped that day and I was able to fix it as soon as I received it a few days later. I will always begin my search for parts with this company first!
Guest -
November 9, 2022
Verified Purchase
Easy repair. Detailed instructions.
fit perfectly, repair easy, great instructions!
Guest -
July 28, 2022
Verified Purchase
Merci la pièce est parfaite
Merci la pièce est parfaite
iGlobal -
November 25, 2021
Verified Purchase
Easy Fix!
Got the water gauge for a 60-cup coffee maker which now makes it functional. Was an easy repair.
Guest -
September 14, 2019
Verified Purchase
Easy to put on
Took about a week to get but arrived in great condition. It was very simple to install and works great.
Guest -
September 10, 2019
Verified Purchase
Water Gage
The part was packaged for travel and arrived same and in good order
Guest -
April 24, 2019
Verified Purchase
Broken part
When we installed our part it broke immediately. I called and they replaced the part immediately. The second attempt worked fine. Very courteous staff to work with.
Guest -
November 26, 2019
Verified Purchase
t
t
t -
t days ago
Verified Purchase
eReplacementParts Team
t
Questions & Answers ?
Our customer Service team is at the ready daily to answer your part and product questions.

Ask our Team
We have a dedicated staff with decades of collective experience in helping customers just like you purchase parts to repair their products.
Does this fit my product?Questions & Answers for Water Gauge
I have the water gauge in tact but what's missing is the rubber band or washer that stops water from leaking. Is that included in the replacement part or can I purchase that part?
Lesley
for model number D50065
asked on 2022-12-07
Hi Lesley,
Thank you for your question. The part number listed under your model number for the water window gauge gasket is 990092500. If you need help placing an order for it, customer service is open 7 days a week and anyone will be happy to assist you. Please feel free to give us a call. We look forward to hearing from you!
eReplacementParts Team December 07, 2022
Customer Repair Instructions ?
All our customer repair instructions are solicited directly from other customers just like you who have purchased and replaced this exact part.
Replaced the glass level tube
Johnny - April 19, 2016
👍 11 of 12 people found this instruction helpful
Tool Type
Coffee Maker
Difficulty
Easy
Time
Less than 15 minutes
Tools Used
, None
Parts Used
Unscrew plastic nut on bottom of tube,remove old tube. Reuse old rubber washer on the bottom of the tube replace the new tube, tighten plastic nut. Check for leaks.
Did you find this story helpful?
Thanks for voting and helping fellow customers!
Someone washing the coffee pot dropped it a little and broke the glass water gauge.
Christopher - April 25, 2018
👍 5 of 5 people found this instruction helpful
Tool Type
Coffee Maker
Difficulty
Easy
Time
Less than 15 minutes
Tools Used
, Tighten by hand
Parts Used
1.0 Unscrew the broken seal at the bottom of the water gauge by hand.
2.0 Remove the broken water gauge.
3.0 Temporarily remove the cap on top of the new water gauge.
4.0 Insert the top of the new water gauge through the top bracket on the coffee maker (the bracket rotates +/- about 30 degrees to allow this).
5,0 Set the bottom of the new water gauge on the sealing flange at the bottom.
6.0 Ensure the writing on the glass gauge is centered outward.
7.0 Hand Tighten the seal nut onto the threads at the bottom of the gauge.
8.0 Put the cap (see step 3.0) back on the top of the water gauge (we have to put a strip of tape over it to ensure it stays on day in and day out).
Did you find this story helpful?
Thanks for voting and helping fellow customers!
Broken gauge
Artie - February 12, 2016
👍 5 of 7 people found this instruction helpful
Tool Type
Coffee Maker
Difficulty
Easy
Time
Less than 15 minutes
Tools Used
, None
Parts Used
Just a matter of unscrewing the top of water gauge and placing the new one in place.
Did you find this story helpful?
Thanks for voting and helping fellow customers!
No water level gauge
samantha - June 17, 2018
👍 1 of 1 people found this instruction helpful
Tool Type
Coffee Maker
Difficulty
Easy
Time
Less than 15 minutes
Tools Used
Adjustable Wrench, My husband
Parts Used
Did you find this story helpful?
Thanks for voting and helping fellow customers!
Water gauge broke while cleaning.
Ron - May 16, 2018
Tool Type
Coffee Maker
Difficulty
Easy
Time
15-30 minutes
Tools Used
Parts Used
1 Remove broken water gauge
2 Remove faucet
3 Clean urn
4 Replace the new faucet
5 Replace the new water gauge.
6 Completed
2 Remove faucet
3 Clean urn
4 Replace the new faucet
5 Replace the new water gauge.
6 Completed
Did you find this story helpful?
Thanks for voting and helping fellow customers!
Faucet and water gauge was broken
Philip - March 23, 2018
Tool Type
Coffee Maker
Difficulty
Easy
Time
Less than 15 minutes
Tools Used
Pliers
Parts Used
Took the old off and easily put the new on. Uses pliers to hold and tighten.
Did you find this story helpful?
Thanks for voting and helping fellow customers!
Spout handle and glass sight tube broken
David - February 22, 2018
Tool Type
Coffee Maker
Difficulty
Easy
Time
Less than 15 minutes
Tools Used
Wrench Set
Parts Used
Removed old parts, installed new parts
Did you find this story helpful?
Thanks for voting and helping fellow customers!
Water gauge was broken.
Thomas - October 16, 2017
Tool Type
Coffee Maker
Difficulty
Easy
Time
Less than 15 minutes
Tools Used
Parts Used
Unscrewed the coupler and removed the damaged gauge from the retaining ring. Removed the cap from the new gauge. Slid the new gauge into the retaining ring. Then, tightened the coupler and reinstalled the cap. No tools required.
Did you find this story helpful?
Thanks for voting and helping fellow customers!
Broken gauge glass
lorenz - August 31, 2017
Tool Type
Coffee Maker
Difficulty
Easy
Time
Less than 15 minutes
Tools Used
Parts Used
Removed top cap on gauge glass, removed broken gauge glass. Replaced gauge glass with new. Replaced top cap. Checked for leaks OK
Did you find this story helpful?
Thanks for voting and helping fellow customers!
Glass tube on the exterior of the coffee pot broke.
Debra - July 31, 2017
Tool Type
Coffee Maker
Difficulty
Easy
Time
Less than 15 minutes
Tools Used
Parts Used
Removed the broken pieces and washed off the small bits of glass. Put the new tube on and screwed the end on. No tools needed. Works great!
Did you find this story helpful?
Thanks for voting and helping fellow customers!
Load More Install Stories
OEM stands for Original Equipment Manufacturer and means the part you’re buying is sourced directly from the manufacturer who made your product. At eReplacementParts, we sell only genuine OEM parts, guaranteeing the part you’re purchasing is of better design and of higher quality than aftermarket parts.
Our product descriptions are a combination of data sourced directly from the manufacturers who made your product as well as content researched and curated by our content & customer service teams. This content is edited and reviewed internally before being made public to customers.
Our customer service team are at the ready daily to answer your part and product questions. We have a dedicated staff with decades of collective experience in helping customers just like you purchase parts to repair their products.
All our part reviews are solicited directly from other customers who have purchased this exact part. While we moderate these reviews for profanity, offensive language or personally identifiable information, these reviews are posted exactly as submitted and no alterations are made by our team.
All our customer repair instructions are solicited directly from other customers just like you who have purchased and replaced this exact part. While we moderate these reviews for profanity, offensive language or personally identifiable information, these reviews are posted exactly as submitted and no alterations are made by our team.
Based on data from past customer purchasing behaviors, these parts are most commonly purchased together along with the part you are viewing. These parts may be necessary or helpful to replace to complete your current repair.
All our installation videos are created and produced in collaboration with our in-house repair technician, Mark Sodja, who has helped millions of eReplacementParts customers over the last 13 years repair their products. Mark has years of experience in selling and repairing both commercial and residential products with a specialty in gas-powered equipment.
This data is collected from customers who submitted a repair instruction after replacing this exact part. Customers can rate how easy the repair was to complete and how long it took. We aggregate this data to provide a repair rating that allows customers to quickly determine the difficulty and time needed to perform their own repair.