


Genuine Porter Cable replacement part, this item is sold individually.
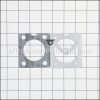
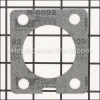
Head Gasket Sold Separately.
This part is used in the all of the compressors models listed below.
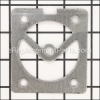
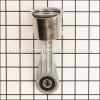
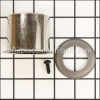
When air is pumped by the piston it passes through the Valve Plate into the compressor tank.
There are reeds on the valve plate that will eventually wear out, and the Valve plate will need to be replace.
It is advisable at this time to replace the Graphite Gasket Kit, part number D30139.
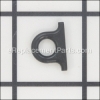
Valve Plate With Lower Gasket N017592SV
OEM part for: Porter Cable, Delta, DeWALT, DeVilbiss, Black and Decker, Craftsman, Bostitch, Stanley, Husky
Part Number: N017592SV
$14.72
In Stock
Jump To:
Product Description ?
- Classification: Part
- Weight: 0.25 lbs.
- Shipping: Ships Worldwide
Frequently Purchased Together ?
Compatibility
This part will fit the following 308 machines
Porter Cable
CF1400 Pancake Air Compressor View Diagrams & Manuals
CF2600 Type 0 Pancake Air Compressor View Diagrams & Manuals
CF2600 Type 1 Pancake Air Compressor View Diagrams & Manuals
CF2600 Type 2 Pancake Air Compressor View Diagrams & Manuals
CPFAC2040P Type 0 Pancake Compressor View Diagrams & Manuals
CPFAC2040P Type 1 Pancake Compressor View Diagrams & Manuals
CPFAC2040P Type 2 Pancake Compressor View Diagrams & Manuals
CPFAC2040P Type 3 Pancake Compressor View Diagrams & Manuals
CPFAC2600P Type 0 2 HP 6-Gallon Pancake Compressor View Diagrams & Manuals
CPFAC2600P Type 1 2 HP 6-Gallon Pancake Compressor View Diagrams & Manuals
CPFAC2600P Type 2 2 HP 6-Gallon Pancake Compressor View Diagrams & Manuals
CPFAC2600P Type 3 2 HP 6-Gallon Pancake Compressor View Diagrams & Manuals
CFFN250N Type 2 Compressor View Diagrams & Manuals
CFFN251T Compressor View Diagrams & Manuals
CFBN220 Type 0 A 2HP 6G PC UM 1STG 120 Compressor View Diagrams & Manuals
CFBN220 Type 1 A 2HP 6G PC UM 1STG 120 Compressor View Diagrams & Manuals
CFFN250B Type 2 A 2HP 6G PC UM 1STG 120 Compressor View Diagrams & Manuals
CFFN250B Type 3 A 2HP 6G PC UM 1STG 120 Compressor View Diagrams & Manuals
CFFN250T Type 0 Nailer/Compressor View Diagrams & Manuals
E2002 Type 0 A 2HP 4G PC UM 1STG 120 Compressor View Diagrams & Manuals
E2002 Type 1 A 2HP 4G PC UM 1STG 120 Compressor View Diagrams & Manuals
CFBN125A Type 2 A 2HP 6G PC UM 1STG 120 Compressor View Diagrams & Manuals
CFBN125A Type 3 A 2HP 6G PC UM 1STG 120 Compressor View Diagrams & Manuals
CFBN125N Type 0 A 2HP 6G PC UM 1STG 120 Compressor View Diagrams & Manuals
CFBN125N Type 1 A 2HP 6G PC UM 1STG 120 Compressor View Diagrams & Manuals
CFBN200A Type 0 A 2HP 6G PC UM 1STG 120 Compressor View Diagrams & Manuals
CFBN200A Type 2 A 2HP 6G PC UM 1STG 120 Compressor View Diagrams & Manuals
CFBN200A Type 3 A 2HP 6G PC UM 1STG 120 Compressor View Diagrams & Manuals
CFBN217A Type 1 A 2HP 6G PC UM 1STG 120 Compressor View Diagrams & Manuals
CFBN217A Type 2 A 2HP 6G PC UM 1STG 120 Compressor View Diagrams & Manuals
C2005 Type 0 Compressor View Diagrams & Manuals
C2006 Type 0 Compressor View Diagrams & Manuals
C2006 Type 2 Compressor View Diagrams & Manuals
C2006 Type 3 Compressor View Diagrams & Manuals
C2000 Type 0 A 2.5HP 6G PC UM 1STG 120 Compressor View Diagrams & Manuals
C2000 Type 1 A 2.5HP 6G PC UM 1STG 120 Compressor View Diagrams & Manuals
C2001-WK Type 0 A 1.5HP 6G PC UM 1STG 120 Compressor View Diagrams & Manuals
C2002-WK Type 0 1HP 6G Compressor View Diagrams & Manuals
C3001 Type 0 A 3HP 4G SS UM 1STG 120 Compressor View Diagrams & Manuals
C3001 Type 01 A 3HP 4G SS UM 1STG 120 Compressor View Diagrams & Manuals
C3001 Type 1 A 3HP 4G SS UM 1STG 120 Compressor View Diagrams & Manuals
C3001 Type 2 A 3HP 4G SS UM 1STG 120 Compressor View Diagrams & Manuals
CPFAC2600P-W Type 0 A 2HP 6G PC UM 1STG 120 Compressor View Diagrams & Manuals
CPFAC2600P-W Type 1 A 2HP 6G PC UM 1STG 120 Compressor View Diagrams & Manuals
C2025 150 PSI 2.5 Gal Oil-Free Hotdog Compressor View Diagrams & Manuals
C6001 150 PSI 17 Gallon Oil-Free Vertical Portable Compressor View Diagrams & Manuals
C2005 Type 2 Air Compressor View Diagrams & Manuals
C2005 Type 3 Air Compressor View Diagrams & Manuals
CFFN250N Type 0 2.0HP 6g Air Compressor View Diagrams & Manuals
C2006 Type 4 Compressor View Diagrams & Manuals
C2002 Type 2 1HP 6 Gallon Compressor View Diagrams & Manuals
C2002 Type 3 1HP 6 Gallon Compressor View Diagrams & Manuals
C2000-WK Type 0 2.5 Hp Compressor View Diagrams & Manuals
C2000-WK Type 1 2.5 Hp Compressor View Diagrams & Manuals
C2002 Type 0 1 HP 6 Gallon Compressor View Diagrams & Manuals
C2002 Type 4 1 HP 6 Gallon Compressor View Diagrams & Manuals
C2002 Type 5 1 HP 6 Gallon Compressor View Diagrams & Manuals
C2002 Type 7 1 HP 6 Gallon Compressor View Diagrams & Manuals
C2004-WK Type 1 4 GAL Air Compressor View Diagrams & Manuals
C2004-WK Type 3 4 GAL Air Compressor View Diagrams & Manuals
CF6131-P Compressor View Diagrams & Manuals
C2005 Type 5 Compressor View Diagrams & Manuals
C2005 Type 4 Compressor View Diagrams & Manuals
PCFP02003 Compressor View Diagrams & Manuals
C2002 Type 8 1 HP 6 Gallon Compressor View Diagrams & Manuals
C2004 (Type 1) 4gal Compressor View Diagrams & Manuals
C2004 (Type 3) 4gal Compressor View Diagrams & Manuals
C2002M-WK (Type 1) Compressor View Diagrams & Manuals
CFFN250A (Type 0) A 2.0hp 6g Pc Um 1stg 120 View Diagrams & Manuals
CFFN251N-P (Type 0) Finish, Brad & Compressor View Diagrams & Manuals
C2002-WK (Type 3) Finish Nailer Power Tool View Diagrams & Manuals
C2002-WK (Type 4) A 1.5hp 6g Pc Um 1stg 120 Power Tool View Diagrams & Manuals
C2002-WK (Type 5) A 1.5hp 6g Pc Um 1stg 120 Power Tool View Diagrams & Manuals
C2002-WK (Type 7) A 1.5hp 6g Pc Um 1stg 120 Power Tool View Diagrams & Manuals
C2002 (Type 9) 1hp 6gal Compressor Power Tool View Diagrams & Manuals
C2025 (Type 1) Compressor Power Tool View Diagrams & Manuals
C2025 (Type 2) Compressor Power Tool View Diagrams & Manuals
C6001 (Type 0) 17g 150psi Compressr Power Tool View Diagrams & Manuals
C6001 (Type 2) 17g 150psi Compressr Power Tool View Diagrams & Manuals
CF1400 (Type 1) A 1.0hp 4g Pc Um 1stg 120 Power Tool View Diagrams & Manuals
CF6131-P (Type 1) Nailer/Cmprsr Combo Power Tool View Diagrams & Manuals
CFFN250N (Type 1) A 2.0hp 6g Pc Um 1stg 120 Power Tool View Diagrams & Manuals
CFFN251T (Type 0) Nailer Combo Power Tool View Diagrams & Manuals
CPFAC2600P-WK (Type 0) A 2.0hp 6g Pc Um 1stg 120 Power Tool View Diagrams & Manuals
CPFAC2600P-WK (Type 1) A 2.0hp 6g Pc Um 1stg 120 Power Tool View Diagrams & Manuals
CPFAC2600P-WK (Type 2) A 2.0hp 6g Pc Um 1stg 120 Power Tool View Diagrams & Manuals
PCFP02003 (Type 1) Compressor Power Tool View Diagrams & Manuals
PCFP02003 (Type 2) Compressor Power Tool View Diagrams & Manuals
Delta
CP503 Type 0 Compressor View Diagrams & Manuals
CP503 Type 1 Compressor View Diagrams & Manuals
CP503 Type 2 Compressor View Diagrams & Manuals
CP503 Type 3 Compressor View Diagrams & Manuals
DeWALT
D55141 Type 1 Compressor View Diagrams & Manuals
D55141 Type 2 Compressor View Diagrams & Manuals
D55141 Type 3 Compressor View Diagrams & Manuals
D55141 Type 4 Compressor View Diagrams & Manuals
D55141 Type 5 Compressor View Diagrams & Manuals
DWFP55126 (Type 1) Heavy Duty 165 PSI Pancake Compressor View Diagrams & Manuals
D2002M-WK (Type 3) Dewalt Compressor View Diagrams & Manuals
D2002M-WK (Type 4) Dewalt Compressor View Diagrams & Manuals
D2002M-WK (Type 5) Dewalt Compressor View Diagrams & Manuals
D2002M-WK (Type 7) Dewalt Compressor View Diagrams & Manuals
D2002M-WK (Type 8) Dewalt Compressor View Diagrams & Manuals
D55141 (Type 6) Compressor Power Tool View Diagrams & Manuals
DWEC6165 (Type 1) Shell Comp 6.0g 165psi Um Power Tool View Diagrams & Manuals
DWFP55126 (Type 2) Comp 6.0g 150psi Um Power Tool View Diagrams & Manuals
DeVilbiss
3JR69 Type 0 Hand-Carry Compressor View Diagrams & Manuals
3JR69A Type 0 Hand-Carry Compressor View Diagrams & Manuals
CPFAC2600P-WK Type 2 Hand-Carry Compressor View Diagrams & Manuals
EXFA2080SV Type 0 Workshop/Auto Compressor View Diagrams & Manuals
FA750 Type 0 Workshop/Auto Compressor View Diagrams & Manuals
FA750 Type 1 Workshop/Auto Compressor View Diagrams & Manuals
FA750 Type 2 Workshop/Auto Compressor View Diagrams & Manuals
HFAC100 Type 0 Workshop/Auto Compressor View Diagrams & Manuals
HFAC100 Type 1 Workshop/Auto Compressor View Diagrams & Manuals
IRSFAC28 Type 0 Workshop/Auto Compressor View Diagrams & Manuals
IRSFAC28 Type 2 Workshop/Auto Compressor View Diagrams & Manuals
Y6010-WK Type 0 Compressor View Diagrams & Manuals
HFAC153 Type 0 1.5 HP 3G HD Air Compressor View Diagrams & Manuals
HFAC153 Type 1 1.5 HP 3G HD Air Compressor View Diagrams & Manuals
HFAC153 Type 2 1.5 HP 3G HD Air Compressor View Diagrams & Manuals
HFAC153 Type 3 1.5 HP 3G HD Air Compressor View Diagrams & Manuals
HFAC153 Type 4 1.5 HP 3G HD Air Compressor View Diagrams & Manuals
EXFAC200 Type 0 125 PSI Air Compressor View Diagrams & Manuals
EXFAC200 Type 1 125 PSI Air Compressor View Diagrams & Manuals
PAFAC153 Type 0 1.5 HP 3G Compressor View Diagrams & Manuals
PAFAC153 Type 1 1.5HP 3G Compressor View Diagrams & Manuals
PAFAC153 Type 2 1.5HP 3G Compressor View Diagrams & Manuals
PAFAC153 Type 3 1.5HP 3G Compressor View Diagrams & Manuals
PAFAC153 Type 4 1.5HP 3G Compressor View Diagrams & Manuals
EXFAC125 (Type 2) 1 HP 2.5 Gallon Compressor View Diagrams & Manuals
EXFAC125 (Type 3) 1 HP 2.5 Gallon Compressor View Diagrams & Manuals
PFACS2X4 (Type 0) A 2.0 Hp 4G Pc Um 1Stg 120 Compressor View Diagrams & Manuals
RA102D (Type 0) A .75Hp 2G Mm Um 1Stg Air Compressor View Diagrams & Manuals
RA102D (Type 1) A .75Hp 2G Mm Um 1Stg Air Compressor View Diagrams & Manuals
RAFA125 (Type 1) A 1.0Hp 2.5G Md Um 1Stg 1 Air Compressor View Diagrams & Manuals
RAFA125 (Type 2) A 1.0Hp 2.5G Md Um 1Stg 1 Air Compressor View Diagrams & Manuals
RAFA125 (Type 3) A 1.0Hp 2.5G Md Um 1Stg 1 Air Compressor View Diagrams & Manuals
RAFA125 (Type 4) A 1.0Hp 2.5G Md Um 1Stg 1 Air Compressor View Diagrams & Manuals
WB-100D (Type 1) A .75Hp 0G Nt Um 1Stg 120 Compressor View Diagrams & Manuals
WB-100D (Type 2) A .75Hp 0G Nt Um 1Stg 120 Compressor View Diagrams & Manuals
WB-100D-WK (Type 1) A .75Hp 0G Nt Um 1Stg 120 Compressor View Diagrams & Manuals
XE-7D (Type 0) A .75Hp 0G Nt Um 1Stg 120 Compressor View Diagrams & Manuals
XE-7D (Type 1) A .75Hp 0G Nt Um 1Stg 120 Compressor View Diagrams & Manuals
XE-7D (Type 2) A .75Hp 0G Nt Um 1Stg 120 Compressor View Diagrams & Manuals
XE-7D-WK (Type 1) A .75Hp 0G Nt Um 1Stg 120 Compressor View Diagrams & Manuals
YD76B (Type 3) A 2.0Hp 4G Pc Um 1Stg 120 Compressor View Diagrams & Manuals
Y6020-WK (Type 0) A 5.2hp 25g Vp Um 1stg 12 View Diagrams & Manuals
Y6020-WK (Type 1) A 5.2hp 25g Vp Um 1stg 12 View Diagrams & Manuals
FA750SV2-2 (Type 2) A .75hp 0g Nt Um 1stg 120 View Diagrams & Manuals
HFAC100-WK (Type 1) A 1.0hp 0g Nt Um 1stg 120 View Diagrams & Manuals
IRC1D (Type 2) A .75hp 0g Nt Um 1stg 120 View Diagrams & Manuals
IRFA100 (Type 0) A 1.0hp 0g Nt Um 1stg 120 View Diagrams & Manuals
PAFA125SV1 (Type 1) A 1.0hp 2.5g Md Um 1stg 2 View Diagrams & Manuals
PAFAC750 (Type 0) A .75hp 0g Nt Um 1stg 120 View Diagrams & Manuals
EXFAC100 (Type 0) A 1.0hp 0g Nt Um 1stg 120 View Diagrams & Manuals
EXFAC100 (Type 1) A 1.0hp 0g Nt Um 1stg 120 View Diagrams & Manuals
EXFAC28S1 (Type 1) A 2.0hp 8g Hp Um 1stg 120 View Diagrams & Manuals
GFAC100 (Type 0) A 1.0hp 0g Nt Um 1stg 120 View Diagrams & Manuals
GFAC100 (Type 1) A 1.0hp 0g Nt Um 1stg 120 View Diagrams & Manuals
PAFA125 (Type 7) A 1.0hp 2.5g Md Um 1stg 1 View Diagrams & Manuals
GFAC1025 (Type 0) A 1.0hp 2.5g Md Um 1stg 1 View Diagrams & Manuals
4YD76 (Type 0) Westward Portable Air Compressor View Diagrams & Manuals
4YD76 (Type 2) Westward Portable Air Compressor View Diagrams & Manuals
4YD76 (Type 3) Westward Portable Air Compressor View Diagrams & Manuals
4YD76 (Type 4) Westward Portable Air Compressor View Diagrams & Manuals
EXFAC2080 (Type 0) A 2.0hp 8g Hp Um 1stg 120 View Diagrams & Manuals
EXFAC2080 (Type 1) A 2.0hp 8g Hp Um 1stg 120 View Diagrams & Manuals
EXFAC23 (Type 0) A 2.0hp 3g Hd Um 1stg 120 View Diagrams & Manuals
EXFAC23 (Type 1) A 2.0hp 3g Hd Um 1stg 120 View Diagrams & Manuals
EXFAC24 (Type 0) A 2.0hp 4g Pc Um 1stg 120 View Diagrams & Manuals
EXFAC24 (Type 2) A 2.0hp 4g Pc Um 1stg 120 View Diagrams & Manuals
EXFAC24 (Type 3) A 2.0hp 4g Pc Um 1stg 120 View Diagrams & Manuals
EXFAC24 (Type 4) A 2.0hp 4g Pc Um 1stg 120 View Diagrams & Manuals
EXFAC28S1 (Type 2) A 2.0hp 8g Hp Um 1stg 120 View Diagrams & Manuals
FA125 (Type 1) A 1.0hp 2.5g Md Um 1stg 1 View Diagrams & Manuals
FA125 (Type 2) A 1.0hp 2.5g Md Um 1stg 1 View Diagrams & Manuals
FA125 (Type 3) A 1.0hp 2.5g Md Um 1stg 1 View Diagrams & Manuals
FA125 (Type 4) A 1.0hp 2.5g Md Um 1stg 1 View Diagrams & Manuals
FAC28 (Type 0) A 2.0hp 8g Hp Um 1stg 120 View Diagrams & Manuals
FAC28 (Type 1) A 2.0hp 8g Hp Um 1stg 120 View Diagrams & Manuals
FAC28 (Type 2) A 2.0hp 8g Hp Um 1stg 120 View Diagrams & Manuals
HFA2X4 (Type 0) A 2.0hp 3g Hd Um 1stg 120 View Diagrams & Manuals
HFA2X4 (Type 1) A 2.0hp 3g Hd Um 1stg 120 View Diagrams & Manuals
HFAC28 (Type 0) A 2.0hp 8g Hp Um 1stg 120 View Diagrams & Manuals
HFAC28 (Type 1) A 2.0hp 8g Hp Um 1stg 120 View Diagrams & Manuals
HFAC28 (Type 2) A 2.0hp 8g Hp Um 1stg 120 View Diagrams & Manuals
HFAC28 (Type 3) A 2.0hp 8g Hp Um 1stg 120 View Diagrams & Manuals
HFAC3030 (Type 0) A 3.0hp 3g Hd Um 1stg 120 View Diagrams & Manuals
HFAC3030 (Type 1) A 3.0hp 3g Hd Um 1stg 120 View Diagrams & Manuals
IR102D (Type 0) A .75hp 2g Mm Um 1stg 120 View Diagrams & Manuals
IR102D (Type 1) A .75hp 2g Mm Um 1stg 120 View Diagrams & Manuals
IR102D (Type 2) A .75hp 2g Mm Um 1stg 120 View Diagrams & Manuals
IR102D (Type 3) A .75hp 2g Mm Um 1stg 120 View Diagrams & Manuals
IRC102D (Type 0) A .75hp 2g Mm Um 1stg 120 View Diagrams & Manuals
IRC102D (Type 1) A .75hp 2g Mm Um 1stg 120 View Diagrams & Manuals
IRFA125 (Type 1) A 1.0hp 2.5g Md Um 1stg 1 View Diagrams & Manuals
IRFA125 (Type 2) A 1.0hp 2.5g Md Um 1stg 1 View Diagrams & Manuals
IRFA125 (Type 3) A 1.0hp 2.5g Md Um 1stg 1 View Diagrams & Manuals
IRFA125 (Type 4) A 1.0hp 2.5g Md Um 1stg 1 View Diagrams & Manuals
IRFA153 (Type 0) A 1.5hp 3g Hd Um 1stg 120 View Diagrams & Manuals
IRFA153 (Type 2) A 1.5hp 3g Hd Um 1stg 120 View Diagrams & Manuals
IRFA153 (Type 3) A 1.5hp 3g Hd Um 1stg 120 View Diagrams & Manuals
IRFA153 (Type 4) A 1.5hp 3g Hd Um 1stg 120 View Diagrams & Manuals
PAFA125 (Type 1) A 1.0hp 2.5g Md Um 1stg 1 View Diagrams & Manuals
PAFA125 (Type 2) A 1.0hp 2.5g Md Um 1stg 1 View Diagrams & Manuals
PAFA125 (Type 3) A 1.0hp 2.5g Md Um 1stg 1 View Diagrams & Manuals
PAFA125 (Type 4) A 1.0hp 2.5g Md Um 1stg 1 View Diagrams & Manuals
PAFAC2030 (Type 0) A 2.0hp 3g Hd Um 1stg 120 View Diagrams & Manuals
PAFAC2030 (Type 1) A 2.0hp 3g Hd Um 1stg 120 View Diagrams & Manuals
PAFAC2040 (Type 0) A 2.0hp 4g Pc Um 1stg 120 View Diagrams & Manuals
PAFAC2040 (Type 1) A 2.0hp 4g Pc Um 1stg 120 View Diagrams & Manuals
PAFAC752 (Type 2) A .75hp 2g Mm Um 1stg 120 View Diagrams & Manuals
PAFAC752 (Type 3) A .75hp 2g Mm Um 1stg 120 View Diagrams & Manuals
PFA2X4 (Type 0) A 2.0hp 4g Pc Um 1stg 120 View Diagrams & Manuals
PFA2X4 (Type 2) A 2.0hp 4g Pc Um 1stg 120 View Diagrams & Manuals
PFA2X4 (Type 3) A 2.0hp 4g Pc Um 1stg 120 View Diagrams & Manuals
RAC102D (Type 0) A .75hp 2g Mm Um 1stg 120 View Diagrams & Manuals
RAC102D (Type 1) A .75hp 2g Mm Um 1stg 120 View Diagrams & Manuals
Black and Decker
919-15316 Type 0 Compressor / Nailer View Diagrams & Manuals
919-16537 Type 0 1 Horse Power Compressor View Diagrams & Manuals
919-16537 Type 1 1 Horse Power Compressor View Diagrams & Manuals
919-16537 Type 2 1 Horse Power Compressor View Diagrams & Manuals
919-16538 Type 0 1 Horse Power Compressor View Diagrams & Manuals
919-16538 Type 1 1 Horse Power Compressor View Diagrams & Manuals
919-16538 Type 2 1 Horse Power Compressor View Diagrams & Manuals
919-16538 Type 3 1 Horse Power Compressor View Diagrams & Manuals
919-16644 Type 0 3.0 Horse Power 15 Gallon Compressor View Diagrams & Manuals
919-16644 Type 1 3.0 Horse Power 15 Gallon Compressor View Diagrams & Manuals
919-16644 Type 2 3.0 Horse Power 15 Gallon Compressor View Diagrams & Manuals
919-16726 Type 0 1.5 Horse Power Compressor View Diagrams & Manuals
919-16727 Type 0 1.5 Horse Power Compressor View Diagrams & Manuals
919-16737 Type 0 Compressor View Diagrams & Manuals
919-16738 Type 0 Compressor View Diagrams & Manuals
919-72412 Type 0 3.0 Horse Power 15 Gallon Compressor View Diagrams & Manuals
919-72412 Type 1 3.0 Horse Power 15 Gallon Compressor View Diagrams & Manuals
919-72412 Type 2 3.0 Horse Power 15 Gallon Compressor View Diagrams & Manuals
919-72412 Type 3 3.0 Horse Power 15 Gallon Compressor View Diagrams & Manuals
919-72413 Type 0 3.0 Horse Power 15 Gallon Compressor View Diagrams & Manuals
919-72413 Type 1 3.0 Horse Power 15 Gallon Compressor View Diagrams & Manuals
919-72413 Type 2 3.0 Horse Power 15 Gallon Compressor View Diagrams & Manuals
RCK2-4 Type 1 Compressor / Nailer View Diagrams & Manuals
PM102D (Type 1) Lawn Mower View Diagrams & Manuals
Craftsman
919152160 Air Compressor View Diagrams & Manuals
919167370 Air Compressor View Diagrams & Manuals
919167380 Air Compressor View Diagrams & Manuals
919153160 Air Compressor View Diagrams & Manuals
919167260 Air Compressor View Diagrams & Manuals
919167270 Air Compressor View Diagrams & Manuals
919167244 Air Compressor View Diagrams & Manuals
919166442 Air Compressor View Diagrams & Manuals
919152145 Air Compressor View Diagrams & Manuals
919166441 Air Compressor View Diagrams & Manuals
919167243 Air Compressor View Diagrams & Manuals
919166440 Air Compressor View Diagrams & Manuals
919152144 Air Compressor View Diagrams & Manuals
919152143 Air Compressor View Diagrams & Manuals
919167242 Air Compressor View Diagrams & Manuals
919165381 Air Compressor View Diagrams & Manuals
919165361 Air Compressor View Diagrams & Manuals
919152340 Air Compressor View Diagrams & Manuals
919165370 Air Compressor View Diagrams & Manuals
919165281 Air Compressor View Diagrams & Manuals
919165282 Air Compressor View Diagrams & Manuals
919152142 Air Compressor View Diagrams & Manuals
919165360 Air Compressor View Diagrams & Manuals
919165380 Air Compressor View Diagrams & Manuals
919152141 Air Compressor View Diagrams & Manuals
919165240 Air Compressor View Diagrams & Manuals
919165280 Air Compressor View Diagrams & Manuals
919152350 Air Compressor View Diagrams & Manuals
919152120 Air Compressor View Diagrams & Manuals
919165040 Air Compressor View Diagrams & Manuals
919150340 Air Compressor View Diagrams & Manuals
919152040 Air Compressor View Diagrams & Manuals
919162080 Air Compressor View Diagrams & Manuals
919150200 Air Compressor View Diagrams & Manuals
919150390 Air Compressor View Diagrams & Manuals
919162120 Air Compressor View Diagrams & Manuals
919150360 Air Compressor View Diagrams & Manuals
919150260 Compact Air Compressor View Diagrams & Manuals
919150330 Compressor View Diagrams & Manuals
919150210 Compressor View Diagrams & Manuals
919150331 Air Compressor View Diagrams & Manuals
919150311 Air Compressor View Diagrams & Manuals
919150310 Compressor View Diagrams & Manuals
919152042 Permanently Lubricated Compressor View Diagrams & Manuals
919152020 Air Compressor View Diagrams & Manuals
919162121 Air Compressor View Diagrams & Manuals
919152041 Air Compressor View Diagrams & Manuals
91915216 Compressor View Diagrams & Manuals
919167241 Air Compressor View Diagrams & Manuals
919165041 Air Compressor View Diagrams & Manuals
919167240 Air Compressor View Diagrams & Manuals
919167160 Air Compressor View Diagrams & Manuals
919152140 Air Compressor View Diagrams & Manuals
919167141 Air Compressor View Diagrams & Manuals
919151360 Air Compressor View Diagrams & Manuals
919154210 Compressor View Diagrams & Manuals
919154310 Compressor View Diagrams & Manuals
Bostitch
BTFP02011 (Type 1) 6G 150Psi Compressor View Diagrams & Manuals
BTFP02012 (Type 1) Comp 6.0g 150psi Umc View Diagrams & Manuals
BTFP02011 (Type 2) 6g 150psi Compressor Power Tool View Diagrams & Manuals
BTFP02011 (Type 3) 6g 150psi Compressor Power Tool View Diagrams & Manuals
BTFP02012 (Type 2) Comp 6.0g 150psi Umc Power Tool View Diagrams & Manuals
Stanley
STFP12799 (Type 1) 1 Tool Combo Kit - Swk185 View Diagrams & Manuals
Husky
Y6020-WK (Type 0) Air Compressor Pump 5.2hp 25g View Diagrams & Manuals
Y6020-WK (Type 1) Air Compressor Pump 5.2hp 25g View Diagrams & Manuals
Show More Compatible Models
This item works with the following types of products:
- Compressor Parts
This part replaces obsolete part #: N017592, Z-A08548
Repair Videos ?
Watch the Repair Video for
Valve Plate With Lower Gasket

Articles:
|
Expertly and economically remove and install the valve plate assembly on an air compressor. ...
November 20, 2014
|

Customer Part Reviews ?
Average Rating (out of 5):
Click to filter by ratings:
5 stars
19
4 stars
4
3 stars
0
2 stars
0
1 stars
0
< PREV
- 1
- 2
- 3
Not building up enough pressure to shut off
Part was exact fit works great
ray -
August 21, 2023
Verified Purchase
Easy Repair
with the right parts, it becomes an easy repair and operates like new.
iGlobal -
July 25, 2023
Verified Purchase
Quality parts, good service.
The parts for my compressor came quickly and fit perfectly. I was able to fix the unit and save hundreds of dollars repairing it instead of replacing it.
Guest -
May 30, 2023
Verified Purchase
Great
Very easy repair, fit perfectly
Guest -
May 16, 2023
Verified Purchase
Excellent user friendly website.
Part arrived very quickly, excellent condition, perfect fit.
Guest -
May 3, 2023
Verified Purchase
worked as expected. Arrived fast
Valve Plate with lower gasket for a cratfsmen compressor Parts came very quickly and were correct work perfect.
Guest -
March 24, 2023
Verified Purchase
Great parts - working as new
Parts and instructions work as new and fit great. Thank You
Ronald -
February 5, 2023
Verified Purchase
Air compressor parts were an exact fit!
The customer service lady was courteous and helpful, the parts received were an exact fit, and my compressor is running like new. Thanks so much
Guest -
November 19, 2022
Verified Purchase
Great part
The part was shipped in a timely manner and was a new part. Thanks!
Anonymous -
February 26, 2022
Verified Purchase
Valve repair
The part came quickly and was correct as advertised. The video on replacement was very helpful. Up and running.
Guest -
December 1, 2021
Verified Purchase
t
t
t -
t days ago
Verified Purchase
eReplacementParts Team
t
Questions & Answers ?
Our customer Service team is at the ready daily to answer your part and product questions.

Ask our Team
We have a dedicated staff with decades of collective experience in helping customers just like you purchase parts to repair their products.
Does this fit my product?Questions & Answers for Valve Plate With Lower Gasket
No questions have been asked yet
Customer Repair Instructions ?
All our customer repair instructions are solicited directly from other customers just like you who have purchased and replaced this exact part.
My compressor started leaking air!
Edward - April 5, 2016
👍 23 of 24 people found this instruction helpful
Tool Type
Compressor
Difficulty
Medium
Time
30-60 minutes
Tools Used
Screwdriver, Pliers, Socket set, Long Allen wrenches
When the motor stopped I could hear air leaking from somewhere inside the motor/compressor unit. I removed the screws holding the motor housing together and exposed the compressor. Air was leaking from a pinhole in the compressor cylinder head! I bled off the remaining air in the tank and filled the pinhole with epoxy. I assumed this was a defect in the casting. Wrong! The compressor stopped leaking air but now it was making weird noises. The hole is there to bleed off the air between the cylinder and the tank once the motor stops. The problem was a failed check valve. Air flows from the cylinder to the tank when the compressor is on. When the compressor stops, the check valve prevents the air from escaping from the tank back into the cylinder. Once you understand how the thing works fixing it is easy! Bought a new check valve from eReplacementParts. Took 2 minutes to remove the old one and install the new one. Replaced the cylinder head I ruined. While I had it apart I also replaced the valve plate. Works perfectly! The Porter Cable service center said to buy a new compressor! Fixing mine was so much more satisfying. eReplacementParts had what I needed.
Did you find this story helpful?
Thanks for voting and helping fellow customers!
blown head gasket
Konrad - May 30, 2016
👍 11 of 12 people found this instruction helpful
Tool Type
Compressor
Difficulty
Easy
Time
30-60 minutes
Tools Used
Screwdriver, Pliers, Nutdriver, 1/4 drive ratchet
This repair covers a blown head gasket on a Porter Cable pancake compressor.
While using the machine, it started making a strange noise and refused to develop pressure.
Using a socket drive I disconnected the high pressure hose exiting the motor/pump cover going to the one way check valve mounted on the tank.
Using a Philips head screwdriver, I removed the two screws holding the housing in place near the tank brackets.
Using a torx driver I removed the screws holding the two motor/pump cases together, pushed the assembly forward from the mounting brackets and then separated the plastic cases.
There are rubber mounting feet placed at various locations keeping the pump and motor mounted to the plastic cases. Be certain to retain all of these square feet. If one or more are lost, they are available at this site as a separate part number.
Once again, using a nut driver, I removed the pump head (four screws) and separated the gaskets, valve assembly and O-ring. This is when I discovered the missing piece of head gasket. As the parts were so inexpensive, I ordered everything except the head casting itself.
The gasket kit I received had a replacement gasket to go with the new valve assembly that no longer used the O-ring. The gasket kit contained an O-ring had I used the old valve assembly.
Installing the head required using a cross-tightening pattern for installing the head bolts. As I had no specifics regarding the actual torque suggested for the head bolts, I tightened them to a level I thought appropriate without stripping the cylinder threaded holes.
Re-assembly was a reversal of the process listed above.
Silly me! Had I known the repair was going to be successful, I would have ordered motor brushes as they are worn more than half way and are only another $20. Now I need to order additional parts and separate the motor/pump casing halves again in order to replace the brushes.
KL
Did you find this story helpful?
Thanks for voting and helping fellow customers!
The compressor wouldn't build pressure.
John - April 14, 2016
👍 6 of 7 people found this instruction helpful
Tool Type
Compressor
Difficulty
Easy
Time
15-30 minutes
Tools Used
Screwdriver, Pliers, Socket set, Nutdriver, Adjustable Wrench, Thread seal tape
I had disassembled the compressor earlier to discover the reason it wouldn't work. Upon arrival of the parts, I found all of the items that I had ordered were very well packed and accompanied by complete diagrams and instructions. This repair could not have gone any better! The order was processed faster than I had expected and the tracking of my order was extremely accurate. I will absolutely order parts again for any of my power tools as needed.
Did you find this story helpful?
Thanks for voting and helping fellow customers!
The valve plate had a broken tab, which was causing the air compressor to run without building pressure.
joey - May 18, 2018
👍 4 of 5 people found this instruction helpful
Tool Type
Compressor
Difficulty
Easy
Time
15-30 minutes
Tools Used
Socket set, Nutdriver
Parts Used
Removed the plastic housing.
Removed the motor and then removed the head gasket.
Then removed the defective part and installed the new one.
Put it all back together and it runs like a new one.
It holds pressure without any leak down.
Thanks ereplacementparts for quick shipping and quality part. You made my life easier and if I can do it anyone can. I will definitely use you for all of my future repairs.
Did you find this story helpful?
Thanks for voting and helping fellow customers!
leaking air
Rick - September 11, 2018
👍 1 of 1 people found this instruction helpful
Tool Type
Compressor
Difficulty
Easy
Time
15-30 minutes
Tools Used
Screwdriver, Pliers, Torx drivers
Replaced the head plate and gaskets with the pressure switch. Very easy and eliminated the air leak. May not have needed the head plate and gasket but were replaced out of maintenance. Compressor works as new.
Did you find this story helpful?
Thanks for voting and helping fellow customers!
compressor not building pressure quickly
Clark - December 2, 2021
Tool Type
Compressor
Difficulty
Medium
Time
30-60 minutes
Tools Used
Screwdriver, Power Drill, Socket set, Nutdriver, na
Parts Used
Repair went exactly as the Ereplacement video described.
Did you find this story helpful?
Thanks for voting and helping fellow customers!
one of the 3 valves was broken in head.
Jim - May 10, 2021
Tool Type
Compressor
Difficulty
Medium
Time
30-60 minutes
Tools Used
Screwdriver, Pliers, Socket set, Wrench Set, Adjustable Wrench, torque wrench in.lbs.
1-removed compressor from tank. 2-removed outer plastic housings two halves. 3-removed head assembly. 4-clean old gaskets and remove old seals. 5-install new head,seals,and gaskets. 6-install pump assembly into both outer housings. 7-install pump assy. back onto tank.
Did you find this story helpful?
Thanks for voting and helping fellow customers!
reed valve was broken
Roger - October 15, 2020
Tool Type
Compressor
Difficulty
Easy
Time
1-2 hours
Tools Used
Socket set, Nutdriver
removed the head removed the rod and cylinder installed new piston ring and cylinder installed new reed valve plate and gaskets assembled back together pumping air now
Did you find this story helpful?
Thanks for voting and helping fellow customers!
compressor not building pressure
Isidro - June 19, 2020
Tool Type
Compressor
Difficulty
Medium
Time
15-30 minutes
Tools Used
Screwdriver, Wrench Set
Parts Used
1. disconnect air line from compressor to tank
2. removed retaining screws on bottom of plastic case to slide compressor out of position
3. open plastic case by removing screws holding case hales together
4. removed copper air line. Faulty airline seal evident.
5. removed four hex head screws at top of cylinder
6. replaced valve, gaskets after cleaning and inspecting cylinder for wear.
7. Note: clean air line and position new air line gasket on tube first, then insert gasket and tube in cylinder head recess for gasket. Inserting tube after assembly is almost impossible.
8. assembly is reverse of disassembly
Did you find this story helpful?
Thanks for voting and helping fellow customers!
Compressor not building air
Michael - April 4, 2020
Tool Type
Compressor
Difficulty
Easy
Time
30-60 minutes
Tools Used
Screwdriver, Socket set
Parts Used
Removed all screws in housing, & 2 screws at the bottom holding the housing to the tank. Remove supply tube at the tank.Split the housing into & remove pump assembly. Remove 4 bolts in the head, Removed & replaced the valve plate & gaskets. Reassembled torquing the head bolts in a star pattern.
Did you find this story helpful?
Thanks for voting and helping fellow customers!
Load More Install Stories
OEM stands for Original Equipment Manufacturer and means the part you’re buying is sourced directly from the manufacturer who made your product. At eReplacementParts, we sell only genuine OEM parts, guaranteeing the part you’re purchasing is of better design and of higher quality than aftermarket parts.
Our product descriptions are a combination of data sourced directly from the manufacturers who made your product as well as content researched and curated by our content & customer service teams. This content is edited and reviewed internally before being made public to customers.
Our customer service team are at the ready daily to answer your part and product questions. We have a dedicated staff with decades of collective experience in helping customers just like you purchase parts to repair their products.
All our part reviews are solicited directly from other customers who have purchased this exact part. While we moderate these reviews for profanity, offensive language or personally identifiable information, these reviews are posted exactly as submitted and no alterations are made by our team.
All our customer repair instructions are solicited directly from other customers just like you who have purchased and replaced this exact part. While we moderate these reviews for profanity, offensive language or personally identifiable information, these reviews are posted exactly as submitted and no alterations are made by our team.
Based on data from past customer purchasing behaviors, these parts are most commonly purchased together along with the part you are viewing. These parts may be necessary or helpful to replace to complete your current repair.
All our installation videos are created and produced in collaboration with our in-house repair technician, Mark Sodja, who has helped millions of eReplacementParts customers over the last 13 years repair their products. Mark has years of experience in selling and repairing both commercial and residential products with a specialty in gas-powered equipment.
This data is collected from customers who submitted a repair instruction after replacing this exact part. Customers can rate how easy the repair was to complete and how long it took. We aggregate this data to provide a repair rating that allows customers to quickly determine the difficulty and time needed to perform their own repair.