

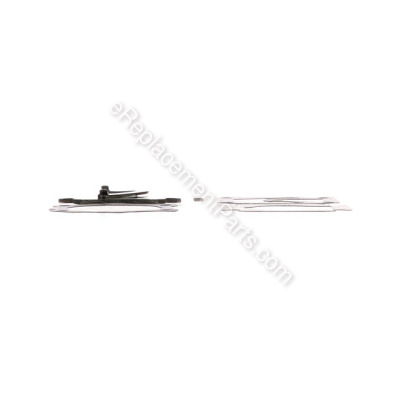


This is a genuine manufacturer sourced replacement kit designed for use with Campbell Hausfeld air compressors. Includes: Valve Plate, 2 Reed Valves & Pins, 3 Gaskets. The purpose of the valve plate is to allow into the cylinder. Once the piston starts traveling up the reeds on the valve plate open and air is sent into the air tank.
Overtime the valves and gaskets will become worn and would need to be replaced. To complete this repair you would need a wrench set and a screwdriver.
Valve Plate Kit HL026100AV
OEM part for: Campbell Hausfeld
Part Number: HL026100AV
$26.47
In Stock
Product Description ?
- Classification: Part
- Weight: 0.38 lbs.
- Shipping: Ships Worldwide
Compatibility
This part will fit the following 24 machines
Campbell Hausfeld
HX4001 (2006) Oil-Lubricated Compressor View Diagrams & Manuals
HX4002 (2006) Oil-Lubricated Compressor View Diagrams & Manuals
HL4000 (2006) Oil Lubricated Pump View Diagrams & Manuals
HL4101 (2005) Oil-Lubricated Compressor View Diagrams & Manuals
HL4000 (2005) Oil Lubricated Pump View Diagrams & Manuals
HL4210 (2005) Oil-Lubricated Compressor View Diagrams & Manuals
HL4315 (2005) Oil-Lubricated Compressor View Diagrams & Manuals
HL4101 (2006) Oil-Lubricated Compressor View Diagrams & Manuals
HL421000 (2006) Oil-Lubricated Compressor View Diagrams & Manuals
HL431500 (2006) Oil-Lubricated Compressor View Diagrams & Manuals
HL421500 (2006) Oil-Lubricated Compressor View Diagrams & Manuals
HL4101 (2007) Oil-Lubricated Compressor View Diagrams & Manuals
HL421000 (2007) Oil-Lubricated Compressor View Diagrams & Manuals
HL431500 (2007) Oil-Lubricated Compressor View Diagrams & Manuals
HL421500 (2007) Oil-Lubricated Compressor View Diagrams & Manuals
HL4000 (2007) Oil-Lubricated Pump View Diagrams & Manuals
HL423200 (2007) Oil-Lubricated Compressor View Diagrams & Manuals
HL4420 (2007) Oil-Lubricated Compressor View Diagrams & Manuals
HL4421 (2007) Oil-Lubricated Compressor View Diagrams & Manuals
HX4008 (2005) Oil-Lubricated Compressor View Diagrams & Manuals
HX4006 (2005) Oil-Lubricated Compressor View Diagrams & Manuals
HX410100 (2007) Oil-Lubricated Compressor View Diagrams & Manuals
HX410194 (2007) Oil-Lubricated Compressor View Diagrams & Manuals
HL410100 (2009) Oil Lubricated Compressor View Diagrams & Manuals
Show More Compatible Models
This item works with the following types of products:
- Compressor Parts
- Pump Parts
Customer Part Reviews ?
Average Rating (out of 5):
Click to filter by ratings:
5 stars
10
4 stars
3
3 stars
0
2 stars
0
1 stars
0
< PREV
- 1
- 2
Perfect fit
Had it fitted in minutes, compressor like new again !
iGlobal -
July 13, 2022
Verified Purchase
Correct part for my Compressor
Arrive on time, correct pats and good Price thank you
Replace it was so easy
Anonymous -
May 31, 2022
Verified Purchase
Part was the right fix.
Plate took care of issue on my Air compressor. Back in service thanks to the prompt parts delivery.
Guest -
January 22, 2022
Verified Purchase
Easy repair kit
The product came in as expected with good packaging. It fits exactly on my unit. Now i am happy that I can use my compressor again!
Guest -
May 5, 2020
Verified Purchase
Worked Great
Arrived quickly and was a great Part easy repair.
Guest -
November 8, 2019
Verified Purchase
compressor now working
The part i recieved was a perfect fit. Easy to install and was in good shape when it arrived.
Guest -
September 20, 2019
Verified Purchase
Got the parts I needed in record time. Very happy.
The part was exactly what I needed to repair my air compressor. The transaction was completed correctly, and fast. Will definitely do business again.
Guest -
September 3, 2019
Verified Purchase
Easy Repair
Everything was there to complete the repair.
Guest -
September 1, 2019
Verified Purchase
Got what I needed and fast delivery!
I ordered parts for my compressor and 2 days later I had them! The parts were correct even though they were for another brand. Thanks!
Guest -
May 21, 2019
Verified Purchase
EASY TO FIX, YOUR ADVICE ABOUT THE PROBLEM WAS RIGHT ON
GOOD PARTS FIXED MY PROBLEM, THANK YOU FOR BEING HELPFUL
Guest -
April 29, 2019
Verified Purchase
t
t
t -
t days ago
Verified Purchase
eReplacementParts Team
t
Questions & Answers ?
Our customer Service team is at the ready daily to answer your part and product questions.

Ask our Team
We have a dedicated staff with decades of collective experience in helping customers just like you purchase parts to repair their products.
Does this fit my product?Questions & Answers for Valve Plate Kit
Will this repair kit fit this model
Randy
for model number DC130000
asked on 2022-10-07
Hi Randy,
Thank you for your question. This would not be the correct valve plate kit for your compressor. The part number listed under your model number for the valve plate kit is DC130057AV. If you need help placing an order for it, customer service is open 7 days a week and anyone will be happy to assist you. Please feel free to give us a call. We look forward to hearing from you!
eReplacementParts Team October 07, 2022
Customer Repair Instructions ?
All our customer repair instructions are solicited directly from other customers just like you who have purchased and replaced this exact part.
The valve in the cylinder head went bad.
David - December 2, 2015
👍 8 of 8 people found this instruction helpful
Tool Type
Compressor
Difficulty
Medium
Time
30-60 minutes
Tools Used
Wrench Set, razor blade / scraper
Parts Used
Remove the air filter.
Remove the line to the cylinder head and the valve from the head.
Remove any trace of the gasket from the cylinder or cylinder head.
Install the new valve plate and gaskets as shown in the diagram at ereplacement.
Install the lines, air filter.
Run it up to pressure and check for leaks with soapy water from a small spray bottle.
Better than replacing the whole compressor!!!
Did you find this story helpful?
Thanks for voting and helping fellow customers!
Compressor will not build air
Fred - March 22, 2017
👍 6 of 6 people found this instruction helpful
Tool Type
Compressor
Difficulty
Easy
Time
15-30 minutes
Tools Used
Screwdriver, Wrench Set
Parts Used
Remove the cylinder head
Removed the gaskets and plate in the order they were in
Cleaned the gasket surfaces
Installed the new parts in the same order as the old ones
Installed the cylinder head back on
Compressor is now working great
Removed the gaskets and plate in the order they were in
Cleaned the gasket surfaces
Installed the new parts in the same order as the old ones
Installed the cylinder head back on
Compressor is now working great
Did you find this story helpful?
Thanks for voting and helping fellow customers!
Broken reed valve.
Chris - December 3, 2015
👍 6 of 6 people found this instruction helpful
Tool Type
Compressor
Difficulty
Easy
Time
Less than 15 minutes
Tools Used
Screwdriver, Socket set, Razor blade
Parts Used
Remove shroud. Remove four bolts on piston jug and remove copper pipe connection. Separate jug top. Discard old gaskets and scrape all surfaces clean. Install new gaskets and reed valves. Reassemble. Simple repair. Great kit. Wasn't expecting gaskets. Had already traced and cut replacements. Thanks.
Did you find this story helpful?
Thanks for voting and helping fellow customers!
Head gasket was broken and leaking at valve plates
Paul - September 2, 2018
👍 2 of 2 people found this instruction helpful
Tool Type
Compressor
Difficulty
Medium
Time
30-60 minutes
Tools Used
Screwdriver, Socket set, Wrench Set, Razor blade
Parts Used
1. Removed head
2. Cheaned heads with razor blade
3. Installed new valve plate and gaskets
4. Torqued down head to specs 37 Ft Lbs
2. Cheaned heads with razor blade
3. Installed new valve plate and gaskets
4. Torqued down head to specs 37 Ft Lbs
Did you find this story helpful?
Thanks for voting and helping fellow customers!
Compressor wouldn't build passed 20 pounds
John - October 5, 2018
👍 1 of 1 people found this instruction helpful
Tool Type
Compressor
Difficulty
Easy
Time
15-30 minutes
Tools Used
Screwdriver, Wrench Set
Parts Used
Pulled the top off and found a reed valve was shattered. Found this set online and thought might as well replace everything. If you can turn a wrench. You can do this.
Did you find this story helpful?
Thanks for voting and helping fellow customers!
Nothing was wrong with my product
Ronald - October 24, 2017
👍 2 of 3 people found this instruction helpful
Tool Type
Compressor
Difficulty
Medium
Time
1-2 hours
Tools Used
Pliers, Socket set, Wrench Set, Dremel
Parts Used
The time to complete was due to the difficulty of removing the bolts as the cooling fins were machined too close to the bolts. If I had a very thin wall socket, this may have not been a problem. Cleaning/scraping the old gasket off took some time and patience, it was green and looked like a sealing glue was used.
I did not use the bottom gasket as it required me to pull the head off completely and I was afraid that I would not get the piston back in. As this is in the low pressure oil section, I thought this would not be a problem and the old gasket seemed in excellent shape.
I ground down some of the cooling fins and installation went smoothly. The compressor pumped right up and shut off... Beautiful!
Did you find this story helpful?
Thanks for voting and helping fellow customers!
Compressor not building pressure.
mark - May 17, 2017
👍 1 of 1 people found this instruction helpful
Tool Type
Compressor
Difficulty
Easy
Time
15-30 minutes
Tools Used
Screwdriver, Socket set, Wire wheel and drill to remove stuck on gasket
1. Removed the head, the valve plate, and the valve reed.
2. Removed all old gasket material.
3. Reassembled using new parts and gaskets.
4. Removed the filter housing.
5. Installed the new filter.
6. Reassembled and tested.
2. Removed all old gasket material.
3. Reassembled using new parts and gaskets.
4. Removed the filter housing.
5. Installed the new filter.
6. Reassembled and tested.
Did you find this story helpful?
Thanks for voting and helping fellow customers!
Bad gasket and reed valve
Dave - December 21, 2016
👍 1 of 1 people found this instruction helpful
Tool Type
Compressor
Difficulty
Easy
Time
15-30 minutes
Tools Used
Screwdriver, Socket set, Wrench Set
Parts Used
Removed air cleaner and shroud.
Removed the 4 14MM valve head bolts.
Removed valve head, clean all mating surfaces removing all old gasket material.
Replace gaskets reed valves and reed valve plate.
Reassemble all parts in reverse order.
Tighten 4 head bolts in a criss cross pattern torquing equally.
Removed the 4 14MM valve head bolts.
Removed valve head, clean all mating surfaces removing all old gasket material.
Replace gaskets reed valves and reed valve plate.
Reassemble all parts in reverse order.
Tighten 4 head bolts in a criss cross pattern torquing equally.
Did you find this story helpful?
Thanks for voting and helping fellow customers!
Valve on air compressor was bad
Jason - March 13, 2019
Tool Type
Compressor
Difficulty
Easy
Time
30-60 minutes
Tools Used
Screwdriver, Wrench Set, Metric Allen wrench
Parts Used
Removed old valve plate and gaskets and swapped out with new set, works like new
Did you find this story helpful?
Thanks for voting and helping fellow customers!
Compressor not building pressure
Donald - October 26, 2018
Tool Type
Compressor
Difficulty
Easy
Time
15-30 minutes
Tools Used
Screwdriver, Socket set, Wrench Set, Nutdriver
Parts Used
1. Unplug and drain compressor
2. Remove intake filter and shroud
3. Remove airline from cylinder head to tank
4. Remove cylinder head bolts
5. Remove cylinder head
6. Remove valve plate, reed valve, valve studs
7. Remove old gasket material from cylinder and head
8. Install new gasket to cylinder head
9. Install new valve studs, reed valve and valve plate
10. Install new gasket to cylinder head
11. Replace cylinder head and bolts (torque appropriately)
12. Replace airline from cylinder head to tank
13. Replace shroud and intake filter
14. Plug in compressor and test for pressure
Did you find this story helpful?
Thanks for voting and helping fellow customers!
Load More Install Stories
OEM stands for Original Equipment Manufacturer and means the part you’re buying is sourced directly from the manufacturer who made your product. At eReplacementParts, we sell only genuine OEM parts, guaranteeing the part you’re purchasing is of better design and of higher quality than aftermarket parts.
Our product descriptions are a combination of data sourced directly from the manufacturers who made your product as well as content researched and curated by our content & customer service teams. This content is edited and reviewed internally before being made public to customers.
Our customer service team are at the ready daily to answer your part and product questions. We have a dedicated staff with decades of collective experience in helping customers just like you purchase parts to repair their products.
All our part reviews are solicited directly from other customers who have purchased this exact part. While we moderate these reviews for profanity, offensive language or personally identifiable information, these reviews are posted exactly as submitted and no alterations are made by our team.
All our customer repair instructions are solicited directly from other customers just like you who have purchased and replaced this exact part. While we moderate these reviews for profanity, offensive language or personally identifiable information, these reviews are posted exactly as submitted and no alterations are made by our team.
Based on data from past customer purchasing behaviors, these parts are most commonly purchased together along with the part you are viewing. These parts may be necessary or helpful to replace to complete your current repair.
All our installation videos are created and produced in collaboration with our in-house repair technician, Mark Sodja, who has helped millions of eReplacementParts customers over the last 13 years repair their products. Mark has years of experience in selling and repairing both commercial and residential products with a specialty in gas-powered equipment.
This data is collected from customers who submitted a repair instruction after replacing this exact part. Customers can rate how easy the repair was to complete and how long it took. We aggregate this data to provide a repair rating that allows customers to quickly determine the difficulty and time needed to perform their own repair.