
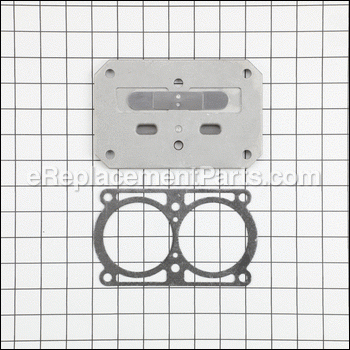
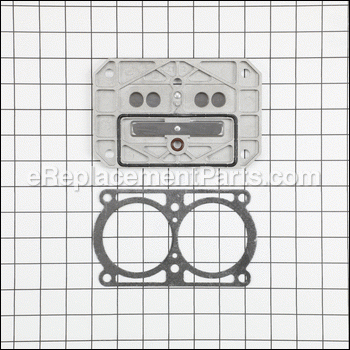
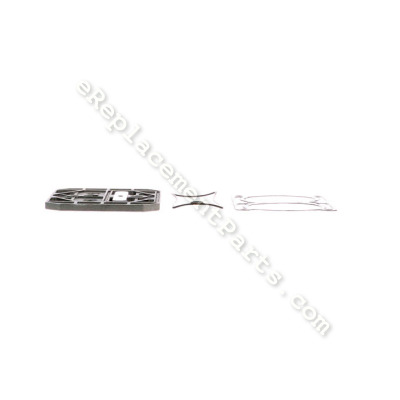


This valve plate assembly is an OEM part direct from Campbell Hausfeld. The set includes the valve plate assembly and two cardboard composite gaskets. This part is compatible with many air compressor machines, and is fitted onto the cylinder head and fasteners. This component has been designed to prevent damage to engine parts and absorb leakage. A wrench and a screwdriver may be needed to make the removal and replacement. This part is sold individually. It is recommended to refer to engine manual and diagrams for further instruction.
Valve Plate Assembly VT491100AV
OEM part for: Campbell Hausfeld
Part Number: VT491100AV
$74.46
In Stock
Jump To:
Frequently Purchased Together ?


Compatibility
This part will fit the following 107 machines
Campbell Hausfeld
1NNF4 135 PSI Speedaire Portable Air Compressor View Diagrams & Manuals
1NNF6 135 PSI Speedaire Portable Air Compressor View Diagrams & Manuals
1NNF7 135 PSI Speedaire Portable Air Compressor View Diagrams & Manuals
2MLW2 135 PSI Speedaire Portable Air Compressor View Diagrams & Manuals
4B246C (2008) Speedaire Compressor Pump View Diagrams & Manuals
4B247C (2008) Speedaire Compressor Pump View Diagrams & Manuals
CIQ51089VP (2006) PowerPro Air Compressor View Diagrams & Manuals
TQ300100AJ (2006) Air Compressor Pump View Diagrams & Manuals
CIQ51089VP (1997) PowerPro Air Compressor View Diagrams & Manuals
TQ300100AJ (1997) Air Compressor Pump View Diagrams & Manuals
CIQ71060V (1999) Four Cylinder Quad Air Compressor View Diagrams & Manuals
CIQ71061V (1999) Four Cylinder Quad Air Compressor View Diagrams & Manuals
CIQ71062V (1999) Four Cylinder Quad Air Compressor View Diagrams & Manuals
CIQ71080V (1999) Four Cylinder Quad Air Compressor View Diagrams & Manuals
CIQ71080VP (1999) Four Cylinder Quad Air Compressor View Diagrams & Manuals
CIQ71083V (1999) Four Cylinder Quad Air Compressor View Diagrams & Manuals
CIQ71081V (1999) Four Cylinder Quad Air Compressor View Diagrams & Manuals
CIQ53067V5 (1999) Four Cylinder Quad Air Compressor View Diagrams & Manuals
CIQ73064V (1999) Four Cylinder Quad Air Compressor View Diagrams & Manuals
CIQ53087H5 (1999) Four Cylinder Quad Air Compressor View Diagrams & Manuals
CIQ53067H5 (1999) Four Cylinder Quad Air Compressor View Diagrams & Manuals
CIQ73064H (1999) Four Cylinder Quad Air Compressor View Diagrams & Manuals
CIQ70000PS (1999) Four Cylinder Quad Air Compressor Pump View Diagrams & Manuals
CIQ70000PP (1999) Four Cylinder Quad Air Compressor Pump View Diagrams & Manuals
TQ300000AJ (1999) Four Cylinder Quad Air Compressor Pump View Diagrams & Manuals
TQ300100AJ (1999) Four Cylinder Quad Air Compressor Pump View Diagrams & Manuals
CIQ70000PS (2003) Four Cylinder Quad Air Compressor Pump View Diagrams & Manuals
CIQ70000PP (2003) Four Cylinder Quad Air Compressor Pump View Diagrams & Manuals
TQ300000AJ (2003) Four Cylinder Quad Air Compressor Pump View Diagrams & Manuals
TQ300100AJ (2003) Four Cylinder Quad Air Compressor Pump View Diagrams & Manuals
VT613106 (2003) Contractor Air Compressor View Diagrams & Manuals
VT615208 (2003) Contractor Air Compressor View Diagrams & Manuals
VT617205 (2003) Contractor Air Compressor View Diagrams & Manuals
EX800300 (2003) Contractor Air Compressor View Diagrams & Manuals
VT617206 (2003) Contractor Air Compressor View Diagrams & Manuals
VT630900 (2003) Contractor Air Compressor View Diagrams & Manuals
VT273100 (2003) Air Compressor Pump View Diagrams & Manuals
VT203003 (2003) Air Compressor Pump View Diagrams & Manuals
VT470200 (2003) Air Compressor Pump View Diagrams & Manuals
VT470000 (2003) Air Compressor Pump View Diagrams & Manuals
VT470401 (2003) Air Compressor Pump View Diagrams & Manuals
EX800301AJ (2005) 5.5 HP Gas Wheelbarrow VT Compressor View Diagrams & Manuals
VT633000AJ (2005) 5.5 HP Gas Wheelbarrow VT Compressor View Diagrams & Manuals
VT633001AJ (2005) 5.5 HP Gas Wheelbarrow VT Compressor View Diagrams & Manuals
VT633200AJ (2005) 5.5 HP Gas Wheelbarrow VT Compressor View Diagrams & Manuals
EX801300AJ (2005) 5.5 HP Gas Wheelbarrow VT Compressor View Diagrams & Manuals
EX800700AJ (2004) Portable Air Compressor View Diagrams & Manuals
VT631900 (2004) Portable Vertical Air Compressor View Diagrams & Manuals
EX800801 (2004) Portable Vertical Air Compressor View Diagrams & Manuals
VT631502 (2004) Portable Vertical Air Compressor View Diagrams & Manuals
VT559505 (2004) Portable Vertical Air Compressor View Diagrams & Manuals
VT634500 (2004) Portable Vertical Air Compressor View Diagrams & Manuals
VT631900 (2005) Portable Vertical Air Compressor View Diagrams & Manuals
EX800801 (2005) Portable Vertical Air Compressor View Diagrams & Manuals
VT631503 (2005) Portable Vertical Air Compressor View Diagrams & Manuals
VT559505 (2005) Portable Vertical Air Compressor View Diagrams & Manuals
VT634500 (2005) Portable Vertical Air Compressor View Diagrams & Manuals
VT273100 (2005) Air Compressor Pump View Diagrams & Manuals
VT203003 (2005) Air Compressor Pump View Diagrams & Manuals
VT470200 (2005) Air Compressor Pump View Diagrams & Manuals
VT470000 (2005) Air Compressor Pump View Diagrams & Manuals
VT470401 (2005) Air Compressor Pump View Diagrams & Manuals
VT480400 (2005) Air Compressor Pump View Diagrams & Manuals
VT480000 (2005) Air Compressor Pump View Diagrams & Manuals
VT631900 (2006) Portable Vertical Air Compressor View Diagrams & Manuals
EX800801 (2006) Portable Vertical Air Compressor View Diagrams & Manuals
VT631504 (2006) Portable Vertical Air Compressor View Diagrams & Manuals
VT559506 (2006) Portable Vertical Air Compressor View Diagrams & Manuals
VT634500 (2006) Portable Vertical Air Compressor View Diagrams & Manuals
VT273100 (2006) Air Compressor Pump View Diagrams & Manuals
VT203003 (2006) Air Compressor Pump View Diagrams & Manuals
VT470000 (2006) Air Compressor Pump View Diagrams & Manuals
VT480400 (2006) Air Compressor Pump View Diagrams & Manuals
VT480000 (2006) Air Compressor Pump View Diagrams & Manuals
VT470200 (2006) Air Compressor Pump View Diagrams & Manuals
VT614806 (VT614806AJ)(2003) Contractor Air Compressor View Diagrams & Manuals
EX800900 (2003) Contractor Air Compressor View Diagrams & Manuals
VT617104 (2003) Contractor Air Compressor View Diagrams & Manuals
EX801200 (2005) Gas Wheelbarrow VT Compressor View Diagrams & Manuals
VT635300 (2005) Gas Wheelbarrow VT Compressor View Diagrams & Manuals
EX801800 (2007) Wheelbarrow VT Compressor View Diagrams & Manuals
EX820000 (2004) Portable Vertical Air Compressor View Diagrams & Manuals
EX8302 (2004) Portable Air Compressor View Diagrams & Manuals
VT633500 (2004) Vertical Air Compressor View Diagrams & Manuals
VT632900 (2004) Vertical Air Compressor View Diagrams & Manuals
EX840100 (2004) Vertical Air Compressor View Diagrams & Manuals
VT619504 (2004) Vertical Air Compressor View Diagrams & Manuals
VT627504 (2004) Vertical Air Compressor View Diagrams & Manuals
VT631402 (2004) Vertical Air Compressor View Diagrams & Manuals
EX840500 (2004) Vertical Air Compressor View Diagrams & Manuals
VT761X Air Compressor Pump View Diagrams & Manuals
VT781X Air Compressor Pump View Diagrams & Manuals
VT273100 (2000) Air Compressor Pump View Diagrams & Manuals
VT203003 (2000) Air Compressor Pump View Diagrams & Manuals
VT470200 (2000) Air Compressor Pump View Diagrams & Manuals
VT470000 (2000) Air Compressor Pump View Diagrams & Manuals
VT470401 (2000) Air Compressor Pump View Diagrams & Manuals
VT470000AV (2008) Air Compressor Pump View Diagrams & Manuals
VT480000AV (2008) Air Compressor Pump View Diagrams & Manuals
VT480000 (2004) Air Compressor Pump View Diagrams & Manuals
VT483200 (2004) Air Compressor Pump View Diagrams & Manuals
VT619501AJ Vertical Air Compressor View Diagrams & Manuals
VT619501 Vertical Air Compressor View Diagrams & Manuals
GP90135 (2013) Wheelbarrow Air Compressor View Diagrams & Manuals
VT472200AJ Air Compressor Pump View Diagrams & Manuals
VT482200AJ Air Compressor Pump View Diagrams & Manuals
TQ3050 Air Compressor Pumps View Diagrams & Manuals
Show More Compatible Models
This item works with the following types of products:
- Compressor Parts
This part replaces obsolete part #: VT470800AJ, VT470800AJ (Includes 5 and 15), TQ011300AJ, TQ900400AJ
Customer Part Reviews ?
Average Rating (out of 5):
Click to filter by ratings:
5 stars
2
4 stars
1
3 stars
0
2 stars
0
1 stars
1
< PREV
- 1
Worked as expected
Air compressor is up and working.
Guest -
October 17, 2019
Verified Purchase
Appears well built, works perfectly
It is nice to receive a replacement part that fits and works perfectly.
Guest -
May 18, 2019
Verified Purchase
Wrong part
Wasn't the part we needed, but was concerned that it was wrong from the beginning. The person we dealt with on the phone was very nice and told us we could return the part if it was wrong. A little confusion on the return process but in the end it was made right. Will still continue to order from e-replacement.
Guest -
September 17, 2019
Verified Purchase
new part broke again after 2 months
very disappointed in the quality. original part lasted over a year. first replacement lasted 2 months
Guest -
September 13, 2019
Verified Purchase
t
t
t -
t days ago
Verified Purchase
eReplacementParts Team
t
Questions & Answers ?
Our customer Service team is at the ready daily to answer your part and product questions.

Ask our Team
We have a dedicated staff with decades of collective experience in helping customers just like you purchase parts to repair their products.
Does this fit my product?Questions & Answers for Valve Plate Assembly
What are torque specs for head bolts?
Ed
for model number VT470000AV
asked on 2022-12-27
Hello Ed, Thank you for your inquiry. Researching the model number that you have provided, we show the compressor Head Bolts torque specs as 175-225 IN / LBS. We hope this helps.
eReplacementParts Team December 27, 2022
Customer Repair Instructions ?
All our customer repair instructions are solicited directly from other customers just like you who have purchased and replaced this exact part.
Air compressor failed to build pressure.
Edmund - September 23, 2018
👍 1 of 1 people found this instruction helpful
Tool Type
Compressor
Difficulty
Easy
Time
15-30 minutes
Tools Used
Socket set
Parts Used
Removed 6 bolts holding the head and valve plate on.
Lift off head and plate,separate valve plate and discard.
Install new plate on cylinder, install head and 6 bolts, torque bolts.
Done.
Lift off head and plate,separate valve plate and discard.
Install new plate on cylinder, install head and 6 bolts, torque bolts.
Done.
Did you find this story helpful?
Thanks for voting and helping fellow customers!
My air compressor was taking a while to pump up.
LONNIE - September 21, 2018
👍 1 of 1 people found this instruction helpful
Tool Type
Compressor
Difficulty
Medium
Time
15-30 minutes
Tools Used
Screwdriver, Socket set, Wrench Set, Nutdriver
Parts Used
1. Drain all the air out of the tank.
2. Take off the plastic belt cover.
3. Take off the inlet pipe from the head to the tank.
4. Take off the head and valve plate assembly.
5. Separate the head and the valve plate assembly.
Note: they might have a bunch of paint holding
Them together.
6. Clean off the head surface the cylinder surface and make sure the cylinders are clean of any debris.
7. Now Reassemble - make sure you tighten the head bolts properly.
Note. Mine looked like the head bolts had silicone on the Thread ends so I put some back on mine.
Did you find this story helpful?
Thanks for voting and helping fellow customers!
Bogging down when pressure got over 60 lbs.
Thomas - December 13, 2017
👍 1 of 1 people found this instruction helpful
Tool Type
Compressor
Difficulty
Easy
Time
Less than 15 minutes
Tools Used
, Butterfly impact wrench
Parts Used
1. Loosed the copper air line from head.
2. Removed four top bolts.
3. Took the top head off.
4. Took the reed plate off.
5. Scraped all old gasket off.
6. Sprayed with carburetor cleaner.
7. Wiped head and cylinders off with a clean micro cloth.
8. Put new gasket and O-ring then reassembled.
2. Removed four top bolts.
3. Took the top head off.
4. Took the reed plate off.
5. Scraped all old gasket off.
6. Sprayed with carburetor cleaner.
7. Wiped head and cylinders off with a clean micro cloth.
8. Put new gasket and O-ring then reassembled.
Did you find this story helpful?
Thanks for voting and helping fellow customers!
blown head gasket and Reid valve replacement
Precision - August 9, 2022
Tool Type
Compressor
Difficulty
Easy
Time
30-60 minutes
Tools Used
Screwdriver, Pliers, Socket set, hose clamp to compress oil rings
Parts Used
I removed the valve plate and cylinder head.
I cleaned the old blown gasket off of valve plate and blocks edges.
compressed the rings with a hose clamp and installed the pistons back into the block.
installed new gasket and valve plate assembly.
Torqued head bolts and valve bolts to specs.
cost 50 to repair instead of 1000 for new air compressor.
Did you find this story helpful?
Thanks for voting and helping fellow customers!
It took a long time to build up air.
Ernest - May 11, 2019
Tool Type
Compressor
Difficulty
Medium
Time
15-30 minutes
Tools Used
Wrench Set, torque wrench
Parts Used
I cut power, drained air tank and disassembled compressor head. I payed attention to the torque of the head bolts. I feel this should have been in with the valve plate parts.
I then cleaned the gasket area and replaced the valve assembly and use the new gaskets.
Then torque the head bolts down and started the compressor. Also I had to disconnect the delivery air tube and reconnect it after the head was back one. It was a simple job. The only thing was hard to find the torque spics. Ernie.
Did you find this story helpful?
Thanks for voting and helping fellow customers!
Air Compressor Pump would not produce air to fill compressor tank
Herman - December 31, 2018
👍 1 of 2 people found this instruction helpful
Tool Type
Pump
Difficulty
Easy
Time
30-60 minutes
Tools Used
Screwdriver, Socket set, Wrench Set
Parts Used
I called the name of compressor company. They gave me the number to eReplacement Parts. The lady that assisted me diagnosed the problem that she felt was the issue. I ordered the air compressor valve plate as she recommended.
When I received the part which took about 10 days, I started the repair.
1. Turned switch off
2. Unplugged unit
3. Unbolted the air compressor pump head.
4. Removed the head from the pump being careful to notice what order and direction the valve plate and gasket was in the unit.
5. Removed the valve plate and installed the new one
6. Bolted the air compressor pump head
7. Tighten the head down tight without over tightening.
8. Plugged the unit back in to electrical outlet
9. Turned compressor switch back to automatic position
10. Compressor started and immediately started filling the air tank as it should.
11. Job complete and me happy. Thanks to eReplacementParts.
Did you find this story helpful?
Thanks for voting and helping fellow customers!
One of the reed valves on my valve plate was broken. This happens with age (2004 model)
Paul - December 13, 2017
Tool Type
Compressor
Difficulty
Easy
Time
Less than 15 minutes
Tools Used
Socket set, Wrench Set
Parts Used
Unplug compressor!!!! Unscrew line compression nut. Remove head bolts. Tap head assy with plastic hammer and split head and valve plate. Clean gasket surfaces on cylinder and head. Make sure to remove all of the old gasket and you have a clean dry surface. Install new gaskets and o-rings. They came with valve plate kit. Bolt down and torque head assy. Make sure to torque to spec. Reinstall pressure line. plug in , turn on and you start making air again
Did you find this story helpful?
Thanks for voting and helping fellow customers!
Compressor would not build air pressure.
Dennis - November 23, 2017
Tool Type
Compressor
Difficulty
Easy
Time
15-30 minutes
Tools Used
Socket set, Adjustable Wrench
Parts Used
1. Removed air tube from head to tank.
2. Removed 6 bolts retaining head, removed head.
3. Removed and discarded valve plate.
4. Cleaned gasket from mating surface.
5. Installed new gasket and valve plate.
6. Replaced head, bolts, and air tube.
Fast and easy, saved money.
2. Removed 6 bolts retaining head, removed head.
3. Removed and discarded valve plate.
4. Cleaned gasket from mating surface.
5. Installed new gasket and valve plate.
6. Replaced head, bolts, and air tube.
Fast and easy, saved money.
Did you find this story helpful?
Thanks for voting and helping fellow customers!
Leaking air badly
Tracy - October 16, 2017
Tool Type
Compressor
Difficulty
Easy
Time
15-30 minutes
Tools Used
Socket set, Torque wrench
Parts Used
Removed the cylinder head
Removed the old parts below it
Installed the new parts from the kit
Installed the cylinder head
Removed the old parts below it
Installed the new parts from the kit
Installed the cylinder head
Did you find this story helpful?
Thanks for voting and helping fellow customers!
valve plate worn out
Tonya - January 16, 2017
👍 0 of 1 people found this instruction helpful
Tool Type
Compressor
Difficulty
Easy
Time
15-30 minutes
Tools Used
Socket set
Parts Used
Removed the cylinder head
Remove the valve plate and gaskets
Cleaned the area
Installed the new parts
Installed the cylinder head
Remove the valve plate and gaskets
Cleaned the area
Installed the new parts
Installed the cylinder head
Did you find this story helpful?
Thanks for voting and helping fellow customers!
OEM stands for Original Equipment Manufacturer and means the part you’re buying is sourced directly from the manufacturer who made your product. At eReplacementParts, we sell only genuine OEM parts, guaranteeing the part you’re purchasing is of better design and of higher quality than aftermarket parts.
Our product descriptions are a combination of data sourced directly from the manufacturers who made your product as well as content researched and curated by our content & customer service teams. This content is edited and reviewed internally before being made public to customers.
Our customer service team are at the ready daily to answer your part and product questions. We have a dedicated staff with decades of collective experience in helping customers just like you purchase parts to repair their products.
All our part reviews are solicited directly from other customers who have purchased this exact part. While we moderate these reviews for profanity, offensive language or personally identifiable information, these reviews are posted exactly as submitted and no alterations are made by our team.
All our customer repair instructions are solicited directly from other customers just like you who have purchased and replaced this exact part. While we moderate these reviews for profanity, offensive language or personally identifiable information, these reviews are posted exactly as submitted and no alterations are made by our team.
Based on data from past customer purchasing behaviors, these parts are most commonly purchased together along with the part you are viewing. These parts may be necessary or helpful to replace to complete your current repair.
All our installation videos are created and produced in collaboration with our in-house repair technician, Mark Sodja, who has helped millions of eReplacementParts customers over the last 13 years repair their products. Mark has years of experience in selling and repairing both commercial and residential products with a specialty in gas-powered equipment.
This data is collected from customers who submitted a repair instruction after replacing this exact part. Customers can rate how easy the repair was to complete and how long it took. We aggregate this data to provide a repair rating that allows customers to quickly determine the difficulty and time needed to perform their own repair.