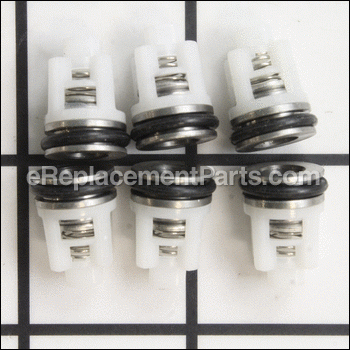

This item is a genuine OEM sourced replacement valve kit designed for use with Dewalt pressure washers. This kit includes three (3) inner and three (3) outer valves that fit in the pump. These valve are made out of plastic with metal and they include rubber o-rings. To complete this repair you will need a set of wrenches and a screwdriver.
Valve Kit 5140117-46
OEM part for: DeWALT, Black and Decker
Part Number: 5140117-46
$53.73
In Stock
Jump To:
Frequently Purchased Together ?


Compatibility
This part will fit the following 7 machines
DeWALT
DXPW3025 Type 0 Gas Pressure Washer View Diagrams & Manuals
DXPW3228 Type 0 Pressure Washer 3200 PSI @ 2.8 GPM, Direct Drive View Diagrams & Manuals
DXPW3425 (Type 0) Professional Gas Cold Water Pressure Washer View Diagrams & Manuals
Black and Decker
BDG2600-B3 (SN 389386 to Present) 2600 Psi Gas Pressure Was View Diagrams & Manuals
BDX2723-B3 (749685 to Present Version A) 2700psi Gasoline Pressure Washer Power Tool View Diagrams & Manuals
BDX2723-B3 (749685 to Present Version B) 2700psi Gasoline Pressure Washer Power Tool View Diagrams & Manuals
BDX3125-B3 (749685 To Present) 3100psi Gasoline Pressure Washer Power Tool View Diagrams & Manuals
Show More Compatible Models
This item works with the following types of products:
- Pressure Washer Parts
Customer Part Reviews ?
Average Rating (out of 5):
Click to filter by ratings:
5 stars
1
4 stars
0
3 stars
0
2 stars
0
1 stars
0
< PREV
- 1
Exact Fit!
Great product. Worked as it should I was back pressure washing within a hour of delivery of my parts. Thanks
Guest -
September 28, 2019
Verified Purchase
t
t
t -
t days ago
Verified Purchase
eReplacementParts Team
t
Questions & Answers ?
Our customer Service team is at the ready daily to answer your part and product questions.

Ask our Team
We have a dedicated staff with decades of collective experience in helping customers just like you purchase parts to repair their products.
Does this fit my product?Questions & Answers for Valve Kit
No questions have been asked yet
Customer Repair Instructions ?
All our customer repair instructions are solicited directly from other customers just like you who have purchased and replaced this exact part.
pump does not have enough pressure due to all six check valves were broken.
Roberto - November 18, 2015
👍 23 of 27 people found this instruction helpful
Tool Type
Pressure Washer
Difficulty
Medium
Time
15-30 minutes
Tools Used
, Allen Wrench, long nose plier
Parts Used
Remove each manifold plug and pulled out broken valve. removed pieces of broken plastic that stock inside the manifold. installed new valve and re installed manifold plug.
Did you find this story helpful?
Thanks for voting and helping fellow customers!
DXPW3425 was low pressure
Kevin - October 23, 2017
👍 10 of 11 people found this instruction helpful
Tool Type
Pressure Washer
Difficulty
Medium
Time
15-30 minutes
Tools Used
Pliers, Wrench Set, Adjustable Wrench, Probe set
Parts Used
1: Removed water pump manifold with allen wrenches
2: Inspected valve seats , O-rings and valves
3: Found top o-rings shredded , upper valves twisted but in tact; inner valve inspected and found to be impacted and sealed from improper pressure and over heat
4: Removed upper O-rings for replacement; replaced upper valves; removed inner valves with probe set; remainder of valves had to be extracted with a thread out adapter as they were sealed in by expansion
5: Replaced all valves ; lubed all O-rings, valve seats , washers and screws
Did you find this story helpful?
Thanks for voting and helping fellow customers!
Pressure washer would not build pressure
Bradley - April 29, 2018
👍 4 of 4 people found this instruction helpful
Tool Type
Pressure Washer
Difficulty
Medium
Time
30-60 minutes
Tools Used
Screwdriver, Pliers, Adjustable Wrench, Allen wrench
Parts Used
Removed pump
Disassembled
Removed old valves and cleaned all passages of broken valve pieces with air and small pick
Installed new valve kit
Reinstalled pump
Disassembled
Removed old valves and cleaned all passages of broken valve pieces with air and small pick
Installed new valve kit
Reinstalled pump
Did you find this story helpful?
Thanks for voting and helping fellow customers!
Power washer no pressure and no soap
Richard - May 6, 2017
👍 3 of 3 people found this instruction helpful
Tool Type
Pressure Washer
Difficulty
Medium
Time
30-60 minutes
Tools Used
Screwdriver, Pliers, Wrench Set, allen wrenchs, and Dental picks
1. Remove old Valves and replace after cleaning
2. replace Soap injector clean the port
3. Unloader check valve remove old , clean and replace with new
4. Start power washer and adjust new parts to the pressures needed and run. It is OK now soap and all.
2. replace Soap injector clean the port
3. Unloader check valve remove old , clean and replace with new
4. Start power washer and adjust new parts to the pressures needed and run. It is OK now soap and all.
Did you find this story helpful?
Thanks for voting and helping fellow customers!
No pressure
terry - November 20, 2016
👍 3 of 4 people found this instruction helpful
Tool Type
Pressure Washer
Difficulty
Medium
Time
30-60 minutes
Tools Used
Screwdriver, Pliers, Wrench Set
Parts Used
I looked at some other repair stories on the type of repair. That all I had to do and I was repairing my washer. Thank you
Did you find this story helpful?
Thanks for voting and helping fellow customers!
Lack of pressure or low pressure
Thomas - April 22, 2016
👍 3 of 5 people found this instruction helpful
Tool Type
Pressure Washer
Difficulty
Easy
Time
30-60 minutes
Tools Used
Pliers, Allen set
I watched your you tube videos on how to repair pressures washers. Thank you They helped immensely. I made copies of them for those of you that are having problems to.
https://www.youtube.com/watch?v=Qmrhgq22ASI
https://www.youtube.com/watch?v=q2c2uUlP13s
https://www.youtube.com/watch?v=Qmrhgq22ASI
https://www.youtube.com/watch?v=q2c2uUlP13s
Did you find this story helpful?
Thanks for voting and helping fellow customers!
No water pressure
Andy - December 23, 2018
Tool Type
Pressure Washer
Difficulty
Medium
Time
30-60 minutes
Tools Used
Pliers, Nutdriver, Adjustable Wrench, Hexhead wrenches, needle nose pliers
Parts Used
1. Checked unloader valve(regulator), it was ok
2. Took off valve body
3. Removed all 6 valves from valve body
4. Cleaned out valve body, build up inside
5. Replaced all 6 valves and thermal relief valves
6. Re-assembled and adjusted unloader
7. Connected water supply, started engine, turned on water
8. Washed 2 vehicles with it, worked just fine
Did you find this story helpful?
Thanks for voting and helping fellow customers!
Pressure washer had no pressure. Valves corroded.
Steve - November 24, 2016
👍 2 of 5 people found this instruction helpful
Tool Type
Pressure Washer
Difficulty
Easy
Time
30-60 minutes
Tools Used
Pliers, Allen wrench set
Parts Used
Removed pump manifold and the plate covering the valves with allen key.
Pull old valves out with needle nose pliers.
Push new valves in by hand
Reinstall cover plate
Reinstall pump manifold
Pull old valves out with needle nose pliers.
Push new valves in by hand
Reinstall cover plate
Reinstall pump manifold
Did you find this story helpful?
Thanks for voting and helping fellow customers!
OEM stands for Original Equipment Manufacturer and means the part you’re buying is sourced directly from the manufacturer who made your product. At eReplacementParts, we sell only genuine OEM parts, guaranteeing the part you’re purchasing is of better design and of higher quality than aftermarket parts.
Our product descriptions are a combination of data sourced directly from the manufacturers who made your product as well as content researched and curated by our content & customer service teams. This content is edited and reviewed internally before being made public to customers.
Our customer service team are at the ready daily to answer your part and product questions. We have a dedicated staff with decades of collective experience in helping customers just like you purchase parts to repair their products.
All our part reviews are solicited directly from other customers who have purchased this exact part. While we moderate these reviews for profanity, offensive language or personally identifiable information, these reviews are posted exactly as submitted and no alterations are made by our team.
All our customer repair instructions are solicited directly from other customers just like you who have purchased and replaced this exact part. While we moderate these reviews for profanity, offensive language or personally identifiable information, these reviews are posted exactly as submitted and no alterations are made by our team.
Based on data from past customer purchasing behaviors, these parts are most commonly purchased together along with the part you are viewing. These parts may be necessary or helpful to replace to complete your current repair.
All our installation videos are created and produced in collaboration with our in-house repair technician, Mark Sodja, who has helped millions of eReplacementParts customers over the last 13 years repair their products. Mark has years of experience in selling and repairing both commercial and residential products with a specialty in gas-powered equipment.
This data is collected from customers who submitted a repair instruction after replacing this exact part. Customers can rate how easy the repair was to complete and how long it took. We aggregate this data to provide a repair rating that allows customers to quickly determine the difficulty and time needed to perform their own repair.