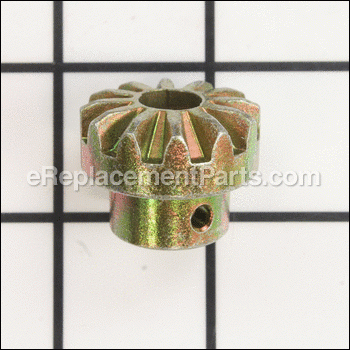

This replacement part is supplied directly from the original equipment manufacturer. It is specially designed for Murray and Simplicity snowblowers. The gear universal interacts with the worm gear that helps to adjust the chute. This is an identical replacement for a damaged or a missing part that was installed on a new equipment. Keep in mind this high-quality component is made of durable metal and is sold individually. Make sure to refer to the diagrams of your model for the correct installation of the new part. You will need a wrench set to perform this repair.
Gear Universal 1718593SM
OEM part for: Murray, Simplicity, Snapper
Part Number: 1718593SM
$15.30
In Stock
Jump To:
Frequently Purchased Together ?

Compatibility
This part will fit the following 136 machines
Murray
Simplicity
1691172 Snowblower View Diagrams & Manuals
1691364 Snowblower View Diagrams & Manuals
1691416 Snowblower View Diagrams & Manuals
1691417 Snowblower View Diagrams & Manuals
71691174 Snowblower View Diagrams & Manuals
71691404 Snowblower View Diagrams & Manuals
1692469 Sno-Away 860M 24In (Ceexport) View Diagrams & Manuals
1692616 824E, 8Hp 24In Snowthrower (Es View Diagrams & Manuals
1693650 860M, 8Hp 24In Snowthrower View Diagrams & Manuals
1693651 860M, 8Hp 24In Snowthrower (Ce View Diagrams & Manuals
1693652 860Dlx, 8Hp 24In Snowthrower View Diagrams & Manuals
1693653 860Dlx, 8Hp 24In Snowthrower ( View Diagrams & Manuals
1693763 860M, 8Hp 24In Snowthrower View Diagrams & Manuals
1693775 860M, 8Hp 24In Snowthrower (Ce View Diagrams & Manuals
1693984 860M, 8Hp 24In Snowthrower View Diagrams & Manuals
1693985 860M, 8Hp 24In Snowthrower (Ce View Diagrams & Manuals
1694241 860Dlxe, 8Hp 24In Snowthrower View Diagrams & Manuals
1694242 860E, 8Hp 24In Snowthrower View Diagrams & Manuals
1694433 860E, 8Hp 24In Snowthrower View Diagrams & Manuals
1694434 860M, 8Hp 24In Snowthrower (Ce View Diagrams & Manuals
1694435 960M, 9Hp 24In Snowthrower (Ce View Diagrams & Manuals
1694436 1060M, 10Hp 24In Snowthrower ( View Diagrams & Manuals
1694439 960E, 9Hp 24In Snowthrower View Diagrams & Manuals
1694440 1060E, 10Hp 24In Snowthrower View Diagrams & Manuals
1694588 860E, 8Hp 24In (Es) View Diagrams & Manuals
1694589 9560E, 9.5Hp 24In Snowthrower View Diagrams & Manuals
1694590 1060E, 10Hp 24In Snowthrower View Diagrams & Manuals
1694596 860M, 8Hp 24In (Ms) (Ceexport) View Diagrams & Manuals
1694597 9560M, 9.5Hp 24In Snowthrower View Diagrams & Manuals
1694598 1060M, 10Hp 24In Snowthrower ( View Diagrams & Manuals
1694845 8560El, 8.5Hp Ohv 24In Snowthr View Diagrams & Manuals
1694846 8560Ex, 8.5Hp Ohv 24In Snowthr View Diagrams & Manuals
1694847 10560E, 10.5Hp 24In Snowthrowe View Diagrams & Manuals
1694848 10560Ex, 10.5Hp 24In Snowthrow View Diagrams & Manuals
1694867 9560E, 9.5Hp 24In Snowthrower View Diagrams & Manuals
1694914 9560Ex, 9.5Hp 24In Snowthrower View Diagrams & Manuals
1691011 555M, 5Hp 22In Two-Stage Snowblower View Diagrams & Manuals
1691181 755E, 7Hp 22In Two-Stage Snowblower View Diagrams & Manuals
1691411 555M, 5Hp 22In Snowblower View Diagrams & Manuals
1691413 755E, 7Hp 22In Snowblower View Diagrams & Manuals
1691414 755M, 7Hp 22In Snowblower View Diagrams & Manuals
1691518 7Hp, 22In Two-Stage Snowblower View Diagrams & Manuals
1692615 722E, 7Hp 22In Snowblower View Diagrams & Manuals
1692680 555, 5Hp 22In Snowblower View Diagrams & Manuals
1692681 755E, 7Hp 22In Snowblower View Diagrams & Manuals
1692746 755M, 7Hp 22In Snowblower View Diagrams & Manuals
1693161 555M, 5Hp 22In Snowblower View Diagrams & Manuals
1693162 755E, 7Hp 22In Snowblower View Diagrams & Manuals
1693163 555M, 5Hp 22In Snowblower View Diagrams & Manuals
1693164 755M, 7Hp 22In Snowblower View Diagrams & Manuals
1693425 555M, 5Hp 22In Snowblower View Diagrams & Manuals
1693426 755E, 7Hp 22In Snowblower View Diagrams & Manuals
1693646 555M, 22In Snowblower View Diagrams & Manuals
1693647 555M, 5Hp 22In Snowblower View Diagrams & Manuals
1693648 755M 22In Snowblower View Diagrams & Manuals
1693649 755M, 7Hp Ohv 22In Snowblower View Diagrams & Manuals
1693980 555M, 5Hp 22In Snowblower View Diagrams & Manuals
1693981 555M, 5Hp 22In Snowblower View Diagrams & Manuals
1693982 755M, 7Hp 22In Snowblower View Diagrams & Manuals
1693983 755E, 7Hp 22In Snowblower View Diagrams & Manuals
1694587 555M, 5Hp 22In Snowblower View Diagrams & Manuals
1694595 555M, 5Hp 22In Snowblower View Diagrams & Manuals
1694836 7555M, 7.5Hp 22In Snowblower View Diagrams & Manuals
1694837 7555Ex, 7.5Hp 22In Snowblower View Diagrams & Manuals
1694849 11570E, 11.5Hp 28In Snowthrowe View Diagrams & Manuals
1694850 E11570, 11.5Hp 28In Snowthrowe View Diagrams & Manuals
7800085 I7524E, 7.5Hp 24In Snowthrower View Diagrams & Manuals
7800087 I7524Ex, 7.5Hp 24In Snowthrowe View Diagrams & Manuals
1690546 1080, 10Hp 32In Two-Stage Snow View Diagrams & Manuals
1690675 10Hp, 32In Snowthrower (Ceexpo View Diagrams & Manuals
1690679 1080Dc,10Hp 32In Two-Stage Sno View Diagrams & Manuals
1690777 1080, 10Hp 32In Two-Stage Snow View Diagrams & Manuals
1690779 1080Dc, 10Hp 32In Two-Stage Sn View Diagrams & Manuals
1690831 10Hp, 12V120V 32In Snowthrower View Diagrams & Manuals
1691371 1080M, 10Hp 32In Snowthrower View Diagrams & Manuals
1691716 1080, 10Hp 32In Snowthrower (C View Diagrams & Manuals
1691776 1080S, 10Hp 32In Snowthrower View Diagrams & Manuals
1691779 1080S, 10Hp 32In Snowthrower View Diagrams & Manuals
1691899 1080S, 10Hp 32In Snowthrower ( View Diagrams & Manuals
1691948 Sno-Away 1080M, 10Hp 32In (Cee View Diagrams & Manuals
1693656 1180M, 11Hp 32In Snowthrower View Diagrams & Manuals
1693657 1180M, 11Hp 32In Snowthrower ( View Diagrams & Manuals
1694244 1180E, 11Hp 32In Snowthrower View Diagrams & Manuals
1694438 1280M, 12Hp 32In Snowthrower ( View Diagrams & Manuals
1694442 1280E, 12Hp 32In Snowthrower View Diagrams & Manuals
1694592 1280E, 12Hp 32In Snowthrower View Diagrams & Manuals
1694600 1280M, 12Hp 32In Snowthrower ( View Diagrams & Manuals
1694851 1380E, 13Hp 32In Snowthrower View Diagrams & Manuals
1694852 E1380, 13Hp 32In Snowthrower ( View Diagrams & Manuals
1694593 1390E, 38In 13Hp Snowthrower View Diagrams & Manuals
1694601 1390M, 13Hp 38In Snowthrower ( View Diagrams & Manuals
1694872 1390E, 13Hp 38In Snowthrower View Diagrams & Manuals
1694915 1390Ex, 13Hp 38In Snowthrower View Diagrams & Manuals
1690543 560, 5Hp 24In Two-Stage Snowth View Diagrams & Manuals
1690544 760, 7Hp 24In Two-Stage Snowth View Diagrams & Manuals
1690678 870Dc, 8Hp 24In Two-Stage Snow View Diagrams & Manuals
1690775 560, 5Hp 24In Two-Stage Snowth View Diagrams & Manuals
1690776 870, 8Hp 24In Two-Stage Snowth View Diagrams & Manuals
1690778 870Dc, 8Hp 24In Two-Stage Snow View Diagrams & Manuals
1690903 760 M, 7Hp 24In Two-Stage Snow View Diagrams & Manuals
1691023 860E, 8Hp 24In Two-Stage Snowt View Diagrams & Manuals
1691024 860E, 8Hp 24In Two-Stage Snowt View Diagrams & Manuals
1691368 560M, 5Hp 24In Snowthrower View Diagrams & Manuals
1691374 560M, 5Hp 24In Snowthrower View Diagrams & Manuals
1691376 860E, 8Hp 24In Snowthrower View Diagrams & Manuals
1691400 8Hp, 24In Two-Stage Snowthrowe View Diagrams & Manuals
1691401 860E, 8Hp 24In Snowthrower View Diagrams & Manuals
1691403 860, 24In Snowthrower (Ceexpor View Diagrams & Manuals
1691707 860E, 8Hp 24In Snowthrower View Diagrams & Manuals
1691708 860, 8Hp 24In Snowthrower (Ms) View Diagrams & Manuals
1691774 560S, 5Hp 24In Snowthrower View Diagrams & Manuals
1691777 860Se, 8Hp 24In Snowthrower View Diagrams & Manuals
1691778 860S, 8Hp 24In Snowthrower View Diagrams & Manuals
1691900 860E, 8Hp 24In Snowthrower (Sn View Diagrams & Manuals
1691946 860S, 8Hp 24In Snowthrower View Diagrams & Manuals
1692569 Sno-Away 970M 28-In. Snowblower View Diagrams & Manuals
10560 E (1694847) 24 Inch Snow Thrower 10.5hp View Diagrams & Manuals
1070 M (1691378) 28 Inch Snow Thrower 10hp View Diagrams & Manuals
11570 E (1694849) 28 Inch Snow Thrower 11.5hp View Diagrams & Manuals
1390 E (1694593) 38 Inch Snow Thrower 13hp View Diagrams & Manuals
1390 E (1694872) 38 Inch Snow Thrower 13hp View Diagrams & Manuals
1690830 12v/120v 28 Inch Snow Thrower 8hp View Diagrams & Manuals
1691402 28 Inch Snow Thrower 10hp View Diagrams & Manuals
7555 M (1694836) 22 Inch Snow Thrower 7.5hp View Diagrams & Manuals
8560 El (1694845) Ohv 24 Inch Snow Thrower 8.5hp View Diagrams & Manuals
928 M (1692617) 28 Inch Snow Thrower 9.5hp View Diagrams & Manuals
I 7524 E (7800085) 24 Inch Snow Thrower 7.5hp View Diagrams & Manuals
Snapper
95247E (Series 7)(1694853)(2006) 24-Inch 9.5 Hp Two Stage Large Frame Snow Thrower View Diagrams & Manuals
E95247 (Series 7)(1694854) 24-Inch 9.5 Hp Two Stage Large Frame Snow Thrower Euro View Diagrams & Manuals
105287E (Series 7)(1694855)(2006) 28-Inch 10.5 Hp Two Stage Large Frame Snow Thrower View Diagrams & Manuals
E105287 (Series 7)(1694856) 28-Inch 10.5 Hp Two Stage Large Frame Snow Thrower Euro View Diagrams & Manuals
115327E (Series 7)(1694857)(2006) 32-Inch 11.5 Hp Two Stage Large Frame Snow Thrower View Diagrams & Manuals
E115327 (Series 7)(1694858) 32-Inch 11.5 Hp Two Stage Large Frame Snow Thrower Euro View Diagrams & Manuals
13387E (Series 7)(1694859)(2006) 38-Inch 13 Hp Two Stage Large Frame Snow Thrower View Diagrams & Manuals
E13387 (Series 7)(1694860) 38-Inch 13 Hp Two Stage Large Frame Snow Thrower Euro View Diagrams & Manuals
Show More Compatible Models
This item works with the following types of products:
- Snowblower Parts
Customer Part Reviews ?
Average Rating (out of 5):
Click to filter by ratings:
5 stars
2
4 stars
0
3 stars
0
2 stars
0
1 stars
0
< PREV
- 1
Universal gear.
Fit perfectly 10 minute repair
Anonymous -
February 14, 2022
Verified Purchase
great parts
Parts are great arrived quickly fit great snow blower works great used E parts a few times always happy with the out come
Guest -
February 9, 2022
Verified Purchase
t
t
t -
t days ago
Verified Purchase
eReplacementParts Team
t
Questions & Answers ?
Our customer Service team is at the ready daily to answer your part and product questions.

Ask our Team
We have a dedicated staff with decades of collective experience in helping customers just like you purchase parts to repair their products.
Does this fit my product?Questions & Answers for Gear Universal
No questions have been asked yet
Customer Repair Instructions ?
All our customer repair instructions are solicited directly from other customers just like you who have purchased and replaced this exact part.
Worn out gears on chute crank
Glenn - January 26, 2016
👍 14 of 14 people found this instruction helpful
Tool Type
Snowblower
Difficulty
Medium
Time
30-60 minutes
Tools Used
Socket set, Wrench Set, punch, hammer
Parts Used
Shut off the fuel to prevent spillage. Drain the fuel or unscrew the gas cap and stretch a clean plastic sandwich bag over the filler neck. Hold the bag in place by screwing the fuel cap back on. This will keep fuel from dripping out of the gas cap vent.
Tip the snow blower forward so the top of the bucket is on the ground. Prop it with blocks if needed.
Remove the bottom plate. Remove the 2 bolts that hold the universal block to the chassis from underneath.
The chute crank will now be movable and easier to work on. Using a suitable punch and hammer drive out the roll pins holding the gears on. After the 2 pins are out the gears will come out of the universal block. Now the new gears can be slipped into place. Align the holes and drive the pins back in. If you are replacing plastic gears there may be a spacer that will no longer be needed.
Bolt the universal block back on the chassis, check for any binding and adjust as necessary.Reinstall the bottom plate. Tip the snowblower back down on it's wheels, and remove the plastic bag under the gas cap.
Did you find this story helpful?
Thanks for voting and helping fellow customers!
Broken teeth on the universal gears for the chute adjustment rods.
Russell - March 19, 2018
👍 1 of 1 people found this instruction helpful
Tool Type
Snowblower
Difficulty
Easy
Time
15-30 minutes
Tools Used
Screwdriver, Pliers, Socket set
Parts Used
1. Disconnected the lower rod attachment at the worm gear end.
2. Removed the universal gear by pushing out the locking pin and sliding the gear off the end of the rod.
3. Removed the cotter pin and universal gear from the upper rod section.
4. Put the (2) new universal gears on in place of the old parts (lower and upper rod, with old lock pin and cotter pin).
5. Re-attached the lower rod holder at the worm gear end.
6. Lubricated the parts.
Did you find this story helpful?
Thanks for voting and helping fellow customers!
The output chute would not rotate
Kevin - March 3, 2016
👍 1 of 1 people found this instruction helpful
Tool Type
Snowblower
Difficulty
Easy
Time
15-30 minutes
Tools Used
Screwdriver, Pliers
Parts Used
Removed cotter pin and roll pin to remove old gears. Used the same cotter pin and roll pin to install the new gears purchased from ereplacement parts. Installation was simple and the gears worked great!
Did you find this story helpful?
Thanks for voting and helping fellow customers!
Snowblower chute controls were broken on three different types of machined
Nazarian - January 7, 2020
Tool Type
Snowblower
Difficulty
Medium
Time
1-2 hours
Tools Used
Screwdriver, Pliers, Socket set, Wrench Set
Removed damaged and broken parts. Replaced each piece as needed. Now have three functional snowblowers.
Did you find this story helpful?
Thanks for voting and helping fellow customers!
Snow chute gears were worn out.
Jerome - March 4, 2019
Tool Type
Snowblower
Difficulty
Medium
Time
15-30 minutes
Tools Used
Pliers, Socket set, Wrench Set, Drift punch , hammer
Parts Used
Removed the brackets for chute rods, punched out the drift pins in old gears,replaced the gears,installed the hold down bracket bolts and adjusted the linkage. Don't forget to order 2 of the gears when you order! I took it for granted they come as a pair, they don't.
Did you find this story helpful?
Thanks for voting and helping fellow customers!
Chute gears worn, could not turn chute
Robert - August 28, 2017
Tool Type
Snowblower
Difficulty
Easy
Time
15-30 minutes
Tools Used
Wrench Set, Punch and hammer
Parts Used
1. Removed nut and bolt that controls chute 1/2 wrench to remove
2. Removed spring pins that hold gears on using punch and hammer
3. Installed in reverse order
2. Removed spring pins that hold gears on using punch and hammer
3. Installed in reverse order
Did you find this story helpful?
Thanks for voting and helping fellow customers!
Belts and chute gears were worn due to age. Maintenance repairs long overdue!
Douglas - April 12, 2017
Tool Type
Snowblower
Difficulty
Medium
Time
1-2 hours
Tools Used
Screwdriver, Pliers, Socket set, Wrench Set, Adjustable Wrench, Cordless drill for easier removal of screws and nuts.
1. Remove bottom gear box cover and pulley cover.
2. Removed the chute handle, removed the old broken gears with handle in a vice, replace the gears and roll pins on both gears. Reassemble.
3. Loosen all belt guards and remove both belts through opening in bottom of snowblower.
4. Replace both belts and re-position belt guards, tighten.
5. Remove both broken shear pins on the blade assembly with hammer and punch; replace with new.
6. Re-install lower gear case cover and pulley cover.
7. Re-install chute handle and mount back on snowblower handle.
8. Check all repairs for tightness and completion.
9. Run snow blower, check blade function and belt engagement on transmission and snowblower auger.
Repairs completed! Prep for winter storage!!
Did you find this story helpful?
Thanks for voting and helping fellow customers!
Gears
Mark - February 27, 2016
Tool Type
Snowblower
Difficulty
Medium
Time
30-60 minutes
Tools Used
Pliers, hammer/ roll pin driver/ roll pins
Parts Used
Remove linkage for chute rotation. Drive out old roll pins. Replaced gears with new roll pins. Put linkage back together and adjust tension on gears.
Did you find this story helpful?
Thanks for voting and helping fellow customers!
OEM stands for Original Equipment Manufacturer and means the part you’re buying is sourced directly from the manufacturer who made your product. At eReplacementParts, we sell only genuine OEM parts, guaranteeing the part you’re purchasing is of better design and of higher quality than aftermarket parts.
Our product descriptions are a combination of data sourced directly from the manufacturers who made your product as well as content researched and curated by our content & customer service teams. This content is edited and reviewed internally before being made public to customers.
Our customer service team are at the ready daily to answer your part and product questions. We have a dedicated staff with decades of collective experience in helping customers just like you purchase parts to repair their products.
All our part reviews are solicited directly from other customers who have purchased this exact part. While we moderate these reviews for profanity, offensive language or personally identifiable information, these reviews are posted exactly as submitted and no alterations are made by our team.
All our customer repair instructions are solicited directly from other customers just like you who have purchased and replaced this exact part. While we moderate these reviews for profanity, offensive language or personally identifiable information, these reviews are posted exactly as submitted and no alterations are made by our team.
Based on data from past customer purchasing behaviors, these parts are most commonly purchased together along with the part you are viewing. These parts may be necessary or helpful to replace to complete your current repair.
All our installation videos are created and produced in collaboration with our in-house repair technician, Mark Sodja, who has helped millions of eReplacementParts customers over the last 13 years repair their products. Mark has years of experience in selling and repairing both commercial and residential products with a specialty in gas-powered equipment.
This data is collected from customers who submitted a repair instruction after replacing this exact part. Customers can rate how easy the repair was to complete and how long it took. We aggregate this data to provide a repair rating that allows customers to quickly determine the difficulty and time needed to perform their own repair.