


This is a genuine Powermatic replacement part, it is sold individually.
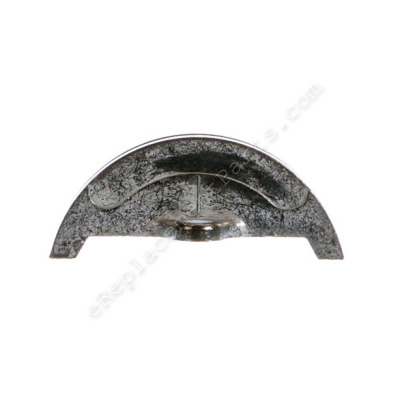
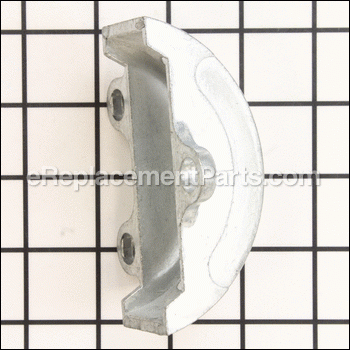
The Trunnion is attached to the Trunnion Support Bracket and the table.
By loosening the Trunnions you are able to tilt the table.
Trunnion PWBS14-144
OEM part for: Powermatic
Part Number: PWBS14-144
$25.33
In Stock
Jump To:
Product Description ?
- Classification: Part
- Weight: 0.28 lbs.
- Shipping: Ships Worldwide
Frequently Purchased Together ?

Compatibility
This part will fit the following 2 machines
Powermatic
PWBS-14 (1791216K) 1.5HP 1Ph 115/230V Bandsaw View Diagrams & Manuals
PWBS-14CS (1791216K) 1.5HP 1Ph 115/230V Bandsaw View Diagrams & Manuals
This item works with the following types of products:
- Band Saw Parts
- Saw Parts
Customer Part Reviews ?
Average Rating (out of 5):
Click to filter by ratings:
5 stars
4
4 stars
1
3 stars
0
2 stars
0
1 stars
0
< PREV
- 1
The part arrived exactly as your communication said it would. Our trailer is still in winter storage, so haven't made the repair yet.
Looks good, but can't put it in till we get our trailer home in April.
Guest -
March 23, 2021
Verified Purchase
Worked perfectly on Delta band saw
These were used on a Delta band saw which had no replacement parts available, but based on recommendation from another review, it was stated these would work. The worked perfectly and were much heavier duty and fit right on the Delta unit.
Guest -
December 3, 2019
Verified Purchase
great part and fast delivery!!!
the trunnion I got for my delta drill press fit perfectly-fast service and was easy to install
Guest -
November 14, 2019
Verified Purchase
Saved my Delta 28-303 Type 1 band saw from the trash heap.
Thought the saw was destroyed when a heavy box was set down on the fence support rails and both trunnions broke. These trunnions fit perfectly and seem to be quite a bit heavier duty than the originals. It was fairly simple to pull the angle scale off the old one and drill the holes for #4 button head screws to hold it on the new one.
Guest -
August 9, 2019
Verified Purchase
Very helpful, friendly people.
All good
Guest -
October 5, 2019
Verified Purchase
t
t
t -
t days ago
Verified Purchase
eReplacementParts Team
t
Questions & Answers ?
Our customer Service team is at the ready daily to answer your part and product questions.

Ask our Team
We have a dedicated staff with decades of collective experience in helping customers just like you purchase parts to repair their products.
Does this fit my product?Questions & Answers for Trunnion
No questions have been asked yet
Customer Repair Instructions ?
All our customer repair instructions are solicited directly from other customers just like you who have purchased and replaced this exact part.
Trunnions on 14 inch bandsaw broke (Rigid) during moving from Florida
Arlie - February 13, 2017
👍 5 of 5 people found this instruction helpful
Tool Type
Band Saw
Difficulty
Easy
Time
15-30 minutes
Tools Used
Wrench Set
Parts Used
I did my research on the internet and found out that the parts to repair my saw were no longer available. I researched for several months and found out that the trunion for a powermatic 14 inch bandsaw would fit. Ordered them and put them on (20 min job) and presto changeo I have aworking saw.
Did you find this story helpful?
Thanks for voting and helping fellow customers!
Broken parts on my bandsaw
Gary - May 31, 2016
👍 2 of 2 people found this instruction helpful
Tool Type
Band Saw
Difficulty
Easy
Time
15-30 minutes
Tools Used
Screwdriver, Socket set
Remove trunnion clamp base from underneath the table. remove trunnions and clamp shoes from the table. Attach the new trunnions and clamp shoes to the table. The attach the clamp shoe base to the table.
Did you find this story helpful?
Thanks for voting and helping fellow customers!
Broken trunnions
Phil - December 24, 2016
👍 1 of 1 people found this instruction helpful
Tool Type
Band Saw
Difficulty
Easy
Time
Less than 15 minutes
Tools Used
Socket set, Wrench Set
Parts Used
Remove the table from the saw
Removed old trunnion pieces
Moved degree sticker to new trunnion
Replaced with new trunnions
Put the table back on the bandsaw
Easy fix..parts fit perfectly and were cheaper than other sites.
Removed old trunnion pieces
Moved degree sticker to new trunnion
Replaced with new trunnions
Put the table back on the bandsaw
Easy fix..parts fit perfectly and were cheaper than other sites.
Did you find this story helpful?
Thanks for voting and helping fellow customers!
2 broken trunnions
Judy - September 5, 2016
👍 1 of 1 people found this instruction helpful
Tool Type
Band Saw
Difficulty
Easy
Time
15-30 minutes
Tools Used
Socket set, Wrench Set
Parts Used
Removed broken attached original trunnions and replaced them with the replacement after market trunnions. Seemed to be of better quality than the originals.
Did you find this story helpful?
Thanks for voting and helping fellow customers!
Broke trunnions with too much downward pressure on band saw table.
Richard - August 22, 2016
👍 1 of 1 people found this instruction helpful
Tool Type
Band Saw
Difficulty
Easy
Time
15-30 minutes
Tools Used
Socket set
Parts Used
I see trunnions have been re-engineered and much stronger it appears. Metal thickness is greater. Original trunnions very thin. Very easy. 8 fasteners and done.
Did you find this story helpful?
Thanks for voting and helping fellow customers!
Old trunnion was broken
Raymond - January 19, 2016
👍 1 of 1 people found this instruction helpful
Tool Type
Band Saw
Difficulty
Easy
Time
15-30 minutes
Tools Used
Screwdriver, Socket set, Wrench Set, square for setting table
Parts Used
Remove: band saw blade, insert plug, and insert pin
Loosen table fasteners
Remove broken trunnion
Install new trunnion, be careful not get it too tight
Reassemble table
Reinstall blade and other components
Adjust table for square
Loosen table fasteners
Remove broken trunnion
Install new trunnion, be careful not get it too tight
Reassemble table
Reinstall blade and other components
Adjust table for square
Did you find this story helpful?
Thanks for voting and helping fellow customers!
The Trunnions under the table broke during our move.
Robert - February 26, 2020
Tool Type
Band Saw
Difficulty
Easy
Time
15-30 minutes
Tools Used
Socket set
Parts Used
Finished removing the table. Put the table one the bench. Removed the bolts holding the old trunnions. Cleaned the area around the trunnions and bolted down the new trunnions. Reinstalled table back on to the saw.
Did you find this story helpful?
Thanks for voting and helping fellow customers!
Well my inexperiance in moving equipment started the problem, Should have removed the cast iron table for transporting. Anyway broke the trunnion.
George - October 26, 2019
Tool Type
Band Saw
Difficulty
Easy
Time
15-30 minutes
Tools Used
Socket set
Parts Used
Vary easy to repair, remove table position bolts, remove trunnion bolts , replace trunnion and put bolts back in. I'm up and running again. This trunnion fit my CalHawk 14" band saw.
Did you find this story helpful?
Thanks for voting and helping fellow customers!
The old trunions had been crushed
Charles - July 14, 2016
Tool Type
Band Saw
Difficulty
Easy
Time
15-30 minutes
Tools Used
Wrench Set
1. Removed broken trunions from table
2. Cleaned out all broken pieces from saw
3. Installed new trunions and shoes to the table
4. Installed table to the saw.
The powermatic trunnions are much heavier duty than the Delta original parts and shouldn't break.
2. Cleaned out all broken pieces from saw
3. Installed new trunions and shoes to the table
4. Installed table to the saw.
The powermatic trunnions are much heavier duty than the Delta original parts and shouldn't break.
Did you find this story helpful?
Thanks for voting and helping fellow customers!
Broken trunions
Roy - February 23, 2016
Tool Type
Band Saw
Difficulty
Easy
Time
15-30 minutes
Tools Used
Socket set, Wrench Set
Parts Used
1. Disconnect power to bandsaw
2. Remove blade
3. Remove table
4. Remove six table bolts from underside of table
5. Remove two table adjuster knobs and associated hardware
6. Remove any remaining trunnion pieces
7. Install trunnions to yoke on bandsaw paying attention to the bolt pattern on the table
8. Place table on trunnions
9. Hand start all table bolts. The two innermost bolts will be very difficult to install if any bolts are tight before starting these two. Hand start all the other bolts first, then these two.
10. Tighten all table mount bolts
11. Replace blade
12. Restore power to bandsaw.
Did you find this story helpful?
Thanks for voting and helping fellow customers!
OEM stands for Original Equipment Manufacturer and means the part you’re buying is sourced directly from the manufacturer who made your product. At eReplacementParts, we sell only genuine OEM parts, guaranteeing the part you’re purchasing is of better design and of higher quality than aftermarket parts.
Our product descriptions are a combination of data sourced directly from the manufacturers who made your product as well as content researched and curated by our content & customer service teams. This content is edited and reviewed internally before being made public to customers.
Our customer service team are at the ready daily to answer your part and product questions. We have a dedicated staff with decades of collective experience in helping customers just like you purchase parts to repair their products.
All our part reviews are solicited directly from other customers who have purchased this exact part. While we moderate these reviews for profanity, offensive language or personally identifiable information, these reviews are posted exactly as submitted and no alterations are made by our team.
All our customer repair instructions are solicited directly from other customers just like you who have purchased and replaced this exact part. While we moderate these reviews for profanity, offensive language or personally identifiable information, these reviews are posted exactly as submitted and no alterations are made by our team.
Based on data from past customer purchasing behaviors, these parts are most commonly purchased together along with the part you are viewing. These parts may be necessary or helpful to replace to complete your current repair.
All our installation videos are created and produced in collaboration with our in-house repair technician, Mark Sodja, who has helped millions of eReplacementParts customers over the last 13 years repair their products. Mark has years of experience in selling and repairing both commercial and residential products with a specialty in gas-powered equipment.
This data is collected from customers who submitted a repair instruction after replacing this exact part. Customers can rate how easy the repair was to complete and how long it took. We aggregate this data to provide a repair rating that allows customers to quickly determine the difficulty and time needed to perform their own repair.