eReplacementParts.com
877-346-4814
Toro Parts
Repair Parts Home
  
Lawn Equipment Parts
  
Toro Parts
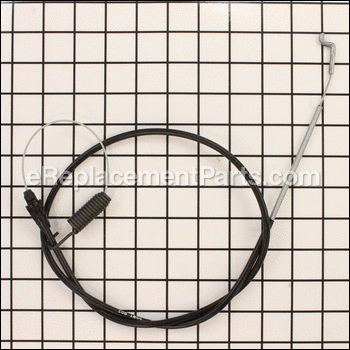
  105-1844 Traction Cable

Traction Cable 105-1844

OEM part for: Toro, Lawn Boy

Part Number: 105-1844


Install
Videos!
Grid squares measure 1x1 inch
In Stock
Order within the next 3 hours and your part ships today!
Medium 30-60 minutes (25 rated repairs)?
OEM: Original Equipment Manufacturer ?
ToroLawn Boy
Does this d-block d-md-none fit my product?

Product Description ?

This is a Genuine Manufacturer Approved replacement part used on some Push Lawn Mowers. This part is sold individually. The Traction Cable engages drive wheels on the lawn mowers. It is connected to the Traction Bail and then attached to the traction bracket near the transmission.

  • Classification: Part
  • Weight: 0.20 lbs.
  • Shipping: Ships Worldwide

Frequently Purchased Together ?

Compatibility

This part will fit the following 65 machines

Toro

20013 (220000001-220300000)(2002) Lawn Mower View Diagrams & Manuals
20013 (220300001-220999999)(2002) Lawn Mower View Diagrams & Manuals
20013 (230000001-230999999)(2003) Lawn Mower View Diagrams & Manuals
20013 (240000001-240999999)(2004) Lawn Mower View Diagrams & Manuals
20013 (250000001-250999999)(2005) Lawn Mower View Diagrams & Manuals
20013 (260000001-260999999)(2006) Lawn Mower View Diagrams & Manuals
20014 (220000001-220300000)(2002) Lawn Mower View Diagrams & Manuals
20014 (220300001-220999999)(2002) Lawn Mower View Diagrams & Manuals
20014 (230000001-230999999)(2003) Lawn Mower View Diagrams & Manuals
20017 (220000001-220300000)(2002) Lawn Mower View Diagrams & Manuals
20017 (220300001-220999999)(2002) Lawn Mower View Diagrams & Manuals
20017 (230000001-230999999)(2003) Lawn Mower View Diagrams & Manuals
20017 (240000001-240999999)(2004) Lawn Mower View Diagrams & Manuals
20017 (250000001-250999999)(2005) Lawn Mower View Diagrams & Manuals
20017 (260000001-260999999)(2006) Lawn Mower View Diagrams & Manuals
20018 (220000001-220300000)(2002) Lawn Mower View Diagrams & Manuals
20018 (220300001-220999999)(2002) Lawn Mower View Diagrams & Manuals
20018 (230000001-230999999)(2003) Lawn Mower View Diagrams & Manuals
20031 (240000001-240999999)(2004) Lawn Mower View Diagrams & Manuals
20041 (250000001-250999999)(2005) Lawn Mower View Diagrams & Manuals
20047 (260000001-260999999)(2006) Lawn Mower View Diagrams & Manuals
20049 (250000001-250999999)(2005) Lawn Mower View Diagrams & Manuals
20051 (240000001-240999999)(2004) Lawn Mower View Diagrams & Manuals
20066 (270000001-270999999)(2007) Lawn Mower View Diagrams & Manuals
20066 (280000001-280999999)(2008) Lawn Mower View Diagrams & Manuals
20067 (270000001-270999999)(2007) Lawn Mower View Diagrams & Manuals
20067 (280000001-280999999)(2008) Lawn Mower View Diagrams & Manuals
20068 (280000001-280999999)(2008) Lawn Mower View Diagrams & Manuals
20070 (260000001-260999999)(2006) Lawn Mower View Diagrams & Manuals
20073 (270000001-270999999)(2007) Lawn Mower View Diagrams & Manuals
20073A (270000001-270999999)(2007) Lawn Mower View Diagrams & Manuals
20074 (270000001-270999999)(2007) Lawn Mower View Diagrams & Manuals
20074A (270000001-270999999)(2007) Lawn Mower View Diagrams & Manuals
20075 (270000001-270999999)(2007) Lawn Mower View Diagrams & Manuals
20076 (270000001-270999999)(2007) Lawn Mower View Diagrams & Manuals
20076A (270000001-270999999)(2007) Lawn Mower View Diagrams & Manuals
20079 (260000001-260999999)(2006) Lawn Mower View Diagrams & Manuals
20089 (280000001-280999999)(2008) Lawn Mower View Diagrams & Manuals
20096 (270000001-270999999)(2007) Lawn Mower View Diagrams & Manuals
20098 (270000001-270999999)(2007) Lawn Mower View Diagrams & Manuals
20112 (280000001-280999999)(2008) Lawn Mower View Diagrams & Manuals
20112 (290000001-290999999)(2009) Lawn Mower View Diagrams & Manuals
20113 (280000001-280999999)(2008) Lawn Mower View Diagrams & Manuals
20113 (290000001-290999999)(2009) Lawn Mower View Diagrams & Manuals
20654 (270000001-270999999)(2007) Lawn Mower View Diagrams & Manuals
20654 (250000001-250999999)(2005) Lawn Mower View Diagrams & Manuals
20654 (260000001-260999999)(2006) Lawn Mower View Diagrams & Manuals
20655 (270000001-270999999)(2007) Lawn Mower View Diagrams & Manuals
20655 (280000001-280999999)(2008) Lawn Mower View Diagrams & Manuals
20655 (290000001-290999999)(2009) Lawn Mower View Diagrams & Manuals
20655 (240000001-240999999)(2004) Lawn Mower View Diagrams & Manuals
20655 (250000001-250999999)(2005) Lawn Mower View Diagrams & Manuals
20655 (260000001-260999999)(2006) Lawn Mower View Diagrams & Manuals
20656 (270000001-270999999)(2007) Lawn Mower View Diagrams & Manuals
20656 (280000001-280999999)(2008) Lawn Mower View Diagrams & Manuals
20656 (290000001-290999999)(2009) Lawn Mower View Diagrams & Manuals
20656 (240000001-240999999)(2004) Lawn Mower View Diagrams & Manuals
20656 (250000001-250999999)(2005) Lawn Mower View Diagrams & Manuals
20656 (260000001-260999999)(2006) Lawn Mower View Diagrams & Manuals
20658 (280000001-280999999)(2008) Lawn Mower View Diagrams & Manuals
20658 (290000001-290999999)(2009) Lawn Mower View Diagrams & Manuals

Lawn Boy

10367 (240000001-240999999)(2004) Silver Series Lawnmower View Diagrams & Manuals
10655 (250000001-250999999)(2005) Gold Series Lawnmower View Diagrams & Manuals
10655 (240000001-240999999)(2004) Gold Series Lawnmower View Diagrams & Manuals
10656 (240000001-240999999)(2004) Gold Series Lawnmower View Diagrams & Manuals
Show More Compatible Models
Don't see yours? Try searching our site for :

This item works with the following types of products:

  • Lawn Mower Parts

Customer Part Reviews ?

5
Average Rating (out of 5):
18 Reviews
Click to filter by ratings:
5 stars
18
4 stars
0
3 stars
0
2 stars
0
1 stars
0
  • Highest Rating
  • Most Recent
< PREV
  • 1
  • 2
NEXT >
  • Great part Exact fit.
    Received this part within 3 days .. Excellent quality replaced original traction cable. Another satisfied, customer.
    Guest - October 23, 2023 Verified Purchase
    Exactly what I needed!
    Fast shipping. Easy fix. Self-propelled works again.
    William - October 17, 2023 Verified Purchase
    Right parts
    The parts I ordered were exactly right and good quality. Shipping was very quick
    Guest - July 17, 2023 Verified Purchase
    Lawn mower self propelled cable.
    This was the right part and it fits like it should. Arrived in just a couple of days.
    Kim - June 28, 2023 Verified Purchase
    Experiance went well, great part, delivery timely, instal easy.
    All went better than expected.
    David - June 6, 2023 Verified Purchase
    Fit
    Proper size and length
    Guest - June 27, 2022 Verified Purchase
    Part fit perfectly
    Shipping time was reasonable and part was as expected
    Anonymous - June 10, 2022 Verified Purchase
    Fit perfect, problem fixed.
    It took a little bit of time to install, not a difficult job, and definitely would recommend eReplacementParts.
    Guest - August 6, 2021 Verified Purchase
    Excellent as alwaya
    It was the correct part in a timely manner.
    Guest - July 21, 2021 Verified Purchase
    Easy repair
    Great part fit perfectly
    Anonymous - June 25, 2021 Verified Purchase
    t
    t
    t - t days ago Verified Purchase
    eReplacementParts Team
    t

    Questions & Answers ?

    Our customer Service team is at the ready daily to answer your part and product questions.

    photo of team member
    Ask our Team

    We have a dedicated staff with decades of collective experience in helping customers just like you purchase parts to repair their products.

    Does this fit my product?

    Questions & Answers for Traction Cable


    No questions have been asked yet

    Customer Repair Instructions ?

    All our customer repair instructions are solicited directly from other customers just like you who have purchased and replaced this exact part.

    Medium 30-60 minutes (25 rated repairs)?

    The traction cable hook at the handle end broke; needed to replace the whole traction cable

    Eric - November 11, 2015
    👍 51 of 55 people found this instruction helpful
    Tool Type

    Lawn Mower

    Difficulty

    Medium

    Time

    15-30 minutes

    Tools Used

    Pliers, Socket set, Adjustable Wrench, Needle nose Pliers, Vise Grip Pliers

    As always, ensure mower is unstartable (disconnect spark plug) before attempting repairs. Set mower on it\'s right side (as you\'re standing behind the mower) for the following repairs.
    1. Remove the left rear wheel adjacent to the point where the cable spring attaches.
    2. Take off the bolt holding the side of the Brace Plate (part number J-25 on the Rear Axle diagram, it\'s really a metal bar across the rear of the housing) off from the same left side as the wheel from step 1. Move the bar away from the area where the spring attaches.
    3. Unhook the spring from the axle assembly.
    4. Pop off the plastic hole cover (Plug Dome, part I-27) to give more room to remove the old cable.
    5. Remove the spring end of the old cable from the mower housing by pulling it out from the top of the housing. Loosen the screw on the Upper Anchor-Cable attachment (part H-17) and slide out the remaining upper end of the cable by pulling it down toward the housing. Discard the old cable.
    6. Insert new cable spring from the top of the mower housing.
    7. Using needlenose pliers, attach spring to axle assembly hole. (A lot easier said than done, but it eventually goes in.)
    8. Put WD-40 on all parts.
    9. Pop the plastic re-inforcement part on the new cable into the housing hole. Slide it over and reattach Plug Dome.
    10. Re-attach Brace Plate from Step 2 with bolt onto housing.
    11. Re-attach wheel from Step 1. Set mower upright.
    12. Slide upper end of cable through Upper Anchor-Cable attachment from the bottom. Do not tighten yet. Pull it through until you can complete the next step.
    13. Insert top end of traction cable (metal hook end) into handle hole.
    14. With mower handle in non-started position, pull Traction Cable from below the Upper Anchor-Cable attachment until it is taught above the Upper Anchor-Cable attachment. Tighten screw on Upper Anchor-Cable attachment. Ensure cable functions correctly when you depress the power handle.
    15. Repair complete!
    Did you find this story helpful?
    Thanks for voting and helping fellow customers!

    Traction cable broke at the handle, Model 20017

    Paul - June 5, 2016
    👍 31 of 35 people found this instruction helpful
    Tool Type

    Lawn Mower

    Difficulty

    Medium

    Time

    More than 2 hours

    Tools Used

    Pliers, Socket set, Wrench Set

    If you are like me and never paid attention to where the cable attached at the handle, the repair could take much longer than necessary. Other posts on this site address the removal and attachment of the cable from under the machine. What these posts do not address are two (2) issues that could have made the repair much easier.

    One: When attaching the new cable to the transmission, rather than only bringing the spring far enough to try attach the spring/hook into that small hole on the lever that controls the transmission, pull enough cable through so that you can easily attach the spring/hook into the hole form the underside of the lever. Once attached just fish the excess cable back through the opening on the mower deck.

    Two: The curved end of the cable that attaches at the handle does NOT attach at the same location on the left side of the handle as does the cable on the right side of the handle. If you attach to this location the mower will only move forward when you pull back on the handle. The cable attaches underneath the sliding handle. You will see a lever under the handle that it will attach to.
    Did you find this story helpful?
    Thanks for voting and helping fellow customers!

    Lawn mower traction cable (the cable that controls the drive wheels) broke on my Toro Personal Pace mower.

    Leonard - May 3, 2017
    👍 13 of 14 people found this instruction helpful
    Tool Type

    Lawn Mower

    Difficulty

    Medium

    Time

    1-2 hours

    Tools Used

    Screwdriver, Socket set, Wrench Set

    Take note of how the old cable is routed (important)
    Removed the old cable by
    using a socket wrench to remove the cable hold from the handle bar,
    Removed the Z clip by hand,
    Turned the mower on it's side and used a screwdriver to remove the cover for the access hole
    Removed the cable spring from the transmission clip
    Removed the cable hold from the mower deck using pliers (had to use a good deal of force)
    Ran new cable (spring side) through the deck access hole
    Attached cable spring to transmission clip (somewhat difficult because of limited access)
    Run cable through cable guide on handle post
    Run cable through cable hold that will attach to handle bar post but do not attach it to the handle bar post yet
    Attach Z end to handle bar
    Push cable hold onto the hole in the mower deck (will snap in)
    Make sure cable is routed correctly
    Reattach cable hold to handle bar post
    Make sure you do this in the correct sequence otherwise you will find yourself taking it apart and redoing it. This is the first time I had to make this repair and as such, it was a learning experience, if I have to do it again it will go easier and faster. This is a good repair to do yourself. Be aware that when you have the mower on it's side it will likely leak a little oil and gas, so it's good to do with an empty or near empty tank and be sure to check the oil level when you are finished.
    Did you find this story helpful?
    Thanks for voting and helping fellow customers!

    The Traction-Cable parted in the middle

    clifford - September 26, 2016
    👍 8 of 10 people found this instruction helpful
    Tool Type

    Lawn Mower

    Difficulty

    Medium

    Time

    15-30 minutes

    Tools Used

    Screwdriver, Pliers, Wrench Set

    I found out that I needed to set my mower on a pair of saw-horses to make the underside of the mower more accessible. After dropping the spring end of the cable through the access hole of the mower body I eventually maneuvered the spring into place with a pair of needle nose pliers. After that it was only a matter of attaching the other end to the press bar and then wire-tying the cable into place.
    Did you find this story helpful?
    Thanks for voting and helping fellow customers!

    Only a bit of difficulty with hooking the end of cable through eyelet.

    Daniel - September 13, 2018
    👍 5 of 6 people found this instruction helpful
    Tool Type

    Lawn Mower

    Difficulty

    Easy

    Time

    15-30 minutes

    Tools Used

    Screwdriver, Pliers, Socket set, Adjustable Wrench, None

    With the mower on its side, I ran the cable through pass in the lower deck and with a little effort hooked the bracket through eyelet. After that part, it was a breeze. Just attached the cable stop and hooked other end to the moving handle mechanism to ensure a taunt cable finish. And after that I checked it out with much satisfaction, it was like new again.
    Did you find this story helpful?
    Thanks for voting and helping fellow customers!

    Traction cable broke

    Charles - June 11, 2017
    👍 3 of 4 people found this instruction helpful
    Tool Type

    Lawn Mower

    Difficulty

    Hard

    Time

    30-60 minutes

    Tools Used

    Pliers, Socket set, Wrench Set, Adjustable Wrench

    1. Remove back left wheel
    2. Disconnected wheel bracket from frame
    3. Remove broken cable
    4. Install new cable
    5. Hook end of spring to arm
    6. Reattach wheel bracket
    7. Put wheel in place
    Did you find this story helpful?
    Thanks for voting and helping fellow customers!

    Traction cable broke

    Gary - May 6, 2022
    Tool Type

    Lawn Mower

    Difficulty

    Medium

    Time

    Less than 15 minutes

    Tools Used

    Screwdriver, Pliers

    Took off the broken traction cable. It was confusing at first. I couldn’t figure out how the cable was through the hole near the mower, then I noticed a slit just big enough for the cable to fit through. After that it came together pretty easy.
    Did you find this story helpful?
    Thanks for voting and helping fellow customers!

    The traction cable broke and the cutout fell out and was cut up

    Dirk - October 27, 2021
    Tool Type

    Lawn Mower

    Difficulty

    Easy

    Time

    15-30 minutes

    Tools Used

    Screwdriver, Pliers

    1) took out a small plug
    2) rolled mover over
    3) removed old cable with a long nose vice grip
    4) place the new cable onto the traction mechanism
    5) connected the top of the cable to the handle
    6) adjusted the cable to make the forward motion correct.
    Did you find this story helpful?
    Thanks for voting and helping fellow customers!

    Lawn Mower Self Propel cable broke

    Robert - October 21, 2021
    Tool Type

    Lawn Mower

    Difficulty

    Medium

    Time

    30-60 minutes

    Tools Used

    Screwdriver, Pliers, Socket set, Wrench Set

    1. Disconnect the spark plug.
    2. Measured cable length. Removed deck plug and cable above the deck and disconnected the spring from below the deck.
    3. Remove the rear plastic chute assemble four nuts/bolts and two top deck screw(to allow easy access for spring installation).
    4. Installed spring below deck and cabling above deck.Install deck plug.
    5. Adjusted cable length to original dimensions.
    6. Installed rear plastic chute assembly.
    7. Reconnected spark plug and readjusted cabling length for appropriate personal pace operations.
    Did you find this story helpful?
    Thanks for voting and helping fellow customers!

    Cables were broken

    Todd - July 4, 2021
    Tool Type

    Lawn Mower

    Difficulty

    Easy

    Time

    15-30 minutes

    Tools Used

    Socket set, Wrench Set, Nutdriver

    removed old cables by removing bolts that held them in place
    installed new cables and replaced blots and nuts
    Adjusted cable position as needed and tighten nut that held cable in place
    Did you find this story helpful?
    Thanks for voting and helping fellow customers!

    OEM stands for Original Equipment Manufacturer and means the part you’re buying is sourced directly from the manufacturer who made your product. At eReplacementParts, we sell only genuine OEM parts, guaranteeing the part you’re purchasing is of better design and of higher quality than aftermarket parts.

    Our product descriptions are a combination of data sourced directly from the manufacturers who made your product as well as content researched and curated by our content & customer service teams. This content is edited and reviewed internally before being made public to customers.

    Our customer service team are at the ready daily to answer your part and product questions. We have a dedicated staff with decades of collective experience in helping customers just like you purchase parts to repair their products.

    All our part reviews are solicited directly from other customers who have purchased this exact part. While we moderate these reviews for profanity, offensive language or personally identifiable information, these reviews are posted exactly as submitted and no alterations are made by our team.

    All our customer repair instructions are solicited directly from other customers just like you who have purchased and replaced this exact part. While we moderate these reviews for profanity, offensive language or personally identifiable information, these reviews are posted exactly as submitted and no alterations are made by our team.

    Based on data from past customer purchasing behaviors, these parts are most commonly purchased together along with the part you are viewing. These parts may be necessary or helpful to replace to complete your current repair.

    All our installation videos are created and produced in collaboration with our in-house repair technician, Mark Sodja, who has helped millions of eReplacementParts customers over the last 13 years repair their products. Mark has years of experience in selling and repairing both commercial and residential products with a specialty in gas-powered equipment.

    This data is collected from customers who submitted a repair instruction after replacing this exact part. Customers can rate how easy the repair was to complete and how long it took. We aggregate this data to provide a repair rating that allows customers to quickly determine the difficulty and time needed to perform their own repair.

    eReplacementParts.com
    7174 South 400 West
    Suite 5
    Midvale, UT 84047
    visa mastercard discover american express PayPal