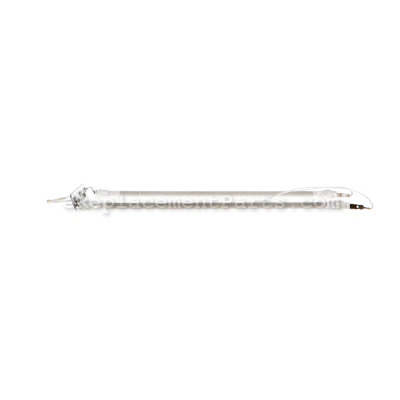
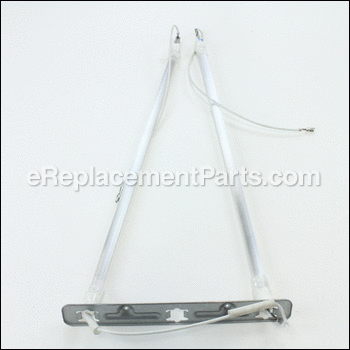


Top Front And Rear Heating Ele SP0010513
Part Number: SP0010513
Leaves our warehouse within
7 - 12 business days
7 - 12 business days
*This part replaces obsolete part #: BOV800XL/197 and BOV800XL197.
Product Information
Specifications
|
Frequently Purchased With


Compatibility
Products Compatibility
This item works with the following types of products:
- • Oven
Questions & Answers for Top Front And Rear Heating Ele
The heating elements on my oven measure about 14" is this part compatible?
Kevin
for model number B0V800xl/A
asked on 2022-02-08
Hello Kevin, Thank you for contacting us. We have researched the model you have provided and have found the part you are looking for is Part Number: SP0010513. If you need help placing an order, customer service is open 7 days a week. Please feel free to give us a call. We look forward to hearing from you!
eReplacementParts Team February 08, 2022
Repair Instructions: Submitted by Customers Like You
14 of 19 people found this instruction helpful
Tool Type:
Convection Oven
Parts Used:
Repair Difficulty:
Medium
Time Spent Repairing:
1-2 hours
Tools Used:
Screwdriver, Pliers, Power Drill
Top front heating element broke
The oven is very well made, almost too well.
Unscrew the side and rear panels, hidden screws underneath.
The wiring is all zip-tide neatly, these must be cut and separated to isolate the front/rear heating element wires on both sides.
The heating heating element is firmly set in the sockets- this took the longest, tiring to pop it out with out damaging the machine. This has to be done on both sides for both the front and rear heating elements.
Insert the replacement heating elements and zip tie the cords back exactly as they were. Make sure all the insulation sheets are set back they way they were as well.
The machine has been working normally since the replacement, it was quite the undertaking.... best of luck.
Did you find this story helpful?
Thanks for voting and helping fellow customers!
4 of 5 people found this instruction helpful
Tool Type:
Convection Oven
Parts Used:
Repair Difficulty:
Medium
Time Spent Repairing:
30-60 minutes
Tools Used:
Screwdriver, Pliers
I broke the top elements of the oven in shipping it to a new house
Took it apart and replaced the bad oven heat bars. Tons of small screws........you better like
tedious disassembly and reassembly. Not too bad though. The $30 beats buying a new $250 unit
tedious disassembly and reassembly. Not too bad though. The $30 beats buying a new $250 unit
Did you find this story helpful?
Thanks for voting and helping fellow customers!
4 of 5 people found this instruction helpful
Tool Type:
Convection Oven
Parts Used:
Repair Difficulty:
Medium
Time Spent Repairing:
1-2 hours
Tools Used:
Screwdriver, Pliers
Not working on toast
Had to remove cover completely, numerous screws and some hidden, not very accessible. Needed to cut wire for broiler element then repair after replacing toaster elements.
Did you find this story helpful?
Thanks for voting and helping fellow customers!
1 of 2 people found this instruction helpful
Tool Type:
Convection Oven
Parts Used:
Repair Difficulty:
Medium
Time Spent Repairing:
More than 2 hours
Tools Used:
Screwdriver, Pliers
Upper heating elements did not work
Followed instructions from others for taking apart. One note that my unit was not the exact model but while different, overall was same size and as a result the heating elements fit fine. The only thing I had to do in addition was splice one of the wires as it did not reach my circuit board. Once spliced, unit works fine. As others said, their are many screws as the unit is definitely not meant to come apart.
Did you find this story helpful?
Thanks for voting and helping fellow customers!
1 of 2 people found this instruction helpful
Tool Type:
Convection Oven
Parts Used:
Repair Difficulty:
Expert
Time Spent Repairing:
1-2 hours
Tools Used:
Screwdriver, Pliers
The glass around the top front heating element broke when my wife attempted to clean it.
There were literally hundreds of screws to get into the core of the oven. Once I removed these screws, I had to remove the front control panel. Then I had to carefully remove the heating elements and replace them. There is no easy way to make this happen. I'm surprised I completed it.
Did you find this story helpful?
Thanks for voting and helping fellow customers!
Reviews
2 Reviews
Average Rating (out of 5):
Click to filter by ratings:
5 stars
1
4 stars
0
3 stars
1
2 stars
0
1 stars
0
< PREV
- 1
Breville Oven Replaced Top Heating Elements
Replacement parts were exact match and works perfect first time. Dissembling toaster oven and replacing top heating elements were a bit challenging. Needed lots of patience and perseverance to complete the task. Well worth the effort and happy with the results.
Guest -
August 21, 2019
Verified Purchase
part is as expected
the part was received as ordered, what you guys need to do is to update your payments and shipping software. i understand this is new, but oh have your software guys ever handled international payments, currencies and shipping? You really need to take another look.
iGlobal -
December 20, 2019
Verified Purchase
Verified Purchase
eReplacementParts Team
< PREV
- 1
Product Information