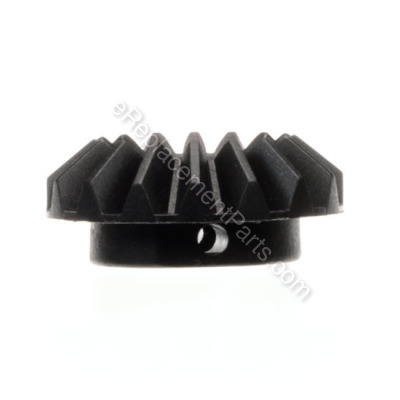


Genuine Bosch Replacement Part which is sold individually. This Plastic Gear sits through the metal Rod and is part of the system which allows the motor assembly to be adjusted. Over time the gear might wear out and might need to be replaced for the adjusting mechanism to function properly.
Toothed Gear 2610996896
OEM part for: Bosch
Part Number: 2610996896
$3.99
In Stock
Jump To:
Frequently Purchased Together ?


Compatibility
This part will fit the following 15 machines
Bosch
4000 (0601476139) Table Saw View Diagrams & Manuals
4100 (0601B13010) Table Saw View Diagrams & Manuals
4100DG-09 (0601B13010) 10" Worksite Table Saw View Diagrams & Manuals
4100DG-09 (3601L13010) 10" Worksite Table Saw View Diagrams & Manuals
4100-09 (0601B13010) 10" Worksite Table Saw View Diagrams & Manuals
4100-09 (3601L13010) 10" Worksite Table Saw View Diagrams & Manuals
GTS 10 XC (3601L30440) Table Saw View Diagrams & Manuals
GTS 10 XC (3601L30490) Table Saw View Diagrams & Manuals
GTS1041A (3601M13510) Table Saw View Diagrams & Manuals
4000 (0601476260) Saw Table View Diagrams & Manuals
4100 (3601L13010) Table Saw View Diagrams & Manuals
4100 (3601L13011) Table Saw View Diagrams & Manuals
4100 (3601L13012) Table Saw View Diagrams & Manuals
4100XC (3601L13014) Table Saw 4100xc View Diagrams & Manuals
4100XC (3601L13015) Table Saw, 10-Inch, Bare Tool Tw Ul62841 View Diagrams & Manuals
Show More Compatible Models
This item works with the following types of products:
- Saw Parts
- Table Saw Parts
Customer Part Reviews ?
Average Rating (out of 5):
Click to filter by ratings:
5 stars
7
4 stars
0
3 stars
1
2 stars
0
1 stars
0
< PREV
- 1
Easy
I ordered two to replace old ones on my saw. Still waiting on Home Depot to return my saw so I can replace them. I believe it should be easy.
Guest -
February 19, 2023
Verified Purchase
A company with customer service!
My order had an empty package for one of the gears I bought. I called the company and the rep quickly took care of the issue. He even saw the humor in the empty package as I did (reps have personality and a good personality. The process is a little messed up where they refund the money, then re charge your card. Even though this cost them money to do it this way, they still make things right. Hopefully this process gets corrected so they are around for many years to come.
Guest -
January 26, 2023
Verified Purchase
Surprised beyond belief
I needed some gears for my Bosch table saw. I thought it most likely could not be repaired and the table saw would be rendered useless. When I found the gears at Replacement parts they looked to the eye to be the same. I took a gamble as the price was surprisingly low. I started taking the old ones out, but had a little trouble putting the new ones in, so I went back to the sight and found a short explanation giving me few tricks to get the gears in place. It worked beautifully and my table saw is now up and running again for a grand total of about $7. Great site I hope to come back to often!
Guest -
January 20, 2023
Verified Purchase
Great service
All was well
Guest -
October 19, 2022
Verified Purchase
Great part
Exact part, easy fix.
Guest -
April 25, 2022
Verified Purchase
Great part
Good condition.
Guest -
January 10, 2020
Verified Purchase
Parts received
Delivery was quick and accurate. Part seems to be of better quality than the original, (time will tell). Part installed and working fine.
Guest -
November 23, 2019
Verified Purchase
Parts work well, but the inventory causes problems
The item arrived in good condition and is working well. The inventory system doesn't update frequently enough. So I ended up ordering parts that were out of stock, even though they appeared in stock when I ordered them. This causes me to have to cancel the order 2 weeks later. That was easy to do, which was nice.
Lucas -
June 27, 2020
Verified Purchase
t
t
t -
t days ago
Verified Purchase
eReplacementParts Team
t
Questions & Answers ?
Our customer Service team is at the ready daily to answer your part and product questions.

Ask our Team
We have a dedicated staff with decades of collective experience in helping customers just like you purchase parts to repair their products.
Does this fit my product?Questions & Answers for Toothed Gear
What are the overall dimensions of this gear and please include bore size.Thanks
CJ
for model number 2610996896
asked on 2022-11-21
Hi CJ,
Thank you for your question. The gear has a diameter of approximately 1-3/4 inches. The diameter of the center hole is approximately 3/8 inches. If you need help placing an order for it, customer service is open 7 days a week and anyone will be happy to assist you. Please feel free to give us a call. We look forward to hearing from you!
eReplacementParts Team November 21, 2022
Customer Repair Instructions ?
All our customer repair instructions are solicited directly from other customers just like you who have purchased and replaced this exact part.
Teeth on plastic gears had become stripped due largely to the fact that the steel rods that the motor assembly rides up and down on had become rusty resulting in a high friction situation.
Tony - November 18, 2015
👍 25 of 25 people found this instruction helpful
Tool Type
Table Saw
Difficulty
Easy
Time
30-60 minutes
Tools Used
Screwdriver, Wrench Set, hammer, 1/8\\\" punch
Parts Used
Place the table saw on its right side. Tilt the arbor to about 30 degrees and lock in place. Loosen the two screws that hold the height adjustment shaft bracket in place allowing the spring loaded assembly to slide outward. This will disengage the two gears. Rotate height adjustment crank handle until you can see the end of the pin that holds the gear on the shaft. Drive the pin out with a hammer and 1/8\" inch straight shaft punch. Pull worn gear off of the shaft and install new gear. Push the pin in by hand and then set it flush with the hammer and punch.
Using (2) 12 mm open ended wrenches, loosen the two nuts that hold the gear on the end of the threaded rod of the height adjustment assembly. Slide the washer off of the shaft. Again, rotate the shaft until the holding pin is visible. Drive it out with the 1/8\" inch punch. Remove the worn gear. Slide the new gear onto the shaft and set the pin the pin flush. Slide the washer onto the shaft. Install the first nut onto the threaded shaft and tighten only to finger tight. Do the same for the second nut. Using the two 12 mm wrenches, tighten the two nuts firmly against each other.
Loosely secure the height adjustment shaft bracket back into place by lightly tightening the two screws. Apply pressure to the crank handle firmly enough to mesh the teeth of the two gears. There will be some resistance due to the existing spring. Once the gears are meshed, firmly tighten the two screws. Test function by turning the crank handle left and right. All parts should turn freely without to much resistance.
It is important to remove any surface rust from the two shafts that the motor assembly rides on. I find that using 000 steel wool works well. I also find that using a small brass bristled brush works well for cleaning the threaded shaft of the raise and lowering assembly. It is imperative to lubricate the smooth shafts and threaded rod regularly. Do not use liquid or grease lubricants as they tend to collect dust and gum up quickly. I use Teflon or silicone spray lubricants that dry within minutes of application. What works best is to apply, let dry and then polish with a dry clean cloth.
Did you find this story helpful?
Thanks for voting and helping fellow customers!
The saw blade would not raise or lower and toothed gears were stripped.
Anker - August 24, 2017
👍 4 of 4 people found this instruction helpful
Tool Type
Table Saw
Difficulty
Hard
Time
More than 2 hours
Tools Used
Screwdriver, Power Drill, Socket set, Wrench Set, Snap ring pliers, roll pin punch
1. Put the saw on the work bench and remove the stand with 10mm sockets.
2. Loosen the angle adjustment.
3. Remove the raise/lower wheel, with a screwdriver and an Allen wrench.
4. Stand the saw up on an edge and support with two one gallon paint cans.
5. Remove two phillips screws supporting horizontal bracket axle. Slide the axle back to release the toothed gear.
6. Use a roll pin punch and remove one pin, out of the way don't lose them, from each gear.
7. Remove two 10mm jam nuts from the end of the vertical axle.
8. Use an Allen wrench to move the Allen stop screw out of the way of the bushing. Move the motor to the bottom of its stroke, channel locks maybe needed and you might bust your knuckles.
9. Use snap ring pliers to remove snap ring from top of the bushing. Tap or pull vertical axle and bushing out of the motor.
10. Slide motor up to top of stroke and remove the vertical axle and bushing.
11. Overbore the vertical axle support bracket with 13/16 or 5/8 bit, I forgot. Just enough to slide new threaded rod through the bracket.
12. Use graphite spray lubricant and flood the threaded rod, several sprays. Move motor up to top of stroke, insert threaded rod through overbored bracket, thread bushing on to the rod. Place bushing into seat on the motor.
13. Reinstall the snap ring, reset the Allen stop screw on the side of the bushing. Reinstall new toothed gear on the threaded rod. Loosely install the two 10mm jamb nuts on the end of the threaded rod.
14. Install the new toothed gear on the horizontal axle. Reinstall the raise/lower wheel, you need to give it a good push to get the center screw to start. Reset allen stop screw.
15. Reinstall the two screws on the horizontal bracket. This is the were the finesse comes in. The horizontal bracket adjusts the horizontal gear relative to the vertical gear. Don't make it too tight or too loose. Lock down the two phillips screws when you are satisfied.
16. Move motor to bottom of the stroke and then lock down the jamb nuts. Again it needs some finesse. The tightest spot for the jamb nuts is at the bottom of the stroke.
17. Move angle stop back to 0 degrees and lock down. Check the movement by raising and lower the motor several times until happy with the motion.
18. Reinstall the stand. Get back to work.
Did you find this story helpful?
Thanks for voting and helping fellow customers!
Gear broke in half, caused by forcing the blade adjustment.
Larry - April 6, 2018
👍 1 of 1 people found this instruction helpful
Tool Type
Table Saw
Difficulty
Medium
Time
30-60 minutes
Tools Used
Socket set, Wrench Set, Adjustable Wrench
Parts Used
1. Turned the saw upside down.
2. Removed the locked nuts and manually turned the shaft down to allow me to put the new gear onto the shaft.
3. Reversed the procedure to reassemble.
2. Removed the locked nuts and manually turned the shaft down to allow me to put the new gear onto the shaft.
3. Reversed the procedure to reassemble.
Did you find this story helpful?
Thanks for voting and helping fellow customers!
Raising and lowering blade hard; gears skipping.
Fred - January 24, 2018
👍 1 of 1 people found this instruction helpful
Tool Type
Table Saw
Difficulty
Easy
Time
30-60 minutes
Tools Used
Screwdriver, Socket set, Wrench Set
Parts Used
Removed gears and replaced with new ones. There was a tutorial on the ereplacements site, right next to the part. I did it a little differently, but guide very helpful. Also dry lubed the shafts, now operating like new. Cost: about $14.
Did you find this story helpful?
Thanks for voting and helping fellow customers!
Toothed gear had stripped
Alan - February 10, 2017
👍 1 of 1 people found this instruction helpful
Tool Type
Table Saw
Difficulty
Hard
Time
1-2 hours
Tools Used
Screwdriver, Power Drill, Socket set, Wrench Set, Adjustable Wrench, Hammer
Parts Used
1. Removed old Toothed gears and pins.
2. Installed new Toothed gears making sure to align the
Hole in the Toothed gear with the hole in the shafts.
3. Install pins.
4. Reinstall nut and washer on the shaft that moves the motor.
5. Reinstall round crank handle that turns the shafts to
Raise and lower the blade, if previously removed.
6. Test operation of the raise/lower mechanism.
Did you find this story helpful?
Thanks for voting and helping fellow customers!
table saw height adjuster cog broke
MICHAEL - March 30, 2022
Tool Type
Table Saw
Difficulty
Hard
Time
More than 2 hours
Tools Used
Screwdriver, Pliers, Power Drill, Socket set, Wrench Set, Nutdriver, Adjustable Wrench, metal punch
The key to replacing this cog is to turn the saw at a 45 degree angle , this allows you to raise the adjuster arm enough to get the new cog on .
Did you find this story helpful?
Thanks for voting and helping fellow customers!
Blade wouldn't go up and down and holding plate cracked
Kent - April 30, 2020
Tool Type
Table Saw
Difficulty
Expert
Time
More than 2 hours
Tools Used
Screwdriver, Pliers, Power Drill, Socket set, Wrench Set
Removed holding plate from saw by:
1. Unbolting tabs (4 bolts - Allen key 5 mm)
2. Removing dust collection piece (6 screws - philips)
3. Remove horizontal threaded rod by removing wheel crank, red angle adjuster, large hex nut, spring, 2 mounting screws (philips)
4. Remove vertical threaded rod by removing double nuts and toothed gear (punched pin out with small allen key), and threading up out of the holding plate
5. Unscrewed motor with 4 philips
6. Took rods out by removing c clamps (2 on each rod)
7. Replaced new holding plate by putting rods back in, through the motor, and reattached everything
Did you find this story helpful?
Thanks for voting and helping fellow customers!
Table saw blade would not raise
Richard - January 14, 2017
👍 0 of 1 people found this instruction helpful
Tool Type
Table Saw
Difficulty
Easy
Time
30-60 minutes
Tools Used
Screwdriver, Pliers, Wrench Set, Adjustable Wrench, Hammer, small punch
Parts Used
Turned the saw upside down
Removed the pin holding the gear to the shaft with punch and hammer
Installed the new one in the same manner
Removed the pin holding the gear to the shaft with punch and hammer
Installed the new one in the same manner
Did you find this story helpful?
Thanks for voting and helping fellow customers!
OEM stands for Original Equipment Manufacturer and means the part you’re buying is sourced directly from the manufacturer who made your product. At eReplacementParts, we sell only genuine OEM parts, guaranteeing the part you’re purchasing is of better design and of higher quality than aftermarket parts.
Our product descriptions are a combination of data sourced directly from the manufacturers who made your product as well as content researched and curated by our content & customer service teams. This content is edited and reviewed internally before being made public to customers.
Our customer service team are at the ready daily to answer your part and product questions. We have a dedicated staff with decades of collective experience in helping customers just like you purchase parts to repair their products.
All our part reviews are solicited directly from other customers who have purchased this exact part. While we moderate these reviews for profanity, offensive language or personally identifiable information, these reviews are posted exactly as submitted and no alterations are made by our team.
All our customer repair instructions are solicited directly from other customers just like you who have purchased and replaced this exact part. While we moderate these reviews for profanity, offensive language or personally identifiable information, these reviews are posted exactly as submitted and no alterations are made by our team.
Based on data from past customer purchasing behaviors, these parts are most commonly purchased together along with the part you are viewing. These parts may be necessary or helpful to replace to complete your current repair.
All our installation videos are created and produced in collaboration with our in-house repair technician, Mark Sodja, who has helped millions of eReplacementParts customers over the last 13 years repair their products. Mark has years of experience in selling and repairing both commercial and residential products with a specialty in gas-powered equipment.
This data is collected from customers who submitted a repair instruction after replacing this exact part. Customers can rate how easy the repair was to complete and how long it took. We aggregate this data to provide a repair rating that allows customers to quickly determine the difficulty and time needed to perform their own repair.