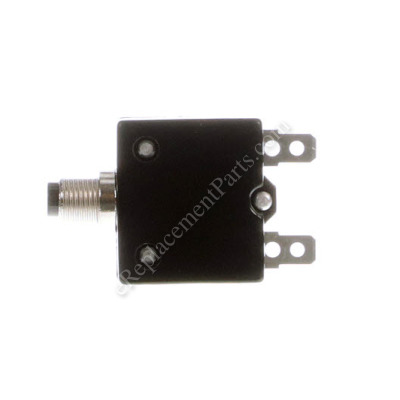


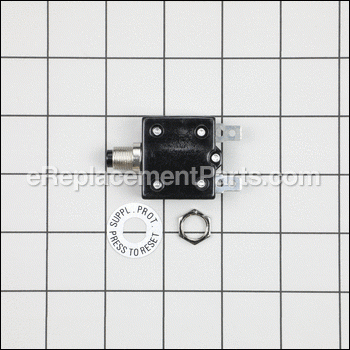
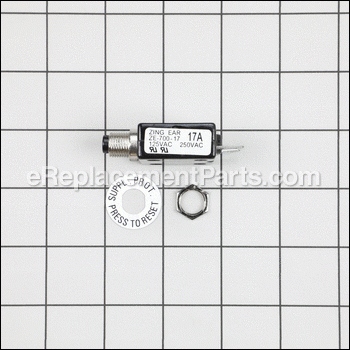
Thermal Protector 881588
Part Number: 881588
")
Order within the next 6 hours
and your part ships today!
and your part ships today!
*This part replaces obsolete part #: 884790.
Product Information
Description:
| This thermal protector switch is an authentic Hitachi replacement part. It is specially manufactured for electric air compressors. This part is designed to protect the engine from overloading. If the engine is overloaded normally you can push the button to reset it, however if the switch is faulty it will need to be replaced to close the circuit. Please note, this thermal protector is sold individually. It includes the indemnification plate and the ring to secure it. Replacing this part is a simple and quick task that should only require a screwdriver. • Unscrew the ring that secures the old protector • Carefully remove the housing • Disconnect the wires and remove the old switch • Secure the new protector in place • Reassemble and test |
Compatibility
This part is compatible with the following machines:
the 8 compatible machines
Products Compatibility
This item works with the following types of products:
- • Compressor
Questions & Answers for Thermal Protector
No questions have been asked yet
Repair Instructions: Submitted by Customers Like You
3 of 3 people found this instruction helpful
Tool Type:
Compressor
Parts Used:
Repair Difficulty:
Easy
Time Spent Repairing:
15-30 minutes
Tools Used:
Screwdriver, Pliers
Wouldn't run
Remove the motor cover
Remove the nut from the front of the overload and remove it
Transfer the wires leads from the old one to the new one
Install the new one in the cover, then install the cover
Remove the nut from the front of the overload and remove it
Transfer the wires leads from the old one to the new one
Install the new one in the cover, then install the cover
Did you find this story helpful?
Thanks for voting and helping fellow customers!
Tool Type:
Compressor
Parts Used:
Repair Difficulty:
Medium
Time Spent Repairing:
15-30 minutes
Tools Used:
Screwdriver, Pliers, Socket set, Wrench Set
Relay constantly trips.
Had to remove shroud and copper line.
Did you find this story helpful?
Thanks for voting and helping fellow customers!
Tool Type:
Compressor
Parts Used:
Repair Difficulty:
Medium
Time Spent Repairing:
30-60 minutes
Tools Used:
Screwdriver, Socket set, Wrench Set, Adjustable Wrench
Compressor keeps cutting out. Built in Thermal protector trips continuously.
1. DRAIN TANK!!!
2. Remove copper pipe between tank and motor;
3. Remove four nuts and bolts holding motor to frame;
4. Lift motor from frame;
5. Remove four rubber washers between motor and frame;
6. Remove four screws holding plastic shroud to motor;
7. Lever off the shroud from the two aluminum pins. This is the worst part.
8. Disconnect and replace the circuit breaker/thermal protector;
9. Reverse ( The shroud plastic is difficult to replace on the aluminum pins and may crack.)
Did you find this story helpful?
Thanks for voting and helping fellow customers!
Tool Type:
Compressor
Parts Used:
Repair Difficulty:
Medium
Time Spent Repairing:
30-60 minutes
Tools Used:
Screwdriver, Wrench Set
Breaker tripped when turning on compressor
Replaced the Thermo switch. The compressor works like new now.
Did you find this story helpful?
Thanks for voting and helping fellow customers!
Tool Type:
Compressor
Parts Used:
Repair Difficulty:
Easy
Time Spent Repairing:
15-30 minutes
Tools Used:
Screwdriver, Socket set, Wrench Set
Compressor would run but would shut off before cycle was complete.
With my comressor, " Rigid Mini Wheelbarrow Compressor", I had to remove the motor from the frame to get the protective cover off. Once I got the cover off the thermal protector was right there. I pulled the wires off and put the new thermal protector in. The process took about 30 minutes only because of the way my compressor was set up. Changing out the part only took a minute.
Did you find this story helpful?
Thanks for voting and helping fellow customers!
0 of 1 people found this instruction helpful
Tool Type:
Compressor
Parts Used:
Repair Difficulty:
Easy
Time Spent Repairing:
Less than 15 minutes
Tools Used:
Screwdriver, Pliers
Had faulty thermal cut-out , tripped often.
Disconnect the terminals from the old circuit breaker. Remove the nut from the old circuit breaker and remove. Install the new breaker and tighten the nut, connect the terminals to the new breaker. No more problems.
Did you find this story helpful?
Thanks for voting and helping fellow customers!
0 of 1 people found this instruction helpful
Tool Type:
Compressor
Parts Used:
Repair Difficulty:
Easy
Time Spent Repairing:
15-30 minutes
Tools Used:
Screwdriver, Wrench Set
Defective thermal protector
Remove plastic motor cover 4 phillips screws. Then remove thermal protector from motor cover 1 nut, switch wires replace thermal protector & cover
Did you find this story helpful?
Thanks for voting and helping fellow customers!
Reviews
3 Reviews
Average Rating (out of 5):
Click to filter by ratings:
5 stars
3
4 stars
0
3 stars
0
2 stars
0
1 stars
0
< PREV
- 1
Correct part
Timely arrival as usual from e replacement
Shane -
February 11, 2023
Verified Purchase
Obscure part
I've used E-replacements before. This one was a little tough to get but they came through. Good job.
Guest -
January 30, 2023
Verified Purchase
Great replacement part
Arrived timely and easy transaction. Stated to fit a Rigid air compressor and worked perfectly.
Guest -
January 22, 2021
Verified Purchase
Verified Purchase
eReplacementParts Team
< PREV
- 1
Product Information