Thermal Fuse Assembly From Pdc SP0022078
Part Number: SP0022078
Ships within 1 business day
*This part replaces obsolete part #: BOV800XL195A, BOV800XL/195A, SP0002659 and SP0010512.
Product Information
Description:
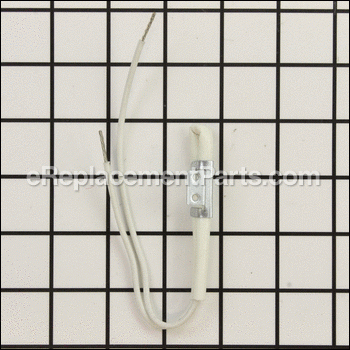
| A genuine Breville replacement part, sold individually. The thermal fuse cuts off power when the oven gets too hot. This part is compatible with the models listed below. It's important to note the connections of the wires before replacement. A screwdriver and pliers are needed for repair. |
Frequently Purchased With

Compatibility
Products Compatibility
This item works with the following types of products:
- • Oven
Questions & Answers for Thermal Fuse Assembly From Pdc
Oven turns on but won't heat. I've read a bunch of discussion boards online and replaced the temperature sensor without any luck. I'm wondering if this could still be the thermal fuse even though the screen turns on? Seems unlikely that all 4 heating rods would go out at the same time so I have not replaced those yet. Thanks!
Joe
for model number BOV800XL
asked on 2023-03-06
Hello Joe, Thank you for the question. If the fuse is blown, it will cut power to the appliance and it will not power on. If the Sensor if good, you can check the wiring. This could also indicate a faulty Pcb Assembly. We hope this is helpful!
eReplacementParts Team March 06, 2023
My Breville toaster oven must cool before it can heatup again. Is that the thermal fuse?
Steven
for model number BOV800XL
asked on 2023-02-21
Hello Steven, Thank you for your inquiry. The thermal fuse cuts off power when the oven gets too hot. It could also be the sensor, part# SP0010508. We hope this helps.
eReplacementParts Team February 21, 2023
Repair Instructions: Submitted by Customers Like You
37 of 40 people found this instruction helpful
Tool Type:
Convection Oven
Parts Used:
Repair Difficulty:
Hard
Time Spent Repairing:
1-2 hours
Tools Used:
Screwdriver, Pliers, Power Drill
Thermal Fuse Died Causing Oven to be Unresponsive
I found other guides online but my unit was slightly different. I had to drill a rivet out of the back thermal shield cover. I put in a screen slightly larger than the hole to fix it. Basically need to remove all the screws off the back. Unscrew the thermal shield, drill out the rivet. Then you can unscrew the mounting bracket which holds the thermal fuse and sleeve. That will give you room to move the wire around to get at the connections. I pulled of the electrical 'twists', forgot what they are called, the things which twist together a couple connections. These are pressure sensitive ones though. Carefully squeeze it to open it up. Pull out the old thermal fuse wire, put in the old, and squeeze it back together. Be sure you put the fuse back in the right way. One side has a black mark.
Did you find this story helpful?
Thanks for voting and helping fellow customers!
24 of 25 people found this instruction helpful
Tool Type:
Convection Oven
Parts Used:
Repair Difficulty:
Medium
Time Spent Repairing:
1-2 hours
Tools Used:
Screwdriver, Pliers
Thermal Fuse Failed
This was for a Breville Smart Oven BOV800XL, I believe. Symptom was oven was dead - no power, no lights. There are a number of resources online about how to fix, so check those out. My comments are additions to those instructions. First, definitely remove the feet from the oven fully as it makes it much easier to remove the back. The back removes after taking out a bunch of screws. Note carefully that the screws on the back are similar to but not the same as the small screws at the center of the feet. The back is snug but can be pried off after the screws are removed. Some instructions mentioned needing to remove the interior back plate, involving drilling out a rivet. This was unnecessary in retrospect, and could be a real problem since the door spring attaches to it. To replace the fuse, pull back the two clips that hold the white insulation in place. They are held against the interior back plate with friction only. Gently pull back the insulation and you'll see the fuse. You will need to remove the bracket that holds the fuse by unscrewing the screws via the interior of the oven (come from the front). I used pliers to remove the friction wire nuts after carefully noting the polarity of the fuse (though I'm told it does not matter). I confirmed it by pulling back the white covering to see the actual component underneath. I threaded the new wires into place, replaced the wire nuts, and put the fuse and bracket back. Then reassembled. Oven works great now.
Did you find this story helpful?
Thanks for voting and helping fellow customers!
22 of 24 people found this instruction helpful
Tool Type:
Convection Oven
Parts Used:
Repair Difficulty:
Hard
Time Spent Repairing:
30-60 minutes
Tools Used:
Screwdriver, wire crimps
Thermal fuse blown on Breville toaster oven
Oven would not power up. Thermal fuse blown. Disassembled oven, back cover off first,(many screws) thermal fuse located to the front of oven so stainless shell needed to be partially removed on that side. problem, stainless shell is held in place by a crimped edge so I needed to carefully bend the shell to dislodge it. The fuse is located behind some lightweight insulation. Confirmed fuse was bad with ohm meter. UN-crimped old fuse connectors and reused them with new fuse. Carefully reassembled. Fuse replacement was easy, but the disassembly and reassemble was not fun.
Did you find this story helpful?
Thanks for voting and helping fellow customers!
8 of 10 people found this instruction helpful
Tool Type:
Convection Oven
Parts Used:
Repair Difficulty:
Medium
Time Spent Repairing:
30-60 minutes
Tools Used:
Screwdriver, Pliers, Power Drill
Oven dead-blown thermal fuse.
Is a pain in the butt! Have to remove around 30 screws &1 rivet.
Be careful,as the metal is very sharp & cuts you easily.
The fuse is hidden behind thermal insulation that disintegrates as soon as you touch it.Two screws on the inside oven wall,clip all the plastic wire ties, then pinch the wire nuts open,remove old fuse & replace with new one.Then just reverse the order of screws you removed.
Did you find this story helpful?
Thanks for voting and helping fellow customers!
5 of 6 people found this instruction helpful
Tool Type:
Convection Oven
Parts Used:
Repair Difficulty:
Medium
Time Spent Repairing:
1-2 hours
Tools Used:
Screwdriver, Pliers, great to have an drill fitted with a phillips head screwdriv
Breville oven would not turn on...no light
1. I unplugged the machine
2. Turned it on its front
3. Unscrewed the back cover, the rubber "feet/legs" and enough of the other screws on the left hand side in order to get access to the fuse
4. Removed insulation around the fuse as carefully as possible
5. Unscrewed the two interior screws clipping the fuse onto the oven
6. Removed old fuse (in case you're just an "ordinary" person like me, you need to squeeze the rubber protector thingies to un-crimp them and get the wires out), remembering to note which wire connected to which wires
7. Attached new fuse and clip with interior screws
8. Smushed all wires back together and reinserted into plastic protectors
9. Re-crimped them and made sure they were snug (this took a few tries on the first one)
10. Plugged the oven in to make sure it turned on
11. Shouted EUREKA
12. Unplugged machine
13. Replaced insulation as best I could over fuse area (used some metal tape to make it more "secure" and well covered
14. Tried to remember in which order I had removed the screws and screwed them back in
Did you find this story helpful?
Thanks for voting and helping fellow customers!
6 of 8 people found this instruction helpful
Tool Type:
Convection Oven
Parts Used:
Repair Difficulty:
Medium
Time Spent Repairing:
1-2 hours
Tools Used:
Screwdriver, Wire connectors, crimper, ties
Oven wouldn't heat
1. Remove back plate > 30 Philips screws.
2. Locate thermal fuse. Remove holding bracket from inside oven. Follow leads to termination points. Remove ties to locate ends.
3. Ensure the black end of the fuse is connected to the same end point as the failed one.
4. Cut the old fuse connections and attach replacement fuse.
5. Test oven to be sure it works before reassembly.
6. Recheck connections.
7. Attach bracket to inside oven. That's very difficult without help from someone.
8. Restest oven.
9. Reattach back plate. That's a little tricky too.
10. Ready for use.
It would have made things a bit easier if I had taken a few pictures of the unit during disassembly. Not being very handy, it took a long time to do as we were being extra cautious with each step.
Did you find this story helpful?
Thanks for voting and helping fellow customers!
3 of 4 people found this instruction helpful
Tool Type:
Toaster
Parts Used:
Repair Difficulty:
Medium
Time Spent Repairing:
Less than 15 minutes
Tools Used:
Screwdriver, Diagonal cutters, wire strippers, wire connector crimper
Toaster oven did not turn on or react in any way - indication that main fuse was blown.
1. Remove the screws that hold on the back of the oven. Note: In my model, you needed to unscrew the 'feet' as well to release the back.
2. Locate the main power fuse under the thermal insulation on the left-hand side of the machine.
3. Clip the wires on both sides of the blown fuse.
4. Connect the clipped wires to both sides of the fuse. I used automotive wire connectors. Note: it doesn't matter which wires connect, fuses don't have polarity.
5. Tuck the fuse down and return the insulation.
6. Reattach and screw down the back.
Did you find this story helpful?
Thanks for voting and helping fellow customers!
Tool Type:
Toaster
Parts Used:
Repair Difficulty:
Easy
Time Spent Repairing:
Less than 15 minutes
Tools Used:
Screwdriver, Pliers, Power Drill, Wire cutters, Butt connectors
Thermal fuse blown
1. Remove all screws
2. Pull panel of rear
3. Pull thermal fuse out
4. Cut two wire connections.
5. Butt connect new fuse.
6. Replace fuse location
7. Reassemble
2. Pull panel of rear
3. Pull thermal fuse out
4. Cut two wire connections.
5. Butt connect new fuse.
6. Replace fuse location
7. Reassemble
Did you find this story helpful?
Thanks for voting and helping fellow customers!
Tool Type:
Convection Oven
Parts Used:
Repair Difficulty:
Medium
Time Spent Repairing:
More than 2 hours
Tools Used:
Screwdriver, Pliers, Power Drill, Nutdriver, Crimper
Completely died. Blew main fuse/thermal overload
Opened the back of the unit and traced the power wiring to the fuse and tested it. Found it blown and ordered replacement. Breville would not sell me the part but ereplacement would.
Did you find this story helpful?
Thanks for voting and helping fellow customers!
Tool Type:
Convection Oven
Parts Used:
Repair Difficulty:
Medium
Time Spent Repairing:
1-2 hours
Tools Used:
Screwdriver, Snips
Started popping the breaker while preheating.
Followed the video repair instructions.
Did you find this story helpful?
Thanks for voting and helping fellow customers!
show more
Reviews
10 Reviews
Average Rating (out of 5):
Click to filter by ratings:
5 stars
7
4 stars
1
3 stars
0
2 stars
0
1 stars
2
< PREV
- 1
Replacement Fuse for a Breville oven
Part was just right, service was excellent, great communication
I need more electronic parts , I will be back soon
Guest -
July 26, 2023
Verified Purchase
Right party- fixed the problem!
The part arrived with extra long leads so I could swap it out easily. Worked perfectly the first time. Still working 3 months later. The fuse size was a bit smaller then the one coming out but a quick call to the help folks and said it was correct. Thanks
Guest -
March 19, 2022
Verified Purchase
Correct part and fast shipping.
The part was exactly what I needed, and it arrived quickly. Thanks!?
Guest -
September 24, 2021
Verified Purchase
Worked
Replacement easier than I thought. Used existing bracket, not the one that came with it.
Guest -
July 25, 2020
Verified Purchase
Works perfectly
The item was new. It arrived quickly. Installation was fairly quick and easy. It completely saved my toaster oven. Amazing such a small item can play a big role.
Guest -
April 9, 2020
Verified Purchase
Great part; worked as expected!
Quick shipment and part was easy to install; having the entire assembly made it easier than having to replace just the fuse
Guest -
January 22, 2020
Verified Purchase
Great Part and service- fixed my $300 Toaster Oven in 1/2 hour.
The part was delivered faster than promised and worked as described.
Guest -
October 2, 2019
Verified Purchase
Get it, got it, good
Found the part I was looking for quickly, Ordering was easy and straight forward. The part was an identical replacement. Shipping was a bit expensive, doubling the cost of the part. It took about 10 days to get it. I think Amazon Prime has spoiled me ;) Thanks for getting me the part I needed!
Guest -
August 16, 2021
Verified Purchase
Didnt fit my oven
Had ton rework to fit. Complained and received no response
Kenton -
July 17, 2020
Verified Purchase
did not work. Did not return because of high shipping cost
Maybe it was the circuit board. Purchased it as well but the part did not fit my model of toaster oven. Shipping more expensive that the parts.
iGlobal -
October 2, 2019
Verified Purchase
Verified Purchase
eReplacementParts Team
< PREV
- 1
Product Information