
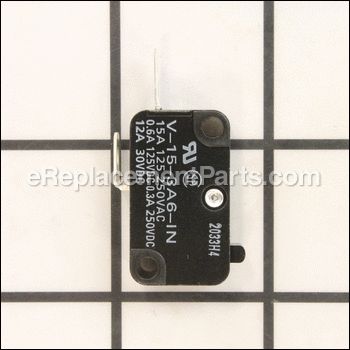
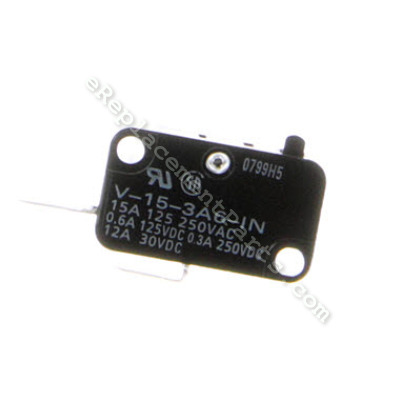


This replacement service switch is specially designed for use with Makita saws. It is a high-quality component which is supplied directly from the original equipment manufacturer. This part plays an important role because it controls the on/off function of the tool. Over time switch may develop mechanical or electrical issues eventually requiring replacement. It is a durable plastic body switch which is sold individually.
Switch V-15-3a6 651891-8
OEM part for: Makita
Part Number: 651891-8
$9.19
Usually ships in 7 - 12 business days
7 - 12 business days
Jump To:
Frequently Purchased Together ?

Compatibility
This part will fit the following 61 machines
Makita
4191D Cordless Saw View Diagrams & Manuals
6831D Cordless Screwdriver View Diagrams & Manuals
5093D Cordless Circular Saw View Diagrams & Manuals
6835D Cordless Autofeed Screwdriver View Diagrams & Manuals
5092D Cordless Circular Saw View Diagrams & Manuals
T220D Cordless Stapler View Diagrams & Manuals
6901D Cordless Impact Driver View Diagrams & Manuals
5094D Cordless Circular Saw View Diagrams & Manuals
5091D Cordless Circular Saw View Diagrams & Manuals
BST221 18V Brushless Impact Driver View Diagrams & Manuals
5094DWD Cordless 3-3/8" Circular Saw View Diagrams & Manuals
SH01W 12V max Lithium-Ion Cordless 3-3/8" Circular Saw Kit View Diagrams & Manuals
BCL180 Compact Cordless Vacuum View Diagrams & Manuals
XMU02 18v Lxt Lithium-Ion Cordless Grass Shear Tool Only View Diagrams & Manuals
XRU02 18v Lxt Lithium-Ion Cordless String Trimmer Tool Only View Diagrams & Manuals
4191DWA Saw View Diagrams & Manuals
5093DWA Saw View Diagrams & Manuals
5094DWA Saw View Diagrams & Manuals
5094DZ Saw View Diagrams & Manuals
6831DWH Screwdriver View Diagrams & Manuals
6835DWA Screwdriver View Diagrams & Manuals
6835DWD Screwdriver View Diagrams & Manuals
BPT350 (Type 1) Misc View Diagrams & Manuals
BPT350 (Type 2) Misc View Diagrams & Manuals
BPT350 (Type 3) Misc View Diagrams & Manuals
BPT350Z (Type 1) Misc View Diagrams & Manuals
BPT350Z (Type 2) Misc View Diagrams & Manuals
BPT350Z (Type 3) Misc View Diagrams & Manuals
BST221F (Type 1) Misc View Diagrams & Manuals
BST221F (Type 2) Misc View Diagrams & Manuals
BST221X (Type 1) Misc View Diagrams & Manuals
BST221X (Type 2) Misc View Diagrams & Manuals
BST221Z (Type 1) Misc View Diagrams & Manuals
BST221Z (Type 2) Misc View Diagrams & Manuals
CC01W Saw View Diagrams & Manuals
LXMU02Z Misc View Diagrams & Manuals
LXRU02Z Grass Trimmer View Diagrams & Manuals
LXRU02Z (Type 1) Grass Trimmer View Diagrams & Manuals
LXRU02Z (Type 2) Grass Trimmer View Diagrams & Manuals
LXTP01 (Type 1) Saw View Diagrams & Manuals
LXTP01 (Type 2) Saw View Diagrams & Manuals
LXTP01Z1 (Type 1) Saw View Diagrams & Manuals
LXTP01Z1 (Type 2) Saw View Diagrams & Manuals
LXTP01Z (Type 1) Saw View Diagrams & Manuals
LXTP01Z (Type 2) Saw View Diagrams & Manuals
SH01 (Type 1) Saw View Diagrams & Manuals
SH01 (Type 2) Saw View Diagrams & Manuals
SH01Z (Type 1) Saw View Diagrams & Manuals
SH01Z (Type 2) Saw View Diagrams & Manuals
SH01ZW Saw View Diagrams & Manuals
T221DW Misc View Diagrams & Manuals
XLC02R1B Vacuum View Diagrams & Manuals
XLC02RB1W Vacuum View Diagrams & Manuals
XLC02ZB Vacuum View Diagrams & Manuals
XLC02ZW Vacuum View Diagrams & Manuals
XMU02Z Misc View Diagrams & Manuals
XRU02Z Grass Trimmer View Diagrams & Manuals
XTP01Z Misc View Diagrams & Manuals
XTS01 Misc View Diagrams & Manuals
XTS01T Misc View Diagrams & Manuals
XTS01Z Misc View Diagrams & Manuals
Show More Compatible Models
This item works with the following types of products:
- Saw Parts
- Screwdriver Parts
- Circular Saw Parts
- Stapler Parts
- Impact Driver Parts
- Vacuum Parts
Customer Part Reviews ?
Average Rating (out of 5):
Click to filter by ratings:
5 stars
2
4 stars
0
3 stars
0
2 stars
0
1 stars
0
< PREV
- 1
Worked as it should
Good price and got to me in 4 days with standard shipping
Guest -
April 11, 2021
Verified Purchase
Part for our Makita Vacuum
We are able to suck up the dirt once again. Thank you for having the part!! Easy to install.
Guest -
January 26, 2021
Verified Purchase
t
t
t -
t days ago
Verified Purchase
eReplacementParts Team
t
Questions & Answers ?
Our customer Service team is at the ready daily to answer your part and product questions.

Ask our Team
We have a dedicated staff with decades of collective experience in helping customers just like you purchase parts to repair their products.
Does this fit my product?Questions & Answers for Switch V-15-3a6
No questions have been asked yet
Customer Repair Instructions ?
All our customer repair instructions are solicited directly from other customers just like you who have purchased and replaced this exact part.
The trigger on my vacuum would work intermittently. Low….then at full speed…. Then low again. For no apparent reason. Tapping the housing would sometimes render the trigger working normally. Howev
Adrian - October 24, 2023
Tool Type
Vacuum
Difficulty
Easy
Time
Less than 15 minutes
Tools Used
Screwdriver, Power Drill, I used a cordless drill with a Phillips driver for efficien.
Parts Used
1. Removed screws on plastic housing.
2. Opened housing
3. Identified and removed defective switch(trigger) by unplugging wires.
4. Replaced defective switch with new factory replacement part.
5. Replaced plastic housing and tightened screws.
2. Opened housing
3. Identified and removed defective switch(trigger) by unplugging wires.
4. Replaced defective switch with new factory replacement part.
5. Replaced plastic housing and tightened screws.
Did you find this story helpful?
Thanks for voting and helping fellow customers!
switch had gone out...
Carol - July 29, 2022
Tool Type
Vacuum
Difficulty
Easy
Time
Less than 15 minutes
Tools Used
Screwdriver
Parts Used
I took out 6 screws, unplugged both wire connections, plugged the new switch in and put it back together. The place I work was going to throw out the Makita vacuum... Have ordered parts from here several times. Always extremely satisfied repairing my own stuff and stuff at my work.. ! showing up the dudes!! Carol
Did you find this story helpful?
Thanks for voting and helping fellow customers!
vacuum switch was not working right
Erastus - October 8, 2021
Tool Type
Vacuum
Difficulty
Easy
Time
15-30 minutes
Tools Used
Screwdriver, Pliers
Took it apart and put in new parts.Now it works like new.
Did you find this story helpful?
Thanks for voting and helping fellow customers!
Switch broke
Albert - April 4, 2021
Tool Type
Vacuum
Difficulty
Easy
Time
15-30 minutes
Tools Used
Screwdriver, Pliers
Parts Used
I removed the case and the switch came right out afterwards. Took me less than 15 minutes
Did you find this story helpful?
Thanks for voting and helping fellow customers!
The vacume would not turn on.
Eliot - November 6, 2018
Tool Type
Vacuum
Difficulty
Easy
Time
15-30 minutes
Tools Used
Screwdriver
Parts Used
First I want to say how much help the suggested parts needed for my fix were. I had no Idea what part I might need. I used the feature on the site that asks what is wrong with the item and then suggests what part might fix it with a percentage of how often that part fixes that problem. This is totally awesome. Thank you so much.
All I had to do was remove some screws that held the the 2 halves of the body of the vacume together. Then disconnect the 2 wires from the switch. They slipped right off and then back on the new part. Then I just had to put the 2 halves back together. Easy peasy.
All I had to do was remove some screws that held the the 2 halves of the body of the vacume together. Then disconnect the 2 wires from the switch. They slipped right off and then back on the new part. Then I just had to put the 2 halves back together. Easy peasy.
Did you find this story helpful?
Thanks for voting and helping fellow customers!
Broken trigger switch
Jeremy - July 20, 2018
Tool Type
Vacuum
Difficulty
Easy
Time
Less than 15 minutes
Tools Used
Screwdriver
Parts Used
1) Removed Phillip screws from Vacuum housing
2) Removed switch (slid out)
3) Removed 2 wires from switch
4) Reversed above for installation of new switch
2) Removed switch (slid out)
3) Removed 2 wires from switch
4) Reversed above for installation of new switch
Did you find this story helpful?
Thanks for voting and helping fellow customers!
Original switch contacts wore out
Rob - April 11, 2018
Tool Type
Vacuum
Difficulty
Easy
Time
Less than 15 minutes
Tools Used
Screwdriver
Parts Used
Removed #1 Phillips screws from case, split the case, lifted out the old switch, disconnected the wire connectors, then reversed the process installing the new switch.
Did you find this story helpful?
Thanks for voting and helping fellow customers!
Contact switch broke
Ron - April 6, 2018
Tool Type
Vacuum
Difficulty
Easy
Time
15-30 minutes
Tools Used
Screwdriver
Split apart the vacuum case. Removed old parts, re-installed the new. Very easy, take a picture before you start, if you need. BTW, I changed all moving parts in the switch mechanism.
Did you find this story helpful?
Thanks for voting and helping fellow customers!
OEM stands for Original Equipment Manufacturer and means the part you’re buying is sourced directly from the manufacturer who made your product. At eReplacementParts, we sell only genuine OEM parts, guaranteeing the part you’re purchasing is of better design and of higher quality than aftermarket parts.
Our product descriptions are a combination of data sourced directly from the manufacturers who made your product as well as content researched and curated by our content & customer service teams. This content is edited and reviewed internally before being made public to customers.
Our customer service team are at the ready daily to answer your part and product questions. We have a dedicated staff with decades of collective experience in helping customers just like you purchase parts to repair their products.
All our part reviews are solicited directly from other customers who have purchased this exact part. While we moderate these reviews for profanity, offensive language or personally identifiable information, these reviews are posted exactly as submitted and no alterations are made by our team.
All our customer repair instructions are solicited directly from other customers just like you who have purchased and replaced this exact part. While we moderate these reviews for profanity, offensive language or personally identifiable information, these reviews are posted exactly as submitted and no alterations are made by our team.
Based on data from past customer purchasing behaviors, these parts are most commonly purchased together along with the part you are viewing. These parts may be necessary or helpful to replace to complete your current repair.
All our installation videos are created and produced in collaboration with our in-house repair technician, Mark Sodja, who has helped millions of eReplacementParts customers over the last 13 years repair their products. Mark has years of experience in selling and repairing both commercial and residential products with a specialty in gas-powered equipment.
This data is collected from customers who submitted a repair instruction after replacing this exact part. Customers can rate how easy the repair was to complete and how long it took. We aggregate this data to provide a repair rating that allows customers to quickly determine the difficulty and time needed to perform their own repair.