
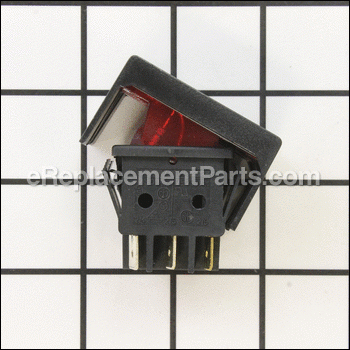
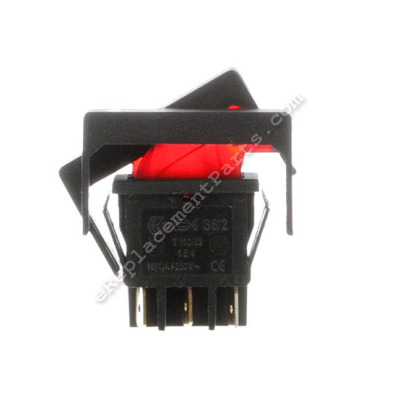


This authentic replacement rocker switch is supplied directly from original manufacturer. It is specially made for use with DeLonghi heaters. It controls the on/off functions of a unit. Switches are commonly replaced parts, over time, mechanical internals will wear out requiring replacement. This plastic switch is sold individually.
To complete this repair you will need a screwdriver.
• First make sure the tools is not plugged in
• Then you want to remove the cover screws
• Remove the old switch
• Secure the new switch in place
• Reassemble and test the unit
Large Double Rocker Switch 511741
OEM part for: DeLonghi
Part Number: 511741
$11.91
In Stock
Jump To:
Product Description ?
- Classification: Part
- Weight: 0.02 lbs.
- Shipping: Ships Worldwide
Frequently Purchased Together ?

Compatibility
This part will fit the following 7 machines
DeLonghi
BU24P Appliance View Diagrams & Manuals
3107 Heater View Diagrams & Manuals
3107T Heater View Diagrams & Manuals
5108T Oil Filled Heater View Diagrams & Manuals
5307 Heater View Diagrams & Manuals
9308 Heater View Diagrams & Manuals
9608 Heater View Diagrams & Manuals
Show More Compatible Models
This item works with the following types of products:
- Heater Parts
Customer Part Reviews ?
Average Rating (out of 5):
Click to filter by ratings:
5 stars
13
4 stars
1
3 stars
0
2 stars
0
1 stars
2
< PREV
- 1
- 2
Quick service. Exact replacement
It was great to get the exact replacement part. Getting the old switch out was the hard part. I finally just cut off the old tabs with a "nipper". My oil filled radiator was back in service within a hour at a fraction of the cost for a new unit. Instruction from prior users was helpful.
Guest -
December 1, 2023
Verified Purchase
Good Experience
Easy repair, received in a reasonable amount of time, part works as expected.
Guest -
January 19, 2023
Verified Purchase
Repeat customer happy again
Switch fell apart but heater worked well. So happy to find original switch and get the heater for functioning again. Modest cost and fast shipping made this a satisfying repair. Thank you!
Robert -
December 14, 2022
Verified Purchase
30yr old heater works again
The part arrived, exact duplicate, fit 30yr old heater, heater works great.
Guest -
December 5, 2022
Verified Purchase
The replacement part made for an easy repair.
The replacement part I received from your company was exactly what I needed to repair my heater and get it operational again. Thanks very much.
Guest -
February 19, 2022
Verified Purchase
Perfect replacement part
Just the exact part I needed Fairly easy to install. Works great
Anonymous -
February 14, 2022
Verified Purchase
Easy Repair.
The switch, arrived and was installed quickly, putting the device back in service .
Guest -
January 26, 2022
Verified Purchase
Thanks eReplacementParts
The switch is an exact replacement. Removed the old and installed the new. The heater is working again.
Guest -
January 7, 2022
Verified Purchase
Switch for oil filled space heater
Part was received as described. Fast shipping. Working great so far. Thanks.
Guest -
December 23, 2021
Verified Purchase
Exactly what we needed!
Order arrived exactly as pictured, This switch was easy to install and worked perfectly on the DeLonghi heater I was trying to fix. Thank you!
Guest -
December 5, 2021
Verified Purchase
t
t
t -
t days ago
Verified Purchase
eReplacementParts Team
t
Questions & Answers ?
Our customer Service team is at the ready daily to answer your part and product questions.

Ask our Team
We have a dedicated staff with decades of collective experience in helping customers just like you purchase parts to repair their products.
Does this fit my product?Questions & Answers for Large Double Rocker Switch
I need the size in inchs
Richard
asked on 2023-11-30
Hi Richard,
Thank you for your question. The top part of the switch measures approximately 2 inches long and the bottom part of the switch measures approximately 1-3/8 inches long. We hope this helps!
eReplacementParts Team November 30, 2023
Customer Repair Instructions ?
All our customer repair instructions are solicited directly from other customers just like you who have purchased and replaced this exact part.
Heater control rocker switch broken.
Henry - December 9, 2015
👍 8 of 8 people found this instruction helpful
Tool Type
Heater
Difficulty
Easy
Time
30-60 minutes
Tools Used
Screwdriver, Needle nose pliers
Parts Used
Before disconnecting, I took pictures of the electrical connections with my smart phone. Then it was just a matter of reconnecting the correct wires to the proper terminals and re-installation of the switch and panel holding the switch to the heater.
Did you find this story helpful?
Thanks for voting and helping fellow customers!
Switch went bad from over heating
James - December 27, 2016
👍 4 of 4 people found this instruction helpful
Tool Type
Heater
Difficulty
Easy
Time
15-30 minutes
Tools Used
Screwdriver, Pliers
Parts Used
1. Unplugged heater from wall (low wattage switch still worked)
2. Removed housing.screw inorder to remove housing.
3. Unplugged wires from old switch
4. Removed old switch from housing.
5. Installed new switch in housing
6. Reattached wires in proper order with finger tips
7. Reattach housing
8. Tighten housing screw
9. Plug heater in wall outlet
10. Turn heater on with new double switch. Works Great
Did you find this story helpful?
Thanks for voting and helping fellow customers!
Replaced switch
Ed - February 7, 2016
👍 3 of 3 people found this instruction helpful
Tool Type
Heater
Difficulty
Easy
Time
Less than 15 minutes
Tools Used
Screwdriver, Pliers
Parts Used
Unscrew the face and bend the 8 plastic wings in. Remove the front plate. Press down on the clips on the switch and pull out. Disconnect the wires one at a time and put on the new switch. Snap the new switch into the front plate. Snap the front plate into the metal front and screw metal front back on heater. Quick fix.
Did you find this story helpful?
Thanks for voting and helping fellow customers!
Double rocker switch worn out.
William - March 1, 2018
👍 2 of 2 people found this instruction helpful
Tool Type
Heater
Difficulty
Easy
Time
15-30 minutes
Tools Used
Screwdriver, Drawings, needle nose pliers
Parts Used
Unplugged heater, draw diagram of wiring, remove one screw lift off panel containing
bad switch remove wiring,compress switch locks and remove., install new switch and
replace panel..
bad switch remove wiring,compress switch locks and remove., install new switch and
replace panel..
Did you find this story helpful?
Thanks for voting and helping fellow customers!
Wattage power selection switch broke.
Stephen - March 31, 2017
👍 2 of 2 people found this instruction helpful
Tool Type
Heater
Difficulty
Easy
Time
Less than 15 minutes
Tools Used
Screwdriver, Pliers
Parts Used
1. Unplugged heater.
2. Removed screw holding cover to heater that had switch mounted on it.
3. Removed wires from old switch that are in pairs of two. The wires stayed in position for re-connection ,
4. Squeezed clips on old switch while pushing it out of cover.
5.Pushed new switch in until clips snapped in place. Replaced wires onto switch.
6.Screwed cover back on. Plugged in and turned on with success.
Ordered my part on day one of a 2 foot snow storm and still got it in 4 days. Thank you.
Did you find this story helpful?
Thanks for voting and helping fellow customers!
The power swithes were broken from impact.
Craig - December 3, 2018
👍 1 of 1 people found this instruction helpful
Tool Type
Heater
Difficulty
Easy
Time
Less than 15 minutes
Tools Used
Screwdriver, Two hands and headlamp.
Parts Used
1: Removed one Phillips head screw from side panel.
2:Pull panel away from unit just far enough to reach cables attached to switch.
3:Gently pull cables off of the switch, keeping them in order for replacement on new switch.
4:Push old switch out of panel from cable side.(may need a little tap)
5:Snap new switch into panel from the front.
6:Reattach cables in the same order they were originally found.
7:Replace panel, catching bottom lip first, and then pushing in the top.
8:Replace screw and your ready to try it out.
Did you find this story helpful?
Thanks for voting and helping fellow customers!
Original switch became defective.
John - February 1, 2018
👍 1 of 1 people found this instruction helpful
Tool Type
Heater
Difficulty
Easy
Time
Less than 15 minutes
Tools Used
Screwdriver, Pliers
Parts Used
Removed 1/4" bolt holding control panel in place. Marked location of wires on existing switch. Disconnected wires and removed switch using flat head screwdriver to pry retaining prongs loose. Snapped new switch into position. Re-attached wires in their proper location. Re-attached control panel. Everything worked.
Did you find this story helpful?
Thanks for voting and helping fellow customers!
Original rocker switch no longer functioned
Robert - January 26, 2018
👍 1 of 1 people found this instruction helpful
Tool Type
Heater
Difficulty
Easy
Time
15-30 minutes
Tools Used
Screwdriver
Parts Used
Removed the end panel from the heater, took a picture of the wiring scheme on the original switch to make ensure accuracy in installing the new switch, replaced the switch, and then reattached the end panel.
Did you find this story helpful?
Thanks for voting and helping fellow customers!
One rocker side came off. Only worked on 900watts side
Thomas - December 20, 2018
Tool Type
Heater
Difficulty
Easy
Time
15-30 minutes
Tools Used
Screwdriver
Parts Used
Unplug heater. Removed one screw and removed cover plate. Slightly pulled out old switch with wires attached. Draw a simple diagram of existing wire attachments- color and thickness of wires. Connections pull off. Reattach wires to new switch per your diagram. Snap into place on cover plate. Push back into place and screw cover back on. Simple.
Did you find this story helpful?
Thanks for voting and helping fellow customers!
The low power switch hinge pin broke thus the spring inside pushed the switch out.
James - December 19, 2018
Tool Type
Heater
Difficulty
Easy
Time
15-30 minutes
Tools Used
Screwdriver, Pliers, Republican common sense
Parts Used
Removed switch panel cover and pulled out old switch module and inserted new one. Then installed cover, tested movement then plugged in. Tested and now have full power.
Did you find this story helpful?
Thanks for voting and helping fellow customers!
Load More Install Stories
OEM stands for Original Equipment Manufacturer and means the part you’re buying is sourced directly from the manufacturer who made your product. At eReplacementParts, we sell only genuine OEM parts, guaranteeing the part you’re purchasing is of better design and of higher quality than aftermarket parts.
Our product descriptions are a combination of data sourced directly from the manufacturers who made your product as well as content researched and curated by our content & customer service teams. This content is edited and reviewed internally before being made public to customers.
Our customer service team are at the ready daily to answer your part and product questions. We have a dedicated staff with decades of collective experience in helping customers just like you purchase parts to repair their products.
All our part reviews are solicited directly from other customers who have purchased this exact part. While we moderate these reviews for profanity, offensive language or personally identifiable information, these reviews are posted exactly as submitted and no alterations are made by our team.
All our customer repair instructions are solicited directly from other customers just like you who have purchased and replaced this exact part. While we moderate these reviews for profanity, offensive language or personally identifiable information, these reviews are posted exactly as submitted and no alterations are made by our team.
Based on data from past customer purchasing behaviors, these parts are most commonly purchased together along with the part you are viewing. These parts may be necessary or helpful to replace to complete your current repair.
All our installation videos are created and produced in collaboration with our in-house repair technician, Mark Sodja, who has helped millions of eReplacementParts customers over the last 13 years repair their products. Mark has years of experience in selling and repairing both commercial and residential products with a specialty in gas-powered equipment.
This data is collected from customers who submitted a repair instruction after replacing this exact part. Customers can rate how easy the repair was to complete and how long it took. We aggregate this data to provide a repair rating that allows customers to quickly determine the difficulty and time needed to perform their own repair.