eReplacementParts.com
877-346-4814
Porter Cable Parts

Switch N224532

OEM part for: Porter Cable, DeWALT, Black and Decker

Part Number: N224532


Install
Videos!
Switch - N224532:Porter Cable 360 View
Switch - N224532:Porter CableSwitch - N224532:Porter CableSwitch - N224532:Porter Cable 360 View
In Stock
Order within the next 9 hours and your part ships today!
Medium 15-30 minutes (13 rated repairs)?
OEM: Original Equipment Manufacturer ?
Porter CableDeWALTBlack and Decker
Does this d-block d-md-none fit my product?

Product Description ?

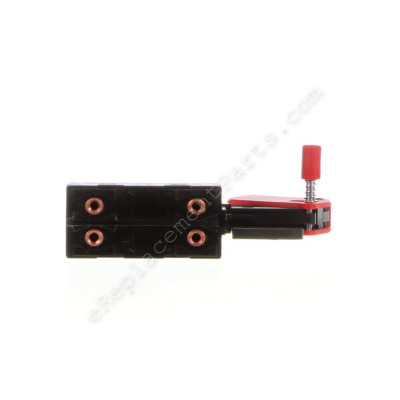
This Trigger switch has 4 terminals and a locking mechanism on the trigger. This authentic Porter Cable replacement part is sold individually.

rnrnSwitches are commonly replaced parts in power tools, handling all on/off and variable speed operations. They also have a role in electric breaking; they can momentarily reverse electrical polarity. Because switches use mechanical internals, they will degrade and wear out over time, eventually needing replacement. Some common signs of a broken or failing switch are:
• The tool has stopped functioning – it refuses to start.
• The tool operates intermittently, requiring multiple tries to turn on, until eventually it won’t start at all.
• The variable speed function and electric braking aren’t working properly.rnrn3.5" L 7/8" Depth 3/4" W

  • Classification: Part
  • Weight: 0.09 lbs.
  • Shipping: Ships Worldwide

Frequently Purchased Together ?

Compatibility

This part will fit the following 72 machines

Porter Cable

738 Type 2 Reciprocating Saw View Diagrams & Manuals
7538 Type 3 Speedmatic Plunge Router View Diagrams & Manuals
360VS Type 5 3x24 Variable Speed Belt Sander View Diagrams & Manuals
360VS Type 6 3x24 Variable Speed Belt Sander View Diagrams & Manuals
360VS Type 7 3x24 Variable Speed Belt Sander View Diagrams & Manuals
360VS Type 8 3x24 Variable Speed Belt Sander View Diagrams & Manuals
360VS Type 9 3x24 Variable Speed Belt Sander View Diagrams & Manuals
360 Type 5 3x24 Belt Sander View Diagrams & Manuals
360 Type 6 3x24 Belt Sander View Diagrams & Manuals
360 Type 7 3x24 Belt Sander View Diagrams & Manuals
360 Type 8 3x24 Belt Sander View Diagrams & Manuals
360 Type 9 3x24 Belt Sander View Diagrams & Manuals
361 Type 5 3x24 Belt Sander View Diagrams & Manuals
361 Type 6 3x24 Belt Sander View Diagrams & Manuals
361 Type 7 3x24 Belt Sander View Diagrams & Manuals
361 Type 8 3x24 Belt Sander View Diagrams & Manuals
362VS Type 5 4x24 Variable Speed Belt Sander View Diagrams & Manuals
362VS Type 6 4x24 Variable Speed Belt Sander View Diagrams & Manuals
362VS Type 7 4x24 Variable Speed Belt Sander View Diagrams & Manuals
362VS Type 8 4x24 Variable Speed Belt Sander View Diagrams & Manuals
362 Type 5 4x24 Belt Sander View Diagrams & Manuals
362 Type 6 4x24 Belt Sander View Diagrams & Manuals
362 Type 7 4x24 Belt Sander View Diagrams & Manuals
362 Type 8 4x24 Belt Sander View Diagrams & Manuals
362 Type 9 4x24 Belt Sander View Diagrams & Manuals
363 Type 5 4x24 Belt Sander View Diagrams & Manuals
363 Type 6 4x24 Belt Sander View Diagrams & Manuals
363 Type 7 4x24 Belt Sander View Diagrams & Manuals
363 Type 8 4x24 Belt Sander View Diagrams & Manuals
7401 Disc Sander View Diagrams & Manuals
7402 Disc Sander View Diagrams & Manuals
7403 Disc Sander View Diagrams & Manuals
7723 Type 1 Porta-Band Band Saw View Diagrams & Manuals
7723 Type 2 Porta-Band Band Saw View Diagrams & Manuals
7723 Type 3 Porta-Band Band Saw View Diagrams & Manuals
7724 Type 1 Portable Band Saw View Diagrams & Manuals
7724 Type 2 Portable Band Saw View Diagrams & Manuals
7724 Type 3 Portable Band Saw View Diagrams & Manuals
362 Type 10 Belt Sander View Diagrams & Manuals
362V Type 10 Belt Sander View Diagrams & Manuals
361 Type 9 Belt Sander View Diagrams & Manuals
361 Type 10 Belt Sander View Diagrams & Manuals
360 Type 10 3x24 Belt Sander View Diagrams & Manuals
360VS Type 10 3x24 Variable Speed Belt Sander View Diagrams & Manuals
7539 Type 5 V-S 3 1/4 H-P Plunge Router View Diagrams & Manuals
304 Type 2 7" Disc Sander View Diagrams & Manuals
305 Type 2 Sander / Polisher View Diagrams & Manuals
7538 Type 6 Plunge Router View Diagrams & Manuals
6911 (Type 9) Base #691 Power Tool View Diagrams & Manuals
7538 (Type 4) Plunge Router Power Tool View Diagrams & Manuals
7538 (Type 5) Plunge Router Power Tool View Diagrams & Manuals
7538 (Type 7) Plunge Router Power Tool View Diagrams & Manuals
7539 (Type 6) V-S 3 1/4 H-P Plunge Power Tool View Diagrams & Manuals
360 (Type 11) 3x24 Belt Sand Dstls Power Tool View Diagrams & Manuals
360VS (Type 11) 3 X 24 Vs Belt Sndr Power Tool View Diagrams & Manuals
362 (Type 11) 4x24 Belt Sand Dstls Power Tool View Diagrams & Manuals
362V (Type 11) Belt Sander Power Tool View Diagrams & Manuals
362V (Type 8) Belt Sander Power Tool View Diagrams & Manuals
363 (Type 10) Belt Sander Power Tool View Diagrams & Manuals
7401 (Type 1) M.O.P. Polisher Power Tool View Diagrams & Manuals
7403 (Type 1) Paint Remover Power Tool View Diagrams & Manuals

DeWALT

DW328 Type 2 Portable Bandsaw View Diagrams & Manuals
DW329 Type 2 Band Saw View Diagrams & Manuals
DW328 Type 3 Band Saw View Diagrams & Manuals
3128K (Type 2) V.S.Port.Band Saw Power Tool View Diagrams & Manuals
3129 (Type 2) 2 Spd.Portable Band Saw Power Tool View Diagrams & Manuals
3129K (Type 2) 2-Sp.Port.Band Saw Power Tool View Diagrams & Manuals

Black and Decker

3128 Type 2 Variable Speed Portable Band Saw View Diagrams & Manuals
3129 Type 2 2-Speed Portable Band Saw View Diagrams & Manuals
363 Type 10 Belt Sander View Diagrams & Manuals
7538 Type 5 Plunge Router View Diagrams & Manuals
7538 Type 4 Plunge Router View Diagrams & Manuals
Show More Compatible Models
Don't see yours? Try searching our site for :

This item works with the following types of products:

  • Reciprocating Saw Parts
  • Saw Parts
  • Router Parts
  • Sander Parts
  • Band Saw Parts
  • Polisher Parts

This part replaces obsolete part #: A22819, 697452

Customer Part Reviews ?

4.1
Average Rating (out of 5):
8 Reviews
Click to filter by ratings:
5 stars
4
4 stars
3
3 stars
0
2 stars
0
1 stars
1
  • Highest Rating
  • Most Recent
< PREV
  • 1
NEXT >
  • Worked as it should.
    Quick delivery , worked great.
    Guest - October 28, 2022 Verified Purchase
    I would use this company again
    Fit in tool. Mounted exactly like original trigger pull Stronger tahan original may last longer.
    Guest - August 26, 2020 Verified Purchase
    Bandsaw switch replacement
    My band saw is older and the part available is not an exact fit but I was able to adjust the wiring within the saw and its now working perfectly. There was some difficulty in timely shipment of the part but one phone call to the company and the problem was fixed! Very courteous service person handled my issue professionally and to my complete satisfaction. Good Job!
    Guest - October 29, 2019 Verified Purchase
    Worked as per description. Made the tool go.
    Easy to find. Easy to order. Order arrived in a timely manner.
    Bruce - May 17, 2019 Verified Purchase
    Well,
    The exact switch I needed for my router was not available so they sent a close part for a skill router. I had to modify the handle in order for the switch to fit but after some work with my Dremel tool I managed to get it in place once I got it mounted back on the tool worked great. shipping was easy and I got the part in just a few days
    Gerald - February 1, 2023 Verified Purchase
    Worked just as advertised.
    The only reason I didn't give 5 stars was because I don't believe it doing that, but as I said, it worked just as advertised and was shipped quickly and efficiently and with as little pain as is imaginable.
    David - September 25, 2019 Verified Purchase
    was not the correct part
    part was in perfect condition but it was not a match for my older Rockwell # 226 door planer. wish I could find the correct switch for it but it looks like it is a discontinued item, very sad
    Guest - May 4, 2019 Verified Purchase
    The switch was fine except it didnt come with the screws needed to install it. Very disappointed
    The switch was fine except it didnt come with the screws needed to install it. Very disappointed
    Guest - October 17, 2019 Verified Purchase
    t
    t
    t - t days ago Verified Purchase
    eReplacementParts Team
    t

    Questions & Answers ?

    Our customer Service team is at the ready daily to answer your part and product questions.

    photo of team member
    Ask our Team

    We have a dedicated staff with decades of collective experience in helping customers just like you purchase parts to repair their products.

    Does this fit my product?

    Questions & Answers for Switch


    No questions have been asked yet

    Customer Repair Instructions ?

    All our customer repair instructions are solicited directly from other customers just like you who have purchased and replaced this exact part.

    Medium 15-30 minutes (13 rated repairs)?

    The plastic trigger broke which when turned on, it would not release to turn off.

    Richard - November 26, 2017
    👍 1 of 1 people found this instruction helpful
    Tool Type

    Router

    Difficulty

    Medium

    Time

    30-60 minutes

    Tools Used

    Screwdriver, Pliers, awl (to spread contacts to release wire to reuse)

    1. Removed four screws that held "D" handle cover.
    2. Unscrewed switch assembly from "D" handle.
    3. Removed wires from switch.
    4. Tried to place same wires from broken switch to the new switch. At first, I had the wires to the new switch in the same basic position as the old wires and switch. When turned on, the circuit breaker snapped off.
    5. I looked at the old switch and noticed that the wire positions were not what I thought. I then paid attention to the numbers "1" and "2". The switch is a double pole switch so the wires had to be inline correctly.
    5. A couple of wires were short so had to improvise to replace the wires. The awl was used to spread the contacts to release them from the original wires to use the contacts again on the new wires.
    6. With the wires in the right position, I did a quick test before putting everything finally together. It worked and worked fine when fully assembled.
    7. This is a favorite router and it was great to have it run correctly again.
    Did you find this story helpful?
    Thanks for voting and helping fellow customers!

    Dead switch

    Jonathan - October 29, 2017
    👍 1 of 1 people found this instruction helpful
    Tool Type

    Sander

    Difficulty

    Medium

    Time

    15-30 minutes

    Tools Used

    Screwdriver, Pliers

    Took handles apart
    Disconnected wires
    Replaced switch
    Reconnected wires
    Reassembled handles
    Good to go!
    Did you find this story helpful?
    Thanks for voting and helping fellow customers!

    Switch stopped working

    Deron - June 13, 2021
    Tool Type

    Sander

    Difficulty

    Medium

    Time

    30-60 minutes

    Tools Used

    Screwdriver, Power Drill, Multi meter

    Remove handle, remove switch
    Check new switch, looks perfect
    Use multi meter for proper connections, new switch was different.
    Reassembled switch, then handle.
    Tested it, perfect. Done
    Did you find this story helpful?
    Thanks for voting and helping fellow customers!

    The Rockwell 4485 Type 1 switch was froze up for several years could not find a replacement switch

    Edward - January 20, 2019
    Tool Type

    Sander

    Difficulty

    Easy

    Time

    Less than 15 minutes

    Tools Used

    Screwdriver, Pliers, I soldea jumper wire to go from the -of the armature wire t

    The Rockwell 1/2 sheet 4485 Type 1 sander switch was froze up for years. No replacement was availible I found this similar looking mount (Two Screw Holes) that matched the The Rockwell 4485 Type 1 switch was froze up for years. Please meter the new switch to make sure you do not bypass the switch instead of connecting to the motor armature. I had searched the internet several times before finding this Porter Cable retro switch. It did the trick for me!!
    Did you find this story helpful?
    Thanks for voting and helping fellow customers!

    Switch on PC belt sander was bad

    LEW - June 24, 2018
    Tool Type

    Sander

    Difficulty

    Easy

    Time

    Less than 15 minutes

    Tools Used

    Screwdriver

    Wiring for new switch is slightly different. Be sure to label wires before removing from old switch.
    Did you find this story helpful?
    Thanks for voting and helping fellow customers!

    Needed to replace switch.

    David - November 18, 2017
    Tool Type

    Sander

    Difficulty

    Medium

    Time

    30-60 minutes

    Tools Used

    Screwdriver, Pliers

    Removed casing.
    Removed wires from old switch.
    Had to look at corresponding wire connections on old switch in order to hook up new switch, because new switch did not match exactly as far as where connections were located.
    Installed new switch....had several trial and error attempts.
    Reattached casing/covers.
    Did you find this story helpful?
    Thanks for voting and helping fellow customers!

    Trigger switch broke, worn brushes

    Scott - April 26, 2017
    Tool Type

    Sander

    Difficulty

    Medium

    Time

    15-30 minutes

    Tools Used

    Screwdriver, Pliers

    Remove handle half
    Remove switch from handle
    Take note of the wiring
    Disconnect the wires from the old switch
    Connect the wires to the new switch
    Attach the new switch
    Remove the brush caps
    Remove the old brushes
    Install the new brushes
    Install the brush caps
    Did you find this story helpful?
    Thanks for voting and helping fellow customers!

    Defective switch

    John - April 13, 2017
    Tool Type

    Sander

    Difficulty

    Easy

    Time

    15-30 minutes

    Tools Used

    Screwdriver, Hex wrench , star screwdriver

    Remove one half of the switch handle
    Remove the cord clamp
    Draw up a wiring diagram
    Disconnect the wires from the switch
    Connect the new wires to the switch
    Attach the switch
    Attach the cord clamp
    Replace the handle half
    Did you find this story helpful?
    Thanks for voting and helping fellow customers!

    Switch was in constant on position. Had to pull plug to turn off. Replaced switch and it works as new

    THOMAS - April 7, 2017
    Tool Type

    Sander

    Difficulty

    Easy

    Time

    15-30 minutes

    Tools Used

    Screwdriver

    Switch wouldn't shut off. Had to pull power plug to get it to shut off. Removed screws in handle and then replaced the switch. Put screws back in handle, plugged unit power cord in wall socket and pressed trigger. works like a charm.
    Did you find this story helpful?
    Thanks for voting and helping fellow customers!

    Switch non-operational

    Thomas - August 25, 2016
    Tool Type

    Sander

    Difficulty

    Medium

    Time

    15-30 minutes

    Tools Used

    Screwdriver, Pliers

    1. Opened handle and removed switch.
    2. Noted wire connection points on the original switch.
    3. Removed wires from the switch.
    4. Connect wiring to new switch using the point designations.
    5. Reinstall the handle, making sure all wiring fits without pinching or potential grounding/shorting.
    Did you find this story helpful?
    Thanks for voting and helping fellow customers!

    OEM stands for Original Equipment Manufacturer and means the part you’re buying is sourced directly from the manufacturer who made your product. At eReplacementParts, we sell only genuine OEM parts, guaranteeing the part you’re purchasing is of better design and of higher quality than aftermarket parts.

    Our product descriptions are a combination of data sourced directly from the manufacturers who made your product as well as content researched and curated by our content & customer service teams. This content is edited and reviewed internally before being made public to customers.

    Our customer service team are at the ready daily to answer your part and product questions. We have a dedicated staff with decades of collective experience in helping customers just like you purchase parts to repair their products.

    All our part reviews are solicited directly from other customers who have purchased this exact part. While we moderate these reviews for profanity, offensive language or personally identifiable information, these reviews are posted exactly as submitted and no alterations are made by our team.

    All our customer repair instructions are solicited directly from other customers just like you who have purchased and replaced this exact part. While we moderate these reviews for profanity, offensive language or personally identifiable information, these reviews are posted exactly as submitted and no alterations are made by our team.

    Based on data from past customer purchasing behaviors, these parts are most commonly purchased together along with the part you are viewing. These parts may be necessary or helpful to replace to complete your current repair.

    All our installation videos are created and produced in collaboration with our in-house repair technician, Mark Sodja, who has helped millions of eReplacementParts customers over the last 13 years repair their products. Mark has years of experience in selling and repairing both commercial and residential products with a specialty in gas-powered equipment.

    This data is collected from customers who submitted a repair instruction after replacing this exact part. Customers can rate how easy the repair was to complete and how long it took. We aggregate this data to provide a repair rating that allows customers to quickly determine the difficulty and time needed to perform their own repair.

    eReplacementParts.com
    7174 South 400 West
    Suite 5
    Midvale, UT 84047
    visa mastercard discover american express PayPal