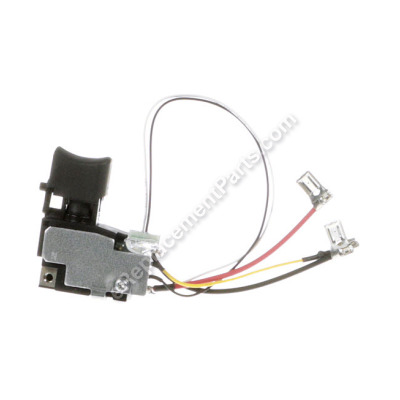
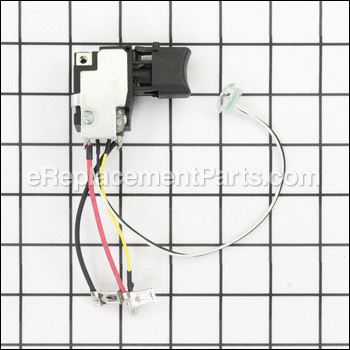
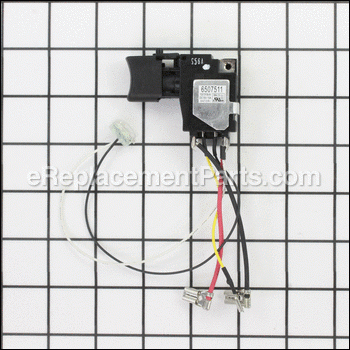


This switch is an original part from Makita. The metal, wiring and plastic item is compatible with the XDT11R Cordless Impact Driver. The switch is fitted into the housing set handle, with the wiring fastened to the motor and battery. This item allows the operator to (de)activate the power tool. You will need a screwdriver for the installation. The switch is sold individually.
Switch 650751-1
OEM part for: Makita
Part Number: 650751-1
$47.88
In Stock
Jump To:
Frequently Purchased Together ?


Compatibility
This part will fit the following 2 machines
Makita
XDT11R Cordless Impact Driver View Diagrams & Manuals
XDT11Z Drill / Driver View Diagrams & Manuals
This item works with the following types of products:
Customer Part Reviews ?
Average Rating (out of 5):
Click to filter by ratings:
5 stars
0
4 stars
1
3 stars
0
2 stars
0
1 stars
0
< PREV
- 1
The right place to find almost any part you need.
I like this website to shop for the parts I need to fix my tools,I only put 4 stars because of the shipping time that it took 8 days to get to me but other than that I’m happy.
Al -
March 22, 2022
Verified Purchase
t
t
t -
t days ago
Verified Purchase
eReplacementParts Team
t
Questions & Answers ?
Our customer Service team is at the ready daily to answer your part and product questions.

Ask our Team
We have a dedicated staff with decades of collective experience in helping customers just like you purchase parts to repair their products.
Does this fit my product?Questions & Answers for Switch
No questions have been asked yet
Customer Repair Instructions ?
All our customer repair instructions are solicited directly from other customers just like you who have purchased and replaced this exact part.
Switch not working
Barry - March 17, 2017
👍 5 of 6 people found this instruction helpful
Tool Type
Drill
Difficulty
Easy
Time
15-30 minutes
Tools Used
Screwdriver
Parts Used
Removed the rear cover
Removed the screws from the housing and carefully separated them
Made a wiring diagram, then removed the old switch
Wired the new switch in
Screwed the housings together, and installed the rear cover
Removed the screws from the housing and carefully separated them
Made a wiring diagram, then removed the old switch
Wired the new switch in
Screwed the housings together, and installed the rear cover
Did you find this story helpful?
Thanks for voting and helping fellow customers!
Switch broke and wouldn't change from forward or reverse
Maximiliano - August 18, 2018
👍 1 of 1 people found this instruction helpful
Tool Type
Impact Driver
Difficulty
Easy
Time
Less than 15 minutes
Tools Used
Screwdriver
Parts Used
Open up the main case make sure not to move the motor as it's a pain to close it just right if it's not sat exactly where it goes
Undo two screws attaching switch to battery put new one in run cables for light where they sit and close it back up simple 5 minute repair
Undo two screws attaching switch to battery put new one in run cables for light where they sit and close it back up simple 5 minute repair
Did you find this story helpful?
Thanks for voting and helping fellow customers!
Needed a new switch
Arlene - April 6, 2018
👍 1 of 1 people found this instruction helpful
Tool Type
Drill
Difficulty
Medium
Time
15-30 minutes
Tools Used
Screwdriver
Parts Used
Opened the drill case carefully. Removed the switch, LED light, and the forward reverse bar.
Removed a wire at a time and transferred it to the new switch. Reassembled the LED light the
switch and the forward reverse bar back into the drill case. Put the cover back on and fasten the drill back together with the screws removed in the first step. With a little patience this repair is easily done.
Did you find this story helpful?
Thanks for voting and helping fellow customers!
broken trigger switch
Henry - December 18, 2021
Tool Type
Drill
Difficulty
Easy
Time
Less than 15 minutes
Tools Used
Screwdriver, Pliers
Parts Used
Took the drill apart replaced the switch put it back together.
Did you find this story helpful?
Thanks for voting and helping fellow customers!
The trigger wasn't working.
Kilian - March 31, 2021
Tool Type
Drill
Difficulty
Medium
Time
15-30 minutes
Tools Used
Screwdriver
Parts Used
1. Took all the screws out.
2. Opened up the handle.
3. Disconnected the old trigger and wires.
4. Reconnected the new trigger and wires.
5. Closed the handle and put screws back.
I had to pull the motor and drive unit out to get the LED light wires underneath. That was the trickiest part.
2. Opened up the handle.
3. Disconnected the old trigger and wires.
4. Reconnected the new trigger and wires.
5. Closed the handle and put screws back.
I had to pull the motor and drive unit out to get the LED light wires underneath. That was the trickiest part.
Did you find this story helpful?
Thanks for voting and helping fellow customers!
switch did not work
Lori - March 25, 2021
Tool Type
Drill
Difficulty
Easy
Time
15-30 minutes
Tools Used
Screwdriver
Parts Used
1 unscrewed casing
2 unplugged switched and removed screws
3 put new switch in
4 reversed steps
2 unplugged switched and removed screws
3 put new switch in
4 reversed steps
Did you find this story helpful?
Thanks for voting and helping fellow customers!
Not working
Michael - October 13, 2019
Tool Type
Drill
Difficulty
Easy
Time
15-30 minutes
Tools Used
Screwdriver, Pliers
Removed housing screws. Removed armature from transmission and brush holder. Installed new armature. Removed screws on switch from brush holder and removed switch and brush holder. Reconnected wire to switch from brush holder and reassembled in reverse order.
Did you find this story helpful?
Thanks for voting and helping fellow customers!
OEM stands for Original Equipment Manufacturer and means the part you’re buying is sourced directly from the manufacturer who made your product. At eReplacementParts, we sell only genuine OEM parts, guaranteeing the part you’re purchasing is of better design and of higher quality than aftermarket parts.
Our product descriptions are a combination of data sourced directly from the manufacturers who made your product as well as content researched and curated by our content & customer service teams. This content is edited and reviewed internally before being made public to customers.
Our customer service team are at the ready daily to answer your part and product questions. We have a dedicated staff with decades of collective experience in helping customers just like you purchase parts to repair their products.
All our part reviews are solicited directly from other customers who have purchased this exact part. While we moderate these reviews for profanity, offensive language or personally identifiable information, these reviews are posted exactly as submitted and no alterations are made by our team.
All our customer repair instructions are solicited directly from other customers just like you who have purchased and replaced this exact part. While we moderate these reviews for profanity, offensive language or personally identifiable information, these reviews are posted exactly as submitted and no alterations are made by our team.
Based on data from past customer purchasing behaviors, these parts are most commonly purchased together along with the part you are viewing. These parts may be necessary or helpful to replace to complete your current repair.
All our installation videos are created and produced in collaboration with our in-house repair technician, Mark Sodja, who has helped millions of eReplacementParts customers over the last 13 years repair their products. Mark has years of experience in selling and repairing both commercial and residential products with a specialty in gas-powered equipment.
This data is collected from customers who submitted a repair instruction after replacing this exact part. Customers can rate how easy the repair was to complete and how long it took. We aggregate this data to provide a repair rating that allows customers to quickly determine the difficulty and time needed to perform their own repair.