
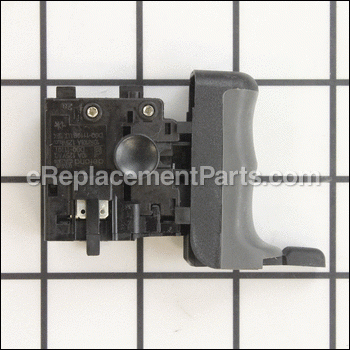
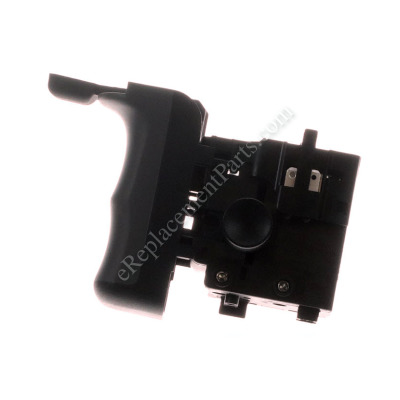

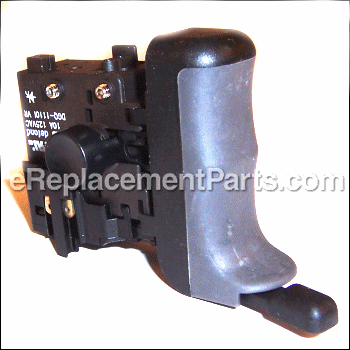

This is an OEM part sourced directly from the manufacturer. The switch is found in Ridgid drills. This part is a complete switch assembly made primarily of high-quality plastic, and it is placed in the handle of the machine to allow the user to trigger the drill. You may require a screwdriver when replacing this part. This item is sold individually.
Switch 760406003
OEM part for: Ridgid
Part Number: 760406003
$16.91
In Stock
Compatibility
This part will fit the following 4 machines
Ridgid
R5011 1/2" Hammer Drill View Diagrams & Manuals
R7110 1/2" Drill View Diagrams & Manuals
R7111 1/2" Drill View Diagrams & Manuals
R5013 1/2" Hammer Drill View Diagrams & Manuals
This item works with the following types of products:
- Drill Parts
- Hammer Drill Parts
This part replaces obsolete part #: 760406002
Customer Part Reviews ?
Average Rating (out of 5):
Click to filter by ratings:
5 stars
2
4 stars
0
3 stars
0
2 stars
0
1 stars
0
< PREV
- 1
Great service!
The part was great and fit my drill, but it turned out the motor was burned out and eReplacementParts was great to work with and returned the part without any hassles. Very satisfied!
Sid -
January 28, 2021
Verified Purchase
Correct part
The part supplied came in fast. Great Service
Jose -
August 6, 2020
Verified Purchase
t
t
t -
t days ago
Verified Purchase
eReplacementParts Team
t
Questions & Answers ?
Our customer Service team is at the ready daily to answer your part and product questions.

Ask our Team
We have a dedicated staff with decades of collective experience in helping customers just like you purchase parts to repair their products.
Does this fit my product?Questions & Answers for Switch
No questions have been asked yet
Customer Repair Instructions ?
All our customer repair instructions are solicited directly from other customers just like you who have purchased and replaced this exact part.
Trigger had failed.
Douglas - June 29, 2017
👍 2 of 2 people found this instruction helpful
Tool Type
Hammer Drill
Difficulty
Easy
Time
15-30 minutes
Tools Used
, Two Allen wrenches
Parts Used
1. Removed 7 Allen screws holding handle together.
2. Swapped the seven wires from broken trigger one at a time to new trigger.
3. Reassembled handle and tested drill features.
2. Swapped the seven wires from broken trigger one at a time to new trigger.
3. Reassembled handle and tested drill features.
Did you find this story helpful?
Thanks for voting and helping fellow customers!
Ridgid hammer drill trigger failed, $15 part, $7 ship and working again
David - April 11, 2024
Tool Type
Hammer Drill
Difficulty
Medium
Time
15-30 minutes
Tools Used
Screwdriver, needle nose
Parts Used
8 torque screws contain the handle to give you access to the trigger. There are 5 wires to remove, suggest taking a picture to assist with reassembly.
Remove the failed trigger, replace with new trigger, wire per the photograph you took (a needle nose pliers helps with wire insertion.
rebuild the handle, test the driller (good as new)
Remove the failed trigger, replace with new trigger, wire per the photograph you took (a needle nose pliers helps with wire insertion.
rebuild the handle, test the driller (good as new)
Did you find this story helpful?
Thanks for voting and helping fellow customers!
Would not disengage
James - May 23, 2020
Tool Type
Hammer Drill
Difficulty
Medium
Time
15-30 minutes
Tools Used
Screwdriver, Pliers
Parts Used
Removed the bad sw. and install the new sw.Took a picture of the wiring connections on sw. before removing wires.
Did you find this story helpful?
Thanks for voting and helping fellow customers!
Switch would not shut off.
Barry - December 28, 2018
Tool Type
Hammer Drill
Difficulty
Hard
Time
30-60 minutes
Tools Used
Screwdriver, Pliers
Parts Used
Took photos of old switch still installed in the handle.
Pushed out switch and removed one wire at a time and plugged it into the new switch.
Took about 20 minutes to get the switch installed in the handle with all the wires tucked always
Pushed out switch and removed one wire at a time and plugged it into the new switch.
Took about 20 minutes to get the switch installed in the handle with all the wires tucked always
Did you find this story helpful?
Thanks for voting and helping fellow customers!
Trigger switch would not shut off all the way....the motor would just turn at a very low rpm
don - March 25, 2017
Tool Type
Hammer Drill
Difficulty
Medium
Time
30-60 minutes
Tools Used
Screwdriver, Pliers, paper clip to remove wires from old switch.
Parts Used
After removing the top half of the handle to expose the switch, using needle nose to pull some wires off the old switch and push them on the new in the same places. The rest of the wires were in push in connector on the switch. That's where the paper clip comes into play as it is used to push in the wire connector to release the remainder of the wires. Then you just push those wires in the same places on the new switch.
Did you find this story helpful?
Thanks for voting and helping fellow customers!
Intermittent power switch
Jeff - July 6, 2016
Tool Type
Hammer Drill
Difficulty
Medium
Time
15-30 minutes
Tools Used
Screwdriver, Pliers
Parts Used
1. Ensure the drill is not plugged into an outlet. Disassemble only the drill handle to expose switch.
2. Compared new switch to old switch for the correct match.
3. Remove power cord cable restraint inside drill handle.
4. Slow lift badly wired the switch from the case. Leave existing wires as much as possible in their original installed routed position. Do not remove wires yet.
5. With needle nose pliers grasp the metal connector of one wire on the old switch and pull gently off of the terminal of the switch and connect that wire to the same location of the new switch terminal. Repeat procedure for the remaining wires.
6. Once all wire are removed from the old switch, remove the switch. Note how old switch is installed into drill handle before removing.
7. Install new switch that was just wired into same location as old switch.
8. Route wires of switch into their original routed location. Ensure wires are in place and will not interfere with the reassembly of the drill handle.
9. Before reassemble of the drill, plug in the drill and test the switch to ensure it works. Careful not to touch the wires on the switch once you plug the power cord into an outlet. 120 volts.
10. Reassemble drill handle.
Did you find this story helpful?
Thanks for voting and helping fellow customers!
OEM stands for Original Equipment Manufacturer and means the part you’re buying is sourced directly from the manufacturer who made your product. At eReplacementParts, we sell only genuine OEM parts, guaranteeing the part you’re purchasing is of better design and of higher quality than aftermarket parts.
Our product descriptions are a combination of data sourced directly from the manufacturers who made your product as well as content researched and curated by our content & customer service teams. This content is edited and reviewed internally before being made public to customers.
Our customer service team are at the ready daily to answer your part and product questions. We have a dedicated staff with decades of collective experience in helping customers just like you purchase parts to repair their products.
All our part reviews are solicited directly from other customers who have purchased this exact part. While we moderate these reviews for profanity, offensive language or personally identifiable information, these reviews are posted exactly as submitted and no alterations are made by our team.
All our customer repair instructions are solicited directly from other customers just like you who have purchased and replaced this exact part. While we moderate these reviews for profanity, offensive language or personally identifiable information, these reviews are posted exactly as submitted and no alterations are made by our team.
Based on data from past customer purchasing behaviors, these parts are most commonly purchased together along with the part you are viewing. These parts may be necessary or helpful to replace to complete your current repair.
All our installation videos are created and produced in collaboration with our in-house repair technician, Mark Sodja, who has helped millions of eReplacementParts customers over the last 13 years repair their products. Mark has years of experience in selling and repairing both commercial and residential products with a specialty in gas-powered equipment.
This data is collected from customers who submitted a repair instruction after replacing this exact part. Customers can rate how easy the repair was to complete and how long it took. We aggregate this data to provide a repair rating that allows customers to quickly determine the difficulty and time needed to perform their own repair.