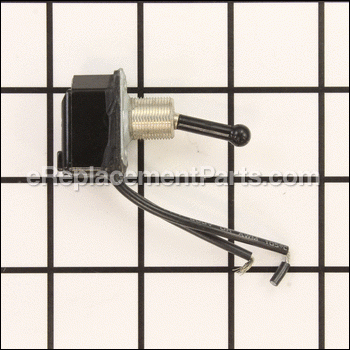

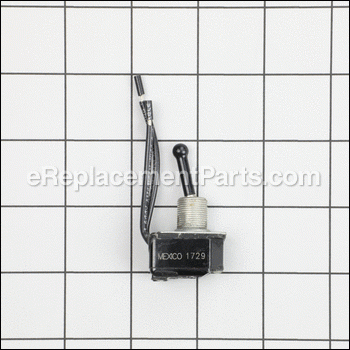

This part is an OEM from Milwaukee. The switch is composed of metal, wiring and plastic, and is compatible with many grinders, shears and nibblers. This item is often fitted into the motor housing and left brush holder, allowing the operator to (de)activate the tool. The switch is sold individually. Pliers and a screwdriver are necessary for the proper replacement. Please refer to the specific manual for further repair instructions.
Switch 23-66-2190
OEM part for: Milwaukee
Part Number: 23-66-2190
$39.36
In Stock
Compatibility
This part will fit the following 21 machines
Milwaukee
5192-2 (SER 669B) Grinder View Diagrams & Manuals
5192-2 (SER 669C) Grinder View Diagrams & Manuals
5192 (SER 669B) Grinder View Diagrams & Manuals
5192 (SER 669C) Grinder View Diagrams & Manuals
5192 (SER 669D) Grinder View Diagrams & Manuals
6815 (SER 710B) Shear View Diagrams & Manuals
6105 (SER 879B) Band File View Diagrams & Manuals
6880-2 (SER 630B) Nibbler View Diagrams & Manuals
6805 (SER 709C) Shear View Diagrams & Manuals
6880 (SER 630C) Nibbler View Diagrams & Manuals
6105 (SER 879A) Band File View Diagrams & Manuals
6815-2 (SER 710C) Shear View Diagrams & Manuals
6805 (SER 709B) 16 Gauge Shear View Diagrams & Manuals
6815 (SER 710C) 14 Gauge Shear View Diagrams & Manuals
6880 (SER 630B) 10 Gauge Nibbler View Diagrams & Manuals
6105 (SER 879C) Band File View Diagrams & Manuals
5192 (SER 699B) D.I. Grinder View Diagrams & Manuals
5192 (SER 699C) D.I. Grinder View Diagrams & Manuals
5192 (SER 699D) D.I. Grinder View Diagrams & Manuals
5192 (SER 699E) D.I. Grinder View Diagrams & Manuals
6805 (SER 709D) 16 Gauge Shear View Diagrams & Manuals
Show More Compatible Models
This item works with the following types of products:
- Grinder Parts
- Shear Parts
- Nibbler Parts
Repair Videos ?
Watch the Repair Video for
Switch

Customer Part Reviews ?
Average Rating (out of 5):
Click to filter by ratings:
5 stars
1
4 stars
0
3 stars
0
2 stars
0
1 stars
0
< PREV
- 1
Straight forward and easy
Received a switch for a grinder. Customer service was friendly and took the time to find the part. It was an older grinder so it took a few weeks to come in, but I was informed of this upfront. Very pleases with eReplacement Parts.
Guest -
January 11, 2021
Verified Purchase
t
t
t -
t days ago
Verified Purchase
eReplacementParts Team
t
Questions & Answers ?
Our customer Service team is at the ready daily to answer your part and product questions.

Ask our Team
We have a dedicated staff with decades of collective experience in helping customers just like you purchase parts to repair their products.
Does this fit my product?Questions & Answers for Switch
No questions have been asked yet
Customer Repair Instructions ?
All our customer repair instructions are solicited directly from other customers just like you who have purchased and replaced this exact part.
Switched Failed on Milwaukee 5192 Die Grinder
Paul - March 18, 2016
Tool Type
Grinder
Difficulty
Easy
Time
Less than 15 minutes
Tools Used
Screwdriver, Crimpers, T20 torx driver
Parts Used
To replace the switch on these units is fairly easy to do as long as you are comfortable crimping wires. The screws themselves can either take a flat blade screwdriver or a T20 torx driver (preferable). You will need two (2x) closed end splices. You can get these from Home Depot SKU #298233 (pack of 10x).
1- Remove the three (3x) screws near the power cable on the backside of the unit. This will allow access to the switch and brushes.
2- Slide the old switch out of the housing and cut the two wire crimps that are attached to the switch leads.
3- Crimp the new switch wires back into place where the old switch was connected. This is a SPST switch so it doesn't matter which wire goes where, just get them both attached.
4- Slide the new switch back into the housing. The switch has a cutout that aligns with the tab in the grinder's housing to ensure proper orientation. Ensure the wires are pressed back into the housing so they won't be pinched by the back cover or the motor. The switch is actually held in place by the back cover so it will still be loose until that is replaced.
5- Replace the back cover and reinsert the three (3x) screws removed in step 1.
6- At this time you can plug the die grinder into the wall to ensure properly switch function.
Happy Grinding!
Did you find this story helpful?
Thanks for voting and helping fellow customers!
OEM stands for Original Equipment Manufacturer and means the part you’re buying is sourced directly from the manufacturer who made your product. At eReplacementParts, we sell only genuine OEM parts, guaranteeing the part you’re purchasing is of better design and of higher quality than aftermarket parts.
Our product descriptions are a combination of data sourced directly from the manufacturers who made your product as well as content researched and curated by our content & customer service teams. This content is edited and reviewed internally before being made public to customers.
Our customer service team are at the ready daily to answer your part and product questions. We have a dedicated staff with decades of collective experience in helping customers just like you purchase parts to repair their products.
All our part reviews are solicited directly from other customers who have purchased this exact part. While we moderate these reviews for profanity, offensive language or personally identifiable information, these reviews are posted exactly as submitted and no alterations are made by our team.
All our customer repair instructions are solicited directly from other customers just like you who have purchased and replaced this exact part. While we moderate these reviews for profanity, offensive language or personally identifiable information, these reviews are posted exactly as submitted and no alterations are made by our team.
Based on data from past customer purchasing behaviors, these parts are most commonly purchased together along with the part you are viewing. These parts may be necessary or helpful to replace to complete your current repair.
All our installation videos are created and produced in collaboration with our in-house repair technician, Mark Sodja, who has helped millions of eReplacementParts customers over the last 13 years repair their products. Mark has years of experience in selling and repairing both commercial and residential products with a specialty in gas-powered equipment.
This data is collected from customers who submitted a repair instruction after replacing this exact part. Customers can rate how easy the repair was to complete and how long it took. We aggregate this data to provide a repair rating that allows customers to quickly determine the difficulty and time needed to perform their own repair.