
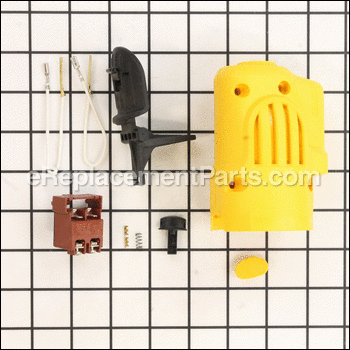
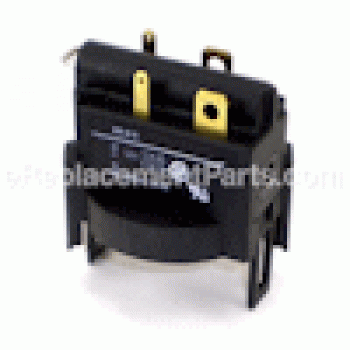
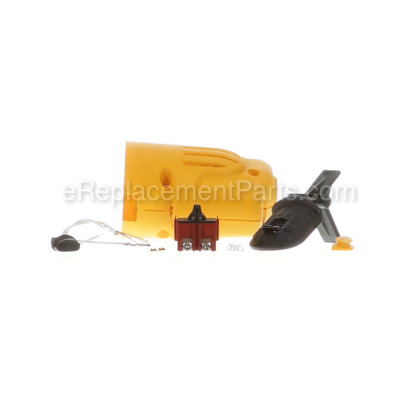


This is a Genuine OEM Sourced replacement part designed for use with Dewalt and Black and Decker Power Tools. Includes: Switch , Switch Housing, 2 Lead Wires , Switch Paddle & Lock Button.
To replace these items you would need a Screwdriver and Pliers.
Switch Kit 5140110-67
OEM part for: DeWALT, Black and Decker, Craftsman
Part Number: 5140110-67
$29.29
In Stock
Jump To:
Product Description ?
- Classification: Part
- Weight: 0.30 lbs.
- Shipping: Ships Worldwide
Frequently Purchased Together ?


Compatibility
This part will fit the following 73 machines
DeWALT
DW892 Type 1 14 Gauge Shear View Diagrams & Manuals
DW892 Type 2 14 Gauge Shear View Diagrams & Manuals
DW893 Type 1 12 Gauge Shear View Diagrams & Manuals
DW893 Type 2 12 Gauge Shear View Diagrams & Manuals
DW896 Type 1 16 Gauge Shear View Diagrams & Manuals
DW896 Type 2 16 Gauge Shear View Diagrams & Manuals
DW897 Type 1 16 Gauge Shear View Diagrams & Manuals
DW897 Type 2 16 Gauge Shear View Diagrams & Manuals
DW898 Type 1 14 Gauge Shear View Diagrams & Manuals
DW898 Type 2 14 Gauge Shear View Diagrams & Manuals
DW887 Type 1 1-1/2 Die Grinder View Diagrams & Manuals
DW887 Type 2 1-1/2 Die Grinder View Diagrams & Manuals
DW887 Type 3 1-1/2 Die Grinder View Diagrams & Manuals
DW402 Type 2 Grinder View Diagrams & Manuals
DW402 Type 1 Angle Grinder View Diagrams & Manuals
DW402 Type 4 Angle Grinder View Diagrams & Manuals
DW402 Type 5 Angle Grinder View Diagrams & Manuals
DW402 Type 6 Angle Grinder View Diagrams & Manuals
DW402G Type 2 Angle Grinder View Diagrams & Manuals
DW402G Type 4 Angle Grinder View Diagrams & Manuals
DW402G Type 6 Angle Grinder View Diagrams & Manuals
DW887-AR (Type 2) Die Grinder View Diagrams & Manuals
DW887-AR (Type 3) Die Grinder View Diagrams & Manuals
DW887-BR (Type 2) Die Grinder View Diagrams & Manuals
DW887-BR (Type 3) Die Grinder View Diagrams & Manuals
DW402-B3 (Type 3) 4-1/2inch Angle Grinder View Diagrams & Manuals
DW402-B3 (Type 4) 4-1/2inch Angle Grinder View Diagrams & Manuals
DW402K (Type 2) 4-1/2 Angle Grinder View Diagrams & Manuals
DW402K (Type 4) 4-1/2 Angle Grinder View Diagrams & Manuals
DW402K (Type 5) 4-1/2 Angle Grinder View Diagrams & Manuals
DW402K (Type 6) 4-1/2 Angle Grinder View Diagrams & Manuals
DW887-B2 (Type 2) Die Grinder View Diagrams & Manuals
DW887-B2 (Type 3) Die Grinder View Diagrams & Manuals
DW3006SW (Type 1) Switch View Diagrams & Manuals
DW402-35 (Type 1) 4-1/2 Ang.Grindr-Ltn.Amr View Diagrams & Manuals
DW402K-B3 (Type 3) 4-1/2 Grinder View Diagrams & Manuals
DW402-BR (Type 3) 4-1/2 Inch Angle Grinder Power Tool View Diagrams & Manuals
Black and Decker
2750 Type 100 4-1/2 Angle Grinder View Diagrams & Manuals
2750 Type 101 4-1/2 Angle Grinder View Diagrams & Manuals
4247-90 Type 100 4-1/2 Grinder View Diagrams & Manuals
4247-90 Type 101 4-1/2 Grinder View Diagrams & Manuals
4247 Type 100 Small Angle Grinder View Diagrams & Manuals
4287 Type 100 Die Grinder View Diagrams & Manuals
4287 Type 101 Die Grinder View Diagrams & Manuals
6246 Type 100 4 Angle Grinder View Diagrams & Manuals
6246 Type 101 4 Angle Grinder View Diagrams & Manuals
6247 Type 100 4 Angle Grinder View Diagrams & Manuals
ET1350 Type 1 4 1/2 Inch Grinder Snap On View Diagrams & Manuals
MT6147 Type 100 4 1/2 Grinder View Diagrams & Manuals
3159 Type 100 Body Grip 2-Speed Jig Saw View Diagrams & Manuals
3212 Type 100 12 Gauge Shear View Diagrams & Manuals
3216 Type 100 16 Gauge Shear View Diagrams & Manuals
3225 Type 100 Shear View Diagrams & Manuals
3251 Type 100 Nibbler View Diagrams & Manuals
3253 Type 100 16 Gauge Nibbler View Diagrams & Manuals
3254 Type 100 14 Gauge Nibbler View Diagrams & Manuals
6930 Type 100 4 1/2" Grinder View Diagrams & Manuals
6930 Type 101 4 1/2" Grinder View Diagrams & Manuals
26730 Type 1 Plate Joiner View Diagrams & Manuals
27730 Type 1 Plate Joiner View Diagrams & Manuals
MTE40 Type 101 4-1/2 Sander / Polisher View Diagrams & Manuals
6147 Type 101 4 1/2 Sander / Grinder View Diagrams & Manuals
6147 Type 100 4 1/2 Sander / Grinder View Diagrams & Manuals
27730 Type 4 Plate Joiner View Diagrams & Manuals
27730 Type 3 Plate Joiner View Diagrams & Manuals
2750-220 (Type 101) 220v 4-1/2 Grinder View Diagrams & Manuals
2750G (Type 101) Sm.Ang.Grinder 3wire View Diagrams & Manuals
4287-220 (Type 101) 220v 1-1/2 Die Grinder View Diagrams & Manuals
4247 (Type 101) Small Angle Grinder Power Tool View Diagrams & Manuals
Craftsman
900277300 Plate Joiner View Diagrams & Manuals
900277303 Jointer Planer View Diagrams & Manuals
90027242 Industrial Sabre Saw View Diagrams & Manuals
900272410 Industrial Sabre Saw View Diagrams & Manuals
Show More Compatible Models
This item works with the following types of products:
- Shear Parts
- Grinder Parts
- Jig saw Parts
- Saw Parts
- Nibbler Parts
- Plate Joiner Parts
- Polisher Parts
- Sander Parts
- Jointer Parts
- Planer Parts
This part replaces obsolete part #: 147818-04, 679923-00, 147818-00
Customer Part Reviews ?
Average Rating (out of 5):
Click to filter by ratings:
5 stars
1
4 stars
1
3 stars
0
2 stars
0
1 stars
1
< PREV
- 1
Exactly the parts needed to repair my grinder.
Easy to follow directions.
Guest -
June 28, 2020
Verified Purchase
Easy enough repair
Had to remove the original connections from casing and reinstall supplied connectors. All went easy as with all electric tools I wish there was more room for the wires. Grinder is working great now
Justin -
October 18, 2021
Verified Purchase
Good product, terrible instructions!
I have to assume I didn't get the complete instruction documents. Because the replacement part is totally different than the original, good instructions are critical. There is no instructions on removal of the old switch and only very limited instructions for installing the new one. If I'm to make this work, I'll have to improvise the methods. It's too bad the customer's experience wasn't equal to the quality of the part and it's delivery time.
Guest -
June 8, 2019
Verified Purchase
t
t
t -
t days ago
Verified Purchase
eReplacementParts Team
t
Questions & Answers ?
Our customer Service team is at the ready daily to answer your part and product questions.

Ask our Team
We have a dedicated staff with decades of collective experience in helping customers just like you purchase parts to repair their products.
Does this fit my product?Questions & Answers for Switch Kit
No questions have been asked yet
Customer Repair Instructions ?
All our customer repair instructions are solicited directly from other customers just like you who have purchased and replaced this exact part.
Switch for turning on and off was defective.
MICHAEL - December 8, 2016
👍 4 of 4 people found this instruction helpful
Tool Type
Grinder
Difficulty
Easy
Time
30-60 minutes
Tools Used
Screwdriver, Pliers, Crimper, Dikes, and multi meter.
Parts Used
Reviewed instructions sent with the switch. In the end, the grinder works and the repair has returned a very useful tool to service at a fraction of the cost of replacing it. Just a suggestion for those who do have the ability. You may want to disassemble the tool completely to inspect clean as needed and you may want to pay particular attention to the brushes.
Did you find this story helpful?
Thanks for voting and helping fellow customers!
Grinder would not shut-off when switch was released.
Robert - January 16, 2018
👍 2 of 2 people found this instruction helpful
Tool Type
Grinder
Difficulty
Medium
Time
1-2 hours
Tools Used
Screwdriver, Pliers, Micro torch and solder
Parts Used
1. Removed the end cap housing assembly. from the grinder.
2. Removed the switch assembly from the motor end.
3. Could not remove the terminal strip from the motor as instructed.
4. Soldered lead wires (supplied) to the terminal strips.
5. Wired lead wires and power cord to new switch (as instructions stated).
6. Assembled switch into new end housing and attached to grinder.
7. Grinder was a black&decker (gray incolor) but the dewalt housing(yellow) fit perfectly.
Did you find this story helpful?
Thanks for voting and helping fellow customers!
Switch failed
santo - October 13, 2018
👍 1 of 1 people found this instruction helpful
Tool Type
Grinder
Difficulty
Medium
Time
15-30 minutes
Tools Used
Screwdriver, Soldering iron
Parts Used
Removed old parts. Model was obsolete so the repair parts were a bit different than the original parts. Instructions were fairly clear but one end of the replacement wires had the wrong connection and I soldered them together rather than trying to find the correct replacement ends.
Did you find this story helpful?
Thanks for voting and helping fellow customers!
The old switch had slide on connectors to the power cord. The new switch had screws. No ring connectors came with the part. I supplied my own.
Ron - August 3, 2022
Tool Type
Grinder
Difficulty
Easy
Time
Less than 15 minutes
Tools Used
, Torx driver, needle nose pliers, wire strippers and crimper
Parts Used
The instructions were helpful but not complete. If you are a handy man, it’s pretty easy to figure out.
Did you find this story helpful?
Thanks for voting and helping fellow customers!
broken switch
Alan - February 9, 2022
Tool Type
Grinder
Difficulty
Easy
Time
15-30 minutes
Tools Used
Screwdriver, soldering iron
Parts Used
1. Removed the old switch and housing.
2. Soldered the new switch leads to the motor power tabs (push on leads didn't fit-not a problem.
3. Assembled the new housing.
4. Grinder lives!
5. Friend I fixed it for very happy!
6. Thanks very much!
2. Soldered the new switch leads to the motor power tabs (push on leads didn't fit-not a problem.
3. Assembled the new housing.
4. Grinder lives!
5. Friend I fixed it for very happy!
6. Thanks very much!
Did you find this story helpful?
Thanks for voting and helping fellow customers!
the on-off switch failed in the "on" position
Gary - December 22, 2021
Tool Type
Grinder
Difficulty
Medium
Time
1-2 hours
Tools Used
Screwdriver, Pliers
Parts Used
Removed the rear housing and power cord.
Thru away old housing and switch
Installed new brush set, new switch and new rear housing.
The instructions need to be improved to show how the original brass can be removed and discarded. This step and the information was not complete and the thought of removing the old connectors had be terrified that I was going to ruin the grinder for good. I used diagonal cutters to grad the old connectors and wiggled them out. The brass ends on the new switch and brushes fit in perfectly.
Did you find this story helpful?
Thanks for voting and helping fellow customers!
Bad switch
steve - January 8, 2021
Tool Type
Grinder
Difficulty
Easy
Time
30-60 minutes
Tools Used
Screwdriver, Pliers
Parts Used
Removed old parts
Installed new
Installed new
Did you find this story helpful?
Thanks for voting and helping fellow customers!
take off side cover
JOHN - October 12, 2020
Tool Type
Grinder
Difficulty
Medium
Time
15-30 minutes
Tools Used
Screwdriver, tape
Parts Used
take cover off be care not brake off wire put new brush in both side put wires on switch Aline switch to fit put handle & lock back put together slow put screw in hole to Aline it done good luck
Did you find this story helpful?
Thanks for voting and helping fellow customers!
Bad swich
William - July 30, 2018
Tool Type
Grinder
Difficulty
Easy
Time
15-30 minutes
Tools Used
Screwdriver, Pliers
Parts Used
1 Removed old rear housing and switch.
2 Removed old connector strips from motor.
3 Installed new retrofit switch and rear housing,following included instructions.
2 Removed old connector strips from motor.
3 Installed new retrofit switch and rear housing,following included instructions.
Did you find this story helpful?
Thanks for voting and helping fellow customers!
Switch bad
Dennis - April 27, 2018
Tool Type
Grinder
Difficulty
Easy
Time
30-60 minutes
Tools Used
Screwdriver, Pliers, Nutdriver
Parts Used
Followed the instructions that came with the kit.
Did you find this story helpful?
Thanks for voting and helping fellow customers!
Load More Install Stories
OEM stands for Original Equipment Manufacturer and means the part you’re buying is sourced directly from the manufacturer who made your product. At eReplacementParts, we sell only genuine OEM parts, guaranteeing the part you’re purchasing is of better design and of higher quality than aftermarket parts.
Our product descriptions are a combination of data sourced directly from the manufacturers who made your product as well as content researched and curated by our content & customer service teams. This content is edited and reviewed internally before being made public to customers.
Our customer service team are at the ready daily to answer your part and product questions. We have a dedicated staff with decades of collective experience in helping customers just like you purchase parts to repair their products.
All our part reviews are solicited directly from other customers who have purchased this exact part. While we moderate these reviews for profanity, offensive language or personally identifiable information, these reviews are posted exactly as submitted and no alterations are made by our team.
All our customer repair instructions are solicited directly from other customers just like you who have purchased and replaced this exact part. While we moderate these reviews for profanity, offensive language or personally identifiable information, these reviews are posted exactly as submitted and no alterations are made by our team.
Based on data from past customer purchasing behaviors, these parts are most commonly purchased together along with the part you are viewing. These parts may be necessary or helpful to replace to complete your current repair.
All our installation videos are created and produced in collaboration with our in-house repair technician, Mark Sodja, who has helped millions of eReplacementParts customers over the last 13 years repair their products. Mark has years of experience in selling and repairing both commercial and residential products with a specialty in gas-powered equipment.
This data is collected from customers who submitted a repair instruction after replacing this exact part. Customers can rate how easy the repair was to complete and how long it took. We aggregate this data to provide a repair rating that allows customers to quickly determine the difficulty and time needed to perform their own repair.