
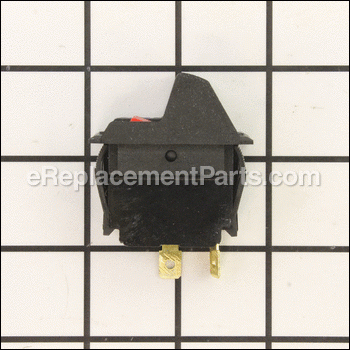
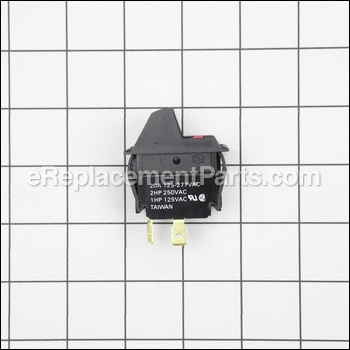


This is a genuine manufacturer-sourced replacement switch which is specially designed for use with Hitachi power tools. It is the component which allows a user to turn the unit on and off, over time parts may wear out and begin to fail eventually requiring a replacement. Keep in mind this high-quality plastic body switch is sold individually, note that the safety key is included.
Switch W/ Key (2p) 972082Z
OEM part for: Metabo HPT (Hitachi)
Part Number: 972082Z
$70.79
In Stock
Compatibility
This part will fit the following 7 machines
Metabo HPT (Hitachi)
CB75F Band Saw View Diagrams & Manuals
P12RA 12-9/32" Portable Planer/Jointer View Diagrams & Manuals
F-1000A Planer Jointer View Diagrams & Manuals
B-600A Band Saw View Diagrams & Manuals
P100F Planer View Diagrams & Manuals
SR15 Universal Saw View Diagrams & Manuals
P12R Planer View Diagrams & Manuals
Show More Compatible Models
This item works with the following types of products:
- Band Saw Parts
- Saw Parts
- Jointer Parts
- Planer Parts
This part replaces obsolete part #: 947-100
Customer Part Reviews ?
Average Rating (out of 5):
Click to filter by ratings:
5 stars
0
4 stars
1
3 stars
0
2 stars
0
1 stars
0
< PREV
- 1
Easy fix
The part, though pricey, arrived quickly and was installed easily. The purchase probably merits a five star review, however, because of the cost involved I rated it a four.
Guest -
June 24, 2019
Verified Purchase
t
t
t -
t days ago
Verified Purchase
eReplacementParts Team
t
Questions & Answers ?
Our customer Service team is at the ready daily to answer your part and product questions.

Ask our Team
We have a dedicated staff with decades of collective experience in helping customers just like you purchase parts to repair their products.
Does this fit my product?Questions & Answers for Switch W/ Key (2p)
No questions have been asked yet
Customer Repair Instructions ?
All our customer repair instructions are solicited directly from other customers just like you who have purchased and replaced this exact part.
would not turn off. had to unplug to shut off
Max - June 3, 2021
Tool Type
Planer
Difficulty
Medium
Time
30-60 minutes
Tools Used
, soldering iron
Parts Used
replaced old switch with new. hardest part was unsoldering old switch,
Did you find this story helpful?
Thanks for voting and helping fellow customers!
Hitachi P12RA Planer wouldn't start. Switch was bad.
Michael - November 26, 2020
Tool Type
Planer
Difficulty
Easy
Time
15-30 minutes
Tools Used
Screwdriver, Power Drill
Parts Used
1. Remove the jointer attachment. (Follow manual instructions.)
2. Remove the plastic side housing on the jointer side of the machine: Remove the screws,
then lift the housing slightly up and away, freeing the bottom of the housing from the
grooves that capture its bottom edger in the top of the machine base.
(It may be worthwhile to mark these and other screws to be removed in this process with
numbers on tape, corresponding to marks made at the locations from which they came,
as a variety of similar looking screws of slightly different types and lengths are involved;
most will only fit in one location.)
3. Remove the housing elements surrounding the switch. Keep track of which screw went
where. Note the orientation of the On/Off switch with respect to the two leads that
connect it.
4. Release the side tabs that hold the switch tightly to the flat plate through which it is
inserted, and remove the switch.
5. Insert the new switch though the hole in the plate you just removed, engaging the side
tabs.
6. Connect the leads on the switch to those corresponding on the ends of the cables.
7. Try the switch to confirm the motor will start.
8. In reverse order, reattach all the housing elements you removed to access the switch.
9. Re-install jointer per manual instructions.
Did you find this story helpful?
Thanks for voting and helping fellow customers!
Power switch wore out
Jerrold - May 22, 2020
Tool Type
Planer
Difficulty
Easy
Time
Less than 15 minutes
Tools Used
Screwdriver, Pliers
Parts Used
First tried to repair switch. When that failed, ordered new switch. When that arrived, I installed it and completed repair.
Process was obvious.
Thanks
Process was obvious.
Thanks
Did you find this story helpful?
Thanks for voting and helping fellow customers!
Switch would not turn off power
PETER - May 29, 2018
Tool Type
Planer
Difficulty
Easy
Time
15-30 minutes
Tools Used
Screwdriver, Soldering iron
Parts Used
Hitachi F1000 planer jointer. Removed four bolts and cover. Labeled wires before cutting. Tinned wires and leads of new switch with tv/radio solder. Soldered wires to switch. Reattached cover. Works perfectly.
Did you find this story helpful?
Thanks for voting and helping fellow customers!
Power switch wore out.
Walter - July 11, 2016
Tool Type
Planer
Difficulty
Easy
Time
Less than 15 minutes
Tools Used
Screwdriver
Parts Used
1. Removed joiner table attachment.
2. Removed side shroud by removing Philips screws.
3. Removed switch housing and unplugged wires running into switch.
4. Removed the switch and replaced it with the new one.
5. Reversed the removal procedure and it was back running again.
6. The replacement switch was an exact replacement.
2. Removed side shroud by removing Philips screws.
3. Removed switch housing and unplugged wires running into switch.
4. Removed the switch and replaced it with the new one.
5. Reversed the removal procedure and it was back running again.
6. The replacement switch was an exact replacement.
Did you find this story helpful?
Thanks for voting and helping fellow customers!
A 30-year old safety switch needed to be replaced
Sewell - June 2, 2016
Tool Type
Planer
Difficulty
Medium
Time
1-2 hours
Tools Used
Screwdriver, Pliers, Soldering iron, needle nose pliers, wire stripper
Parts Used
Hitachi F1000A: BE SURE YOU UNPLUG THE POWER CORD!!! 1. Remove 4 phillips head screws that hold switch housing, 2. Remove at least one phillips head that holds cord in place at base of planer--release cord from hold-down, 3. Remove phillips head screw that holds ground wire inside switch housing,
4. Cut black and yellow wires away from switch, 5. Remove entire switch housing, 6. Remove switch from housing by pressing pop-up plastic bands, 7. Connect stranded wire (black and white (if you don't have yellow) and solder to the new switch and slip heat shrink tubing over soldered switch terminals (gives you room to make motor and feed wire connections), 8. Run wires through switch housing and press new switch into place, 9. Insert heat shrink tubing over wires and solder black and white stranded wires to motor and lead wires respectively, 10. Heat shrink all tubing to cover solder joints, 11. Replace ground screw and switch housing, 12. Replace cord hold-down screw at base of planer, 13. Test switch... NOTE: Consider using a heat sink on the switch terminals when soldering the extension wires---a pair of needle nose vice grips works.
That will prevent the plastic on the switch from overheating when soldering.
Did you find this story helpful?
Thanks for voting and helping fellow customers!
Planer stopped working - switch was suspected as problem
Frank - April 21, 2016
Tool Type
Planer
Difficulty
Medium
Time
30-60 minutes
Tools Used
Screwdriver, Socket set
Parts Used
Become familiar with the removal process for the joiner and the plastic housing near the switch location. These items will have to be removed prior to the switch removal and re-installation.
Did you find this story helpful?
Thanks for voting and helping fellow customers!
OEM stands for Original Equipment Manufacturer and means the part you’re buying is sourced directly from the manufacturer who made your product. At eReplacementParts, we sell only genuine OEM parts, guaranteeing the part you’re purchasing is of better design and of higher quality than aftermarket parts.
Our product descriptions are a combination of data sourced directly from the manufacturers who made your product as well as content researched and curated by our content & customer service teams. This content is edited and reviewed internally before being made public to customers.
Our customer service team are at the ready daily to answer your part and product questions. We have a dedicated staff with decades of collective experience in helping customers just like you purchase parts to repair their products.
All our part reviews are solicited directly from other customers who have purchased this exact part. While we moderate these reviews for profanity, offensive language or personally identifiable information, these reviews are posted exactly as submitted and no alterations are made by our team.
All our customer repair instructions are solicited directly from other customers just like you who have purchased and replaced this exact part. While we moderate these reviews for profanity, offensive language or personally identifiable information, these reviews are posted exactly as submitted and no alterations are made by our team.
Based on data from past customer purchasing behaviors, these parts are most commonly purchased together along with the part you are viewing. These parts may be necessary or helpful to replace to complete your current repair.
All our installation videos are created and produced in collaboration with our in-house repair technician, Mark Sodja, who has helped millions of eReplacementParts customers over the last 13 years repair their products. Mark has years of experience in selling and repairing both commercial and residential products with a specialty in gas-powered equipment.
This data is collected from customers who submitted a repair instruction after replacing this exact part. Customers can rate how easy the repair was to complete and how long it took. We aggregate this data to provide a repair rating that allows customers to quickly determine the difficulty and time needed to perform their own repair.