
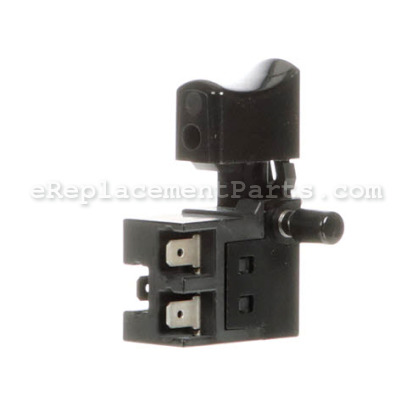
Genuine manufacturer approved replacement switch used on Hitachi compound miter saws. It is the part of the tool handling on/off operations. Since switches have moving mechanical parts, they will eventually wear out and will require a replacement. Switch has a plastic body and it is sold individually.
To replace this switch you would need a screwdriver and a hex key/allen wrench.
• Remove screws used to hold two pieces of housing set together
• Disconnect wires from the old switch and remove it from the housing
• Place the new switch in the housing and connect wires to it
• Reassemble the housing
Switch (3p Faston Type) W/o Lo 375115
OEM part for: Metabo HPT (Hitachi)
Part Number: 375115
Install
Videos!
Watch The
Repair Video
Repair Video
$14.62
In Stock
Product Description ?
- 3P Faston Type. Without Lock.
- Classification: Part
- Weight: 0.01 lbs.
- Shipping: Ships Worldwide
Compatibility
This part will fit the following 6 machines
Metabo HPT (Hitachi)
C12FDH 12" Laser Dual Compound Miter Saw View Diagrams & Manuals
C12LDH 12" Dual Compound Miter Saw View Diagrams & Manuals
C12FDHSM 12 Inch Dual Bevel Miter Saw With Laser Marker View Diagrams & Manuals
C12RSH2M 12 Inch Sliding Compound Miter Saw Wh Laser Marker,sliding Fences View Diagrams & Manuals
C8FSESM 8-1/2-Inch Sliding Compound Miter Saw View Diagrams & Manuals
C8FSHESM 8-1/2-Inch Sliding Compound Miter Saw With Laser And Light View Diagrams & Manuals
Show More Compatible Models
This item works with the following types of products:
- Miter Saw Parts
- Saw Parts
This part replaces obsolete part #: 324998, 324-998
Customer Part Reviews ?
Average Rating (out of 5):
Click to filter by ratings:
5 stars
2
4 stars
1
3 stars
2
2 stars
0
1 stars
0
< PREV
- 1
exact replacement, worked great
Fast shipping, good price, would do business again.
Guest -
October 27, 2019
Verified Purchase
switch replacement for Hitachi SAW
The part was an exact match for my Hitachi Miter Saw and arrived in just a few days. I installed it and my saw is back in working order thanks to REplacement Parts having exactly what I needed.
Guest -
July 18, 2019
Verified Purchase
Wrong part number
I ordered switch 375115 according to your schematic. The switch I got was about half that size. When I called your company I was told that the part number
was changed. And your company did not have that switch. Part number is 324998 was given to me by customer service. That person was very helpful. Customer service gave me a number I could call and get the correct switch. All is taken care of.
Thank you
Gary Harley
Guest -
September 20, 2021
Verified Purchase
Not the correct part for my saw
As usual when ordering parts on line it has the correct numbers, looks correct but when you get it in your hands it immediately becomes apparent is not the correct one. Needing it right away, required me to disassemble the old one and the new one, and by combining parts from the old, removing unnecessary components from the new one was able to make a working replacement switch so I could complete my order on time.
kenneth -
November 29, 2022
Verified Purchase
eReplacementParts Team
Hi Kenneth,
Thank you for your review. Please accept our apologies for this situation. We will be in touch with you shortly regarding your order.
Not the correct part
Need better pictures and descriptions. Needed switch and got a two piece handle. Thought I was getting handle with switch.
Guest -
June 21, 2022
Verified Purchase
t
t
t -
t days ago
Verified Purchase
eReplacementParts Team
t
Questions & Answers ?
Our customer Service team is at the ready daily to answer your part and product questions.

Ask our Team
We have a dedicated staff with decades of collective experience in helping customers just like you purchase parts to repair their products.
Does this fit my product?Questions & Answers for Switch (3p Faston Type) W/o Lo
No questions have been asked yet
Customer Repair Instructions ?
All our customer repair instructions are solicited directly from other customers just like you who have purchased and replaced this exact part.
The saw would not shut off
Philip - September 9, 2016
👍 5 of 6 people found this instruction helpful
Tool Type
Miter Saw
Difficulty
Easy
Time
Less than 15 minutes
Tools Used
Screwdriver
Parts Used
Removed the 3 or 4 screws from the handle and just replaced the switch. Very easy!
Did you find this story helpful?
Thanks for voting and helping fellow customers!
Switch would not turn off the saw.
David - February 11, 2017
👍 1 of 1 people found this instruction helpful
Tool Type
Miter Saw
Difficulty
Medium
Time
1-2 hours
Tools Used
Screwdriver, Power Drill, Socket set, Allen Wrench
Unplugged the saw from power!
Removed the pulley cover, which had suffered damage, plastic was broken at two attachment locations.
Unscrewed the screws holding the handle together an separated the handle halves.
Unplugged the three wires from the old stuck trigger switch.
Plugged the wires into the new part.
Replaced the handles with new screws
Installed the new brushes, saved the old ones they still have some use left.
Installed the new pulley cover with new fasteners.
Added power and tested the new switch and the saw works only when I want it too.
Did you find this story helpful?
Thanks for voting and helping fellow customers!
The switch had stopped working and would not shut the saw off. Needed to be replaced
Gordon - June 7, 2016
👍 2 of 3 people found this instruction helpful
Tool Type
Miter Saw
Difficulty
Medium
Time
15-30 minutes
Tools Used
Screwdriver, Pliers, Hex wrench
Parts Used
Unplug the saw, of course.
You will need to remove the screws on the handle, side cover and side plate to open get at the switch in the handle. I used a magnetic cup to hold all of the screws and put them together for each of the parts removed. The handle opens up and you will need the needle nosed pliers to pull the connectors off the switch. TAKE A PICTURE of the wires in the switch before pulling them off. This makes it super easy to push the wires onto the new switch.
Once the switch is connected and reseated, arrange the wires to allow for reassembly. Push the handle back together and fit into place and screw the handle together. Next screw the top down through the handle to hold it to the top of the saw (hex screws). Finally put the side places together. There are machine screws and regular screws, make sure you remember which go where. I marked the machine screw holes with a sharpie so I would find them.
Very easy.
Did you find this story helpful?
Thanks for voting and helping fellow customers!
The on-off switch contacts had melted together
Darryl - August 13, 2023
Tool Type
Miter Saw
Difficulty
Medium
Time
30-60 minutes
Tools Used
Screwdriver, Pliers, Metric hex wrench set
Parts Used
I had to split the new and old switches in half. I cleaned the trigger contacts on the old switch and snapped that half onto the new switch plugged half. This was because the original switch is no longer available. The replacement switch has a different trigger and a lock button. The removal and reinstall process is pretty straight forward.
Did you find this story helpful?
Thanks for voting and helping fellow customers!
The trigger switch would occasionally stick, causing the saw to continue running after the switch was released.
Robert - December 1, 2019
Tool Type
Miter Saw
Difficulty
Medium
Time
30-60 minutes
Tools Used
Screwdriver, Pliers, 4mm hex wrench
Parts Used
1. Remove the top carrying handle screws. 4 hex drive screws.
2. Remove 3 screws from the operating handle and 6 screws from the belt covers on the right side of the saw housing. #2 Phillips drive.
3. Remove the belt covers.
4. Open the two parts of the operating handle and located the trigger switch assembly.
>>Note the way the switch wires are routed in the handle.
5. There will be 3 wires on the switch, move these to the new switch one at time, by pulling them free with small pliers.
6. Position the switch in the operating handle and re-route the wires to keep them from being pinched while the handle halves are put together.
7. Reassemble the belt covers and reinstall all screws.
Did you find this story helpful?
Thanks for voting and helping fellow customers!
Switch was bad
Jesse - May 4, 2019
Tool Type
Miter Saw
Difficulty
Easy
Time
Less than 15 minutes
Tools Used
Screwdriver
Parts Used
Removed the screws and replaced the switch.
Did you find this story helpful?
Thanks for voting and helping fellow customers!
Switch would not turn off
Robert - January 13, 2019
Tool Type
Miter Saw
Difficulty
Easy
Time
15-30 minutes
Tools Used
Screwdriver
Parts Used
R&R switch
Did you find this story helpful?
Thanks for voting and helping fellow customers!
Switch not working
kenn - May 6, 2017
Tool Type
Miter Saw
Difficulty
Easy
Time
Less than 15 minutes
Tools Used
Screwdriver
Parts Used
Remove the screw from the switch housing
Noted where all the internal parts went
Removed the wires from the old switch and connected them to the new switch
Screwed the switch housing back together
Noted where all the internal parts went
Removed the wires from the old switch and connected them to the new switch
Screwed the switch housing back together
Did you find this story helpful?
Thanks for voting and helping fellow customers!
The switch would stick in the "on" position or not work at all.
Norman - April 24, 2017
Tool Type
Miter Saw
Difficulty
Easy
Time
Less than 15 minutes
Tools Used
Screwdriver
Parts Used
Removed screws until I could get at the switch, swapped out the wires and put it back together. Easy fix. You'll need a torx bit for some screws.
Did you find this story helpful?
Thanks for voting and helping fellow customers!
Switch was intermittent - than stopped altogether.
Richard - February 2, 2017
Tool Type
Miter Saw
Difficulty
Easy
Time
15-30 minutes
Tools Used
Screwdriver
Parts Used
Took a photo of wire color positions on old switch before removing. Made it easier to install correctly.
Did you find this story helpful?
Thanks for voting and helping fellow customers!
Load More Install Stories
OEM stands for Original Equipment Manufacturer and means the part you’re buying is sourced directly from the manufacturer who made your product. At eReplacementParts, we sell only genuine OEM parts, guaranteeing the part you’re purchasing is of better design and of higher quality than aftermarket parts.
Our product descriptions are a combination of data sourced directly from the manufacturers who made your product as well as content researched and curated by our content & customer service teams. This content is edited and reviewed internally before being made public to customers.
Our customer service team are at the ready daily to answer your part and product questions. We have a dedicated staff with decades of collective experience in helping customers just like you purchase parts to repair their products.
All our part reviews are solicited directly from other customers who have purchased this exact part. While we moderate these reviews for profanity, offensive language or personally identifiable information, these reviews are posted exactly as submitted and no alterations are made by our team.
All our customer repair instructions are solicited directly from other customers just like you who have purchased and replaced this exact part. While we moderate these reviews for profanity, offensive language or personally identifiable information, these reviews are posted exactly as submitted and no alterations are made by our team.
Based on data from past customer purchasing behaviors, these parts are most commonly purchased together along with the part you are viewing. These parts may be necessary or helpful to replace to complete your current repair.
All our installation videos are created and produced in collaboration with our in-house repair technician, Mark Sodja, who has helped millions of eReplacementParts customers over the last 13 years repair their products. Mark has years of experience in selling and repairing both commercial and residential products with a specialty in gas-powered equipment.
This data is collected from customers who submitted a repair instruction after replacing this exact part. Customers can rate how easy the repair was to complete and how long it took. We aggregate this data to provide a repair rating that allows customers to quickly determine the difficulty and time needed to perform their own repair.