eReplacementParts.com
877-346-4814
Ryobi Parts
Repair Parts Home
  
Power Tool Parts
  
Ryobi Parts
  089110109712 Switch Assembly

Switch Assembly 089110109712

OEM part for: Ryobi, Craftsman, Ridgid

Part Number: 089110109712


Install
Videos!
Switch Assembly - 089110109712:Ryobi 360 View
Switch Assembly - 089110109712:RyobiSwitch Assembly - 089110109712:RyobiSwitch Assembly - 089110109712:RyobiSwitch Assembly - 089110109712:RyobiSwitch Assembly - 089110109712:RyobiSwitch Assembly - 089110109712:Ryobi 360 ViewSwitch Assembly - 089110109712:RyobiSwitch Assembly - 089110109712:Ryobi
In Stock
Order within the next 2 hours and your part ships today!
Easy 15-30 minutes (124 rated repairs)?
OEM: Original Equipment Manufacturer ?
RyobiCraftsmanRidgid
Does this d-block d-md-none fit my product?

Product Description ?

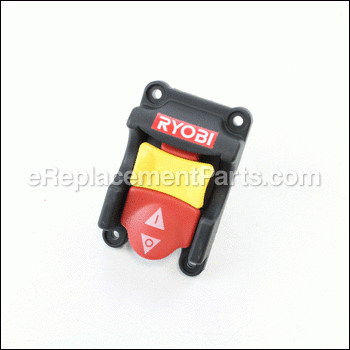
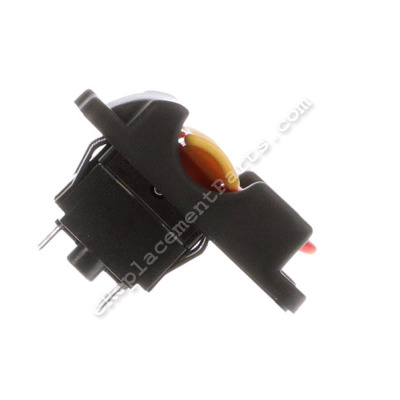
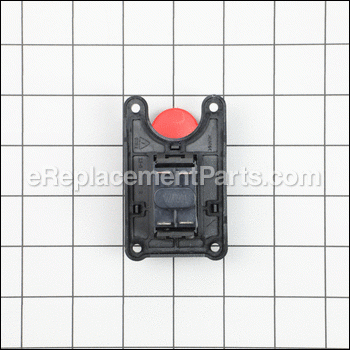
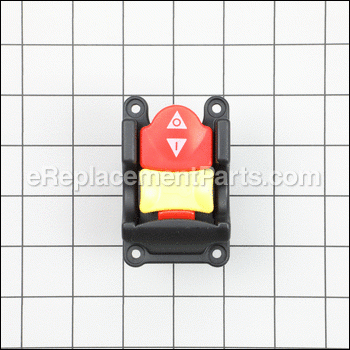
This is a genuine Ryobi Replacement part and is sold individually.
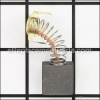
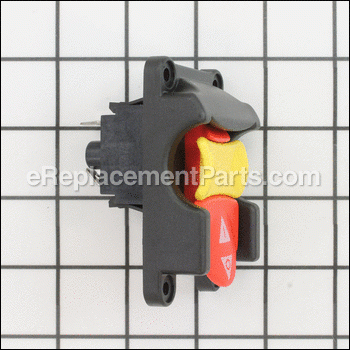
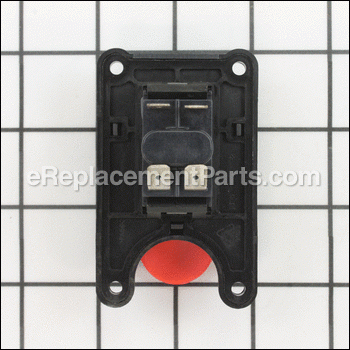
Switches are commonly replaced parts in power tools. This is because switches use mechanical internals, causing them to degrade and wear out over time.
A switch handles the on/off and variable speed functions.
They also have a role in electric breaking; they can momentarily reverse electrical polarity.

Some common signs of a broken or failing switch are:

  • The tool has completely stopped functioning
  • it will not turn on.
  • The tool operates intermittently, requiring multiple tries to turn on, until eventually it won’t turn on at all.

    • Classification: Part
    • Weight: 0.09 lbs.
    • Shipping: Ships Worldwide

    Frequently Purchased Together ?

    Compatibility

    This part will fit the following 25 machines

    Ryobi

    BS1001SV 10" Band Saw View Diagrams & Manuals
    BS902 9" Band Saw View Diagrams & Manuals
    BS903 9" Band Saw View Diagrams & Manuals
    BTS15 10" Table Saw View Diagrams & Manuals
    BTS16 10" Table Saw View Diagrams & Manuals
    BTS20 10" Portable Table Saw View Diagrams & Manuals
    BTS20R 10" Table Saw View Diagrams & Manuals
    BTS20R-1 10" Table Saw View Diagrams & Manuals
    BTS21 10" Table Saw View Diagrams & Manuals
    DP120 12" Drill Press View Diagrams & Manuals
    OSS500 Osclillating Spindle Sander View Diagrams & Manuals
    RTS30 10" Portable Table Saw View Diagrams & Manuals
    RTS20 Portable Table Saw with Quick Stand View Diagrams & Manuals
    RTS10 10" Table Saw View Diagrams & Manuals
    BTS211 10" Table Saw View Diagrams & Manuals
    RTS21 10 in. Table Saw View Diagrams & Manuals
    RTS21G RTS21G 10-In. Table Saw View Diagrams & Manuals
    RTS10G 10-Inch Table Saw View Diagrams & Manuals
    RTS10NS 10-Inch Table Saw View Diagrams & Manuals

    Craftsman

    315284610 10" Table Saw View Diagrams & Manuals
    315353450 10-In. Table Saw View Diagrams & Manuals
    315CM27831TS Saw Table View Diagrams & Manuals
    315349720 Table Saw View Diagrams & Manuals

    Ridgid

    RTS10G 10 In. Tile Saw 3-8-17 (Rev:04) View Diagrams & Manuals
    RTS10 10-Inch Tile Saw View Diagrams & Manuals
    Show More Compatible Models
    Don't see yours? Try searching our site for :

    This item works with the following types of products:

    • Band Saw Parts
    • Saw Parts
    • Table Saw Parts
    • Drill Parts
    • Drill Press Parts
    • Sander Parts

    This part replaces obsolete part #: 16102010G, 889110109712 (This switch has 4 prongs.), 452080007 (This switch has 4 prongs.), 984407003, 984406001

    Customer Part Reviews ?

    4.8
    Average Rating (out of 5):
    49 Reviews
    Click to filter by ratings:
    5 stars
    43
    4 stars
    4
    3 stars
    0
    2 stars
    1
    1 stars
    1
    • Highest Rating
    • Most Recent
    < PREV
    • 1
    • 2
    • 3
    NEXT >
  • New switch for an old table saw
    The paert came in on time and worked as described. Very Happy with the response and product.
    Scott - November 15, 2023 Verified Purchase
    Keep up the great service to your customers!
    Great 90% assurance that this was the part that would get the saw running again, very low price, fast shipping, OEM part all added up to a running saw. Thank You very much. Keep up the great service to your customers!
    David - October 20, 2023 Verified Purchase
    Switch Assembly Replacement
    Part arrived on time, fit perfect, it was just what i needed. Table saw works great. Thank you
    Guest - September 12, 2023 Verified Purchase
    Just right
    It was exactly what I needed.
    Guest - April 15, 2023 Verified Purchase
    My Ryobi table saw has a new life!
    Common Ryobi problem solved with new switch. A little tricky installing but it worked perfectly. Great product, great service and quick shipping. eRP comes through once again. Thanks!
    Guest - January 14, 2023 Verified Purchase
    Perfect! No problems at all.
    The replacement switch fitted perfectly and worked without a hitch. My saw is up and running again.
    Guest - October 26, 2022 Verified Purchase
    Great part, shipped fast. Recommended.
    This was a switch for my Ryobi table saw. I took 20mn to change it, mostly because access is difficult under the tool. For all I can see, the part is identical to the original and the fix worked the first time around. Perfect ! Also, it arrived very promptly after I ordered it.
    Guest - September 28, 2022 Verified Purchase
    Correct part
    The part was exactly correct but two of the male electrical connectors were turned 90 degrees making for a tight fit but was able to change the female connectors so it fit. Works great.
    Guest - August 19, 2022 Verified Purchase
    Simple replacement
    It was the same quality as the part I was replacing
    Anonymous - June 7, 2022 Verified Purchase
    PERFECT OEM part.
    Although the actual 'electrical' portion of this switch is unavailable "separately", this switch contains the new electrical portion. HINT: When replace'n this item, place the table-saw upside down on a work bench. MUCH easier/better to work on!!
    Michael - April 27, 2022 Verified Purchase
    t
    t
    t - t days ago Verified Purchase
    eReplacementParts Team
    t

    Questions & Answers ?

    Our customer Service team is at the ready daily to answer your part and product questions.

    photo of team member
    Ask our Team

    We have a dedicated staff with decades of collective experience in helping customers just like you purchase parts to repair their products.

    Does this fit my product?

    Questions & Answers for Switch Assembly


    Is this part compatible with the RTS 31?
    Bret for model number Rts31 asked on 2023-05-21
    Hello Bret, Thank you for your inquiry. We confirm that this part will fit your model. We hope this helps.
    eReplacementParts Team May 21, 2023
    Will this switch work with a RYOBI 10 inch table saw model RTS10?
    Donald for model number RTS10 asked on 2022-07-10
    Hello Donald, thank you for your question. Yes, the Switch 089110109712 you had chosen is compatible with your model. If you need help placing an order, customer service is open 7 days a week. Please feel free to give us a call. We look forward to hearing from you.
    eReplacementParts Team July 10, 2022

    Customer Repair Instructions ?

    All our customer repair instructions are solicited directly from other customers just like you who have purchased and replaced this exact part.

    Easy 15-30 minutes (124 rated repairs)?

    Tight space where switch is mounted.

    Rob - November 22, 2015
    👍 51 of 54 people found this instruction helpful
    Tool Type

    Table Saw

    Difficulty

    Hard

    Time

    15-30 minutes

    Tools Used

    Screwdriver, Pliers, Head mounted flashlight (needle nose plyers)

    Make sure you have removed the machine from its power source before starting! Tip the Ryoby portable tablesaw onto wheel side of machine to gain easy access underneath and behind front part of switch. Put on forehead mounted flashlight for a clear view of all wires connected to the back of switch before removal because space is tight and not easily seen without illumination. Also both hands are needed for replacement of switch. Remove the four screws on the front of the switch using a Philips screwdriver. When the screws have been removed tip the switch in and towards the bottom of the machine to remove the wiring harness cover and the wires from the terminals. If you have large fingers, long needle nose pliers are recommended for this step. The switch has four terminals with two white wires on the left side and two black wires on the right side. Mark the two bottom wires white and black with electrical tape (after wiring harness cover has been removed) because it will be hard to determine which wires went where when installing the new switch. Marking the wires is important for proper rewiring of the switch. Reverse these steps for re installation. You may encounter difficulty reinstalling the screws into the front of the switch. I recommend you start with the screws closest to the bottom of the switch. Good luck!
    Did you find this story helpful?
    Thanks for voting and helping fellow customers!

    Old switch arched between contacts and remained on unless unplugged.

    Paul - November 16, 2015
    👍 21 of 22 people found this instruction helpful
    Tool Type

    Table Saw

    Difficulty

    Easy

    Time

    Less than 15 minutes

    Tools Used

    Screwdriver, Pliers

    Four screws allowed easy extraction of old switch. At this point Be sure to note order of electrical connections. After removal of switch it was noticed that four blades of old switch were in different orientation than new. New tabs were given a slight angular shift with pliers, this allowed new switch blades to more closely match old ones. Installation then went smoothly into a tight space with the four screws.
    Did you find this story helpful?
    Thanks for voting and helping fellow customers!

    My saw would turn "on" but would not turn "off" via the switch, diagnosed as a defective switch. The only way to shut off the saw was to unplug it.

    James - May 16, 2016
    👍 14 of 17 people found this instruction helpful
    Tool Type

    Table Saw

    Difficulty

    Easy

    Time

    Less than 15 minutes

    Tools Used

    Screwdriver, Pin punch and a nail

    Switch removal is very straight forward by removing 4 sheet metal type Phillips screws which pass through the switch, saw housing and are retained by a small plastic junction box inside of the saw cabinet.

    Remove the 4 screws holding the switch in place and pull the switch and wires out from the saw housing.

    The electrical connections are very simple with hot and neutral both attached to the switch via insulated spade connectors.

    The available wire is a bit short, but workable. I bent the switch contacts slightly to allow easier passage through the opening in the housing. Wiring is very straight forward and intuitive - line in from the cord and line out to the saw motor. Black to black, white to white.

    The only problem which I encountered was getting the screws lined up with the plastic junction box -- the wires want to push the box out of the way. Problem solved by using a pin punch and a 10d finish nail as "line up tools". Once the first two screws were started the repair was simple. Snug the first two screws, start and snug the remaining two screws - check inside the saw housing to be sure no wiring is pinched between the junction box and saw housing -- final tighten on all 4 screws and you are done.
    Did you find this story helpful?
    Thanks for voting and helping fellow customers!

    Saw wouldn't start, then start & stop, finally not starting at all

    Thomas - January 13, 2016
    👍 12 of 17 people found this instruction helpful
    Tool Type

    Table Saw

    Difficulty

    Easy

    Time

    30-60 minutes

    Tools Used

    Screwdriver, Pliers, Socket set

    Took blade out. Removed old switch. Noticed one of contacts looked burnt. Turned saw upside down and removed legs so I wouldn't have to work around them to install new switch. Read directions on website to refresh my memory where black & white wires went: 2 white on left & 2 black on right. Installed new switch and plugged the 4 wires into it. Put saw back together and it works again.
    Did you find this story helpful?
    Thanks for voting and helping fellow customers!

    The switch burned out, and the bracket cracket due to user error

    R - June 8, 2017
    👍 3 of 3 people found this instruction helpful
    Tool Type

    Table Saw

    Difficulty

    Medium

    Time

    1-2 hours

    Tools Used

    Screwdriver, Pliers, Magnetic Bowl (How did I ever live without this?)

    The switch's connections were in a tight area. The good thing is that the cables are color coded to make it easy to fix. If I did it over, I would've taken the cord clamps from the junction box first before I tried to do anything with the switch. (Note: the 3 screws are longer than the 4 that hold the switch in place)

    Print out the wiring diagram in the part's list before you start. This will come in very handy when putting the switch back together.

    Here's the steps should've done.
    1. Unscrew the 4 screws holding the switch in place. The switch can be pulled out and tested with a meter. Mine had a very strong odor of burnt parts.
    2. Order new switch - easy part.
    3. Tilt saw blade so you have room to work.
    4. Remove the 3 screws from the cord strain relief and the green grounding wires.
    5. Get come slack in the cords and slip the switch box to make it easier to hook up the switch.
    6. Install the switch and connect the wires. This where the wiring diagram comes in real handy. This is the time to test the switch. If you don't read the diagram right, this is the time you'll be glad you know where your breaker is located.
    7. Put the wires in the switch box and then screw the switch to the box. (This is where the shorter of the screws go.)
    8. Secure the the cords with the strain relief bar. Make sure that the flat part of the bar is down.
    9. Screw the ground wires back to the plate and you're done.
    Did you find this story helpful?
    Thanks for voting and helping fellow customers!

    Table saw would not turn off.

    James - February 3, 2016
    👍 5 of 7 people found this instruction helpful
    Tool Type

    Table Saw

    Difficulty

    Medium

    Time

    Less than 15 minutes

    Tools Used

    Screwdriver, zip ties

    Unplug the saw and turn it on its side for access to the switch. Remove the four screws holding the switch to the outside of the machine and dust cover to the inside of the machine. There may be other screws or zip ties retaining the power cord, cut or remove as necessary. Remove the four space connectors and fit them to the new switch in the same locations. On the replacement switch the male terminals were oriented at slightly different angles but the same location on the switch and the wires were able to be fitted into the dust cover housing. Replace the mount screws and reconnect the wire retaining clamps or zip tie as required.
    Did you find this story helpful?
    Thanks for voting and helping fellow customers!

    ok

    richard - September 30, 2019
    👍 1 of 1 people found this instruction helpful
    Tool Type

    Table Saw

    Difficulty

    Medium

    Time

    15-30 minutes

    Tools Used

    Screwdriver

    ok
    Did you find this story helpful?
    Thanks for voting and helping fellow customers!

    Switch was broken. Would not turn saw off.

    Joey - October 10, 2018
    👍 2 of 3 people found this instruction helpful
    Tool Type

    Table Saw

    Difficulty

    Easy

    Time

    Less than 15 minutes

    Tools Used

    Screwdriver, Pliers

    Unplugged saw from power source.
    Removed 4 screws.
    Marked and removed 4 push-on connectors from switch.
    Connected new IDENTICAL ! ! Switch.(Thank you so much!)
    Used screws to remount switch and enclosure.
    Plugged in the power cord.
    Tested the Switch.
    PERFECT! ! !
    My 12 year old Grandson did most of the work. Thanks for supplying the EXACT part that the manufacturer said was no longer available!
    Did you find this story helpful?
    Thanks for voting and helping fellow customers!

    Table saw wouldn't turn off.

    Gwen - February 27, 2018
    👍 1 of 1 people found this instruction helpful
    Tool Type

    Table Saw

    Difficulty

    Easy

    Time

    Less than 15 minutes

    Tools Used

    Screwdriver

    1. Removed four screws and pulled out old switch.
    3. Disconnected four wires and pushed them back inside.
    2. Put new switch in before connecting new wires.*
    3. Used a flashlight and an extra set of hands to light up from behind so I could connect new wires.
    4. Held in place while replacing four screws in the front.

    *I tried plugging in the wires first, out front where I could see them, but as others say, the wiring configuration has changed slightly and I just could not get the switch to fit back in from the front with the wires plugged in already. Discovered it wasn't too difficult to do from behind as long as someone held a flashlight for me.
    Did you find this story helpful?
    Thanks for voting and helping fellow customers!

    Saw would not start when switch was placed in the "on" position

    Hubert - October 12, 2017
    👍 2 of 3 people found this instruction helpful
    Tool Type

    Table Saw

    Difficulty

    Easy

    Time

    15-30 minutes

    Tools Used

    Screwdriver, Digital volt/ohm meter

    1. I made sure the saw was not plugged in to an electrical outlet.
    2. I removed the old switch, verified with a V.O.M. that when the switch was closed/on, one side was open/off.
    3. Went online to eReplacementParts.com and ordered a new switch.
    4. When the replacement switch came in I installed it.
    5. Plugged the saw into an electrical outlet, turned it on and it worked!

    ( I was impressed that the price of the switch was so reasonable.)
    Did you find this story helpful?
    Thanks for voting and helping fellow customers!

    OEM stands for Original Equipment Manufacturer and means the part you’re buying is sourced directly from the manufacturer who made your product. At eReplacementParts, we sell only genuine OEM parts, guaranteeing the part you’re purchasing is of better design and of higher quality than aftermarket parts.

    Our product descriptions are a combination of data sourced directly from the manufacturers who made your product as well as content researched and curated by our content & customer service teams. This content is edited and reviewed internally before being made public to customers.

    Our customer service team are at the ready daily to answer your part and product questions. We have a dedicated staff with decades of collective experience in helping customers just like you purchase parts to repair their products.

    All our part reviews are solicited directly from other customers who have purchased this exact part. While we moderate these reviews for profanity, offensive language or personally identifiable information, these reviews are posted exactly as submitted and no alterations are made by our team.

    All our customer repair instructions are solicited directly from other customers just like you who have purchased and replaced this exact part. While we moderate these reviews for profanity, offensive language or personally identifiable information, these reviews are posted exactly as submitted and no alterations are made by our team.

    Based on data from past customer purchasing behaviors, these parts are most commonly purchased together along with the part you are viewing. These parts may be necessary or helpful to replace to complete your current repair.

    All our installation videos are created and produced in collaboration with our in-house repair technician, Mark Sodja, who has helped millions of eReplacementParts customers over the last 13 years repair their products. Mark has years of experience in selling and repairing both commercial and residential products with a specialty in gas-powered equipment.

    This data is collected from customers who submitted a repair instruction after replacing this exact part. Customers can rate how easy the repair was to complete and how long it took. We aggregate this data to provide a repair rating that allows customers to quickly determine the difficulty and time needed to perform their own repair.

    eReplacementParts.com
    7174 South 400 West
    Suite 5
    Midvale, UT 84047
    visa mastercard discover american express PayPal