
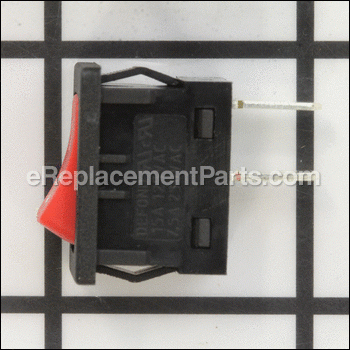
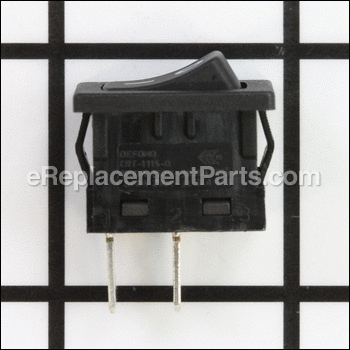

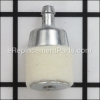
Genuine manufacturer approved replacement switch, it is used on Tanaka and Hitachi handheld lawn and garden equipment. It is the part of the unit handling on/off operations. Over time switch may develop mechanical or electrical issues eventually failing and requiring replacement. Please note this durable plastic switch is sold individually.
Stop Switch 6601275
OEM part for: Tanaka, Metabo HPT (Hitachi)
Part Number: 6601275
$4.99
In Stock
Jump To:
Frequently Purchased Together ?


Compatibility
This part will fit the following 23 machines
Metabo HPT (Hitachi)
CG22EADSLP 21.1cc Split Shaft Grass Trimmer View Diagrams & Manuals
RB24EAP 23.9cc Handheld Blower View Diagrams & Manuals
CG22EASSLP 21.1 cc Straight Shaft Grass Trimmer View Diagrams & Manuals
CS33EB16 16" Rear Handle Chainsaw 32.2cc View Diagrams & Manuals
TCS33EB-16 32cc Rear Handle Chainsaw View Diagrams & Manuals
TCS33EB-14 32cc Rear Handle Chainsaw View Diagrams & Manuals
TCS-40EA 40cc Chainsaw View Diagrams & Manuals
CS51EAP Chainsaw View Diagrams & Manuals
CS40EA18 Chainsaw View Diagrams & Manuals
CG22EABSLP Grass Trimmer View Diagrams & Manuals
CS33EDTP Engine Chainsaw View Diagrams & Manuals
CG27EASP Engine Brush Cutter View Diagrams & Manuals
CG24EASP Engine Brush Cutter View Diagrams & Manuals
CS40EA Gas Powered Rear Handle Chain Saw View Diagrams & Manuals
TRB24EAP 23.9cc Handheld Blower View Diagrams & Manuals
CM75EBPM 14 Inch 75cc, 2 Stroke Gas Cut Off Saw With New /Purefire� Engine View Diagrams & Manuals
CG24EASPSL Trimmer View Diagrams & Manuals
CG27EASPSL Trimmer View Diagrams & Manuals
CH22EAP2 Trimmer View Diagrams & Manuals
CM75EBP View Diagrams & Manuals
Tanaka
TCG-22EAB Grass Trimmer View Diagrams & Manuals
TCS33EDTP Gas Chainsaw View Diagrams & Manuals
TCG-22EAS Brush Cutter View Diagrams & Manuals
Show More Compatible Models
This item works with the following types of products:
- Grass Trimmer Parts
- Trimmer Parts
- Blower Parts
- Chain Saw Parts
- Saw Parts
This part replaces obsolete part #: 6685364, 6696940, 668-5364, 669-6940
Customer Part Reviews ?
Average Rating (out of 5):
Click to filter by ratings:
5 stars
8
4 stars
0
3 stars
1
2 stars
1
1 stars
0
< PREV
- 1
very happy
This is the second time I have purchased something from this company.Very pleased both times. The illustrations made it very easy to find the correct part and order.Pricing was good and so was shipment.
Guest -
December 22, 2021
Verified Purchase
Correct part
It's really great to find the correct parts for older equipment. Excellent service and prompt shipping. Will definitely use this service in the future!!
Guest -
June 25, 2020
Verified Purchase
stop switch
fast shipping for the time where in.easy repair
Guest -
May 20, 2020
Verified Purchase
work great
the part came fast the right one
Guest -
April 19, 2020
Verified Purchase
easy repair !!
Grandson's dog chewed on the handle of leaf blower destroying the off on switch. We were able to salvage the handle and replace the switch and now our leaf blower is saved.
Guest -
December 6, 2019
Verified Purchase
Perfect fit! Works like a charm!
This switch was exactly what I needed. It replaced the oem part perfectly!
Guest -
July 25, 2019
Verified Purchase
Excellent and fast service
The replacement parts arrived as new. My gas trimmer was fixed and works perfectly. Thanks for the good service.
Guest -
May 27, 2019
Verified Purchase
Easy drop-in repair part. Nice quality feel.
Well packaged, quickly shipped and made the repair of my Hitachi leaf-blower a 10 minute job. Only difference is that this one is *not* spring loaded (it latches on or off) and so must be manually switched off -- not a big deal at all.
Guest -
May 27, 2019
Verified Purchase
Worked as expected
Took two long to arrive
Guest -
September 23, 2019
Verified Purchase
It works, but not like oem
OEM was spring-loaded to off. This has to moved manually
Guest -
June 15, 2022
Verified Purchase
eReplacementParts Team
Thank you for your review. We're sorry to hear that happened as we only sell guaranteed OEM parts, we will be in touch soon to help fix this issue.
t
t
t -
t days ago
Verified Purchase
eReplacementParts Team
t
Questions & Answers ?
Our customer Service team is at the ready daily to answer your part and product questions.

Ask our Team
We have a dedicated staff with decades of collective experience in helping customers just like you purchase parts to repair their products.
Does this fit my product?Questions & Answers for Stop Switch
No questions have been asked yet
Customer Repair Instructions ?
All our customer repair instructions are solicited directly from other customers just like you who have purchased and replaced this exact part.
Stop switch would not stop engine
Kenneth - July 8, 2023
Tool Type
Trimmer
Difficulty
Easy
Time
Less than 15 minutes
Tools Used
Screwdriver
Parts Used
1. Remove screws from the throttle housing that contains the stop switch. Take note of how the throttle spring hooks into the handle for re-assembly later.
2. Use a flat blade screwdriver to press in the tabs on the stop switch and pop it loose from the throttle housing. Take note and/or label which wire connects to the "On" end of the stop switch.
3. Unhook the wires from the old stop switch by pulling them off of the stop switch terminals.
4. Plug the new stop switch into the hole in the throttle housing until it snaps into place.
5. Connect the wires to the new stop switch taking care to make sure they are connected to the correct terminals.
6. Screw the throttle housing back together taking care to ensure the throttle trigger spring is inserted properly into the throttle housing.
Did you find this story helpful?
Thanks for voting and helping fellow customers!
Kill switch went bad.
William - November 5, 2022
Tool Type
Chain Saw
Difficulty
Medium
Time
More than 2 hours
Tools Used
Screwdriver, Gorilla Glue and C clamp. Read on.
Parts Used
Took handle apart. Replaced switch. Degree of difficulty was met when you have to have three hands to reassemble the handle regarding the throttle cable jumping out of its slot.
I actually glued the throttle cable in-place overnight. Went together fine without the 3rd hand being necessary. Gotta do what you gotta do!
I actually glued the throttle cable in-place overnight. Went together fine without the 3rd hand being necessary. Gotta do what you gotta do!
Did you find this story helpful?
Thanks for voting and helping fellow customers!
One of my neighbors lend me this tool and have decided to fix it because the other one that I own is old & is almost worn out as well.
Jose - February 18, 2021
Tool Type
Trimmer
Difficulty
Easy
Time
Less than 15 minutes
Tools Used
Screwdriver, Pliers
I first remove the old cutting head assembly & replace it with the new one. Then disassemble the accelerator trigger remove/replace the old stop switch which was damage & put back again the accelerator trigger in place, start the trimmer & look if the new stop switch works. Now I have two trimmer to do my yard work easier. Thanks to eReplacement Parts for the great price and for the availability and prompt delivery of the spare parts................................................JOSE.
Did you find this story helpful?
Thanks for voting and helping fellow customers!
Don’t turn off
Orlando - July 27, 2020
Tool Type
Trimmer
Difficulty
Medium
Time
Less than 15 minutes
Tools Used
Screwdriver, Power Drill, No
Parts Used
The trouble the clip, but I do it
Did you find this story helpful?
Thanks for voting and helping fellow customers!
Mini-switch froze and would not work.
Gary - March 24, 2020
Tool Type
Trimmer
Difficulty
Medium
Time
30-60 minutes
Tools Used
Screwdriver, Needle nose plyers
Parts Used
Disassembled the handle, popped out the old switch and inserted the new one. It took longer than expected because the handle is somewhat difficult to reassemble, but the switch itself was easy.
Did you find this story helpful?
Thanks for voting and helping fellow customers!
bad switch. would not turn off
Joe - April 27, 2019
Tool Type
Blower
Difficulty
Easy
Time
Less than 15 minutes
Tools Used
Screwdriver, Pliers
Parts Used
1 removed all side body screws.
2. loosened the screw below the gas tank
3. used pliers to remove 2 connections on switch [note the direction the switch sets. and which wires to connect]
4. connect new swithc
5. put cover on.
6. put pack all screws
7. snug gas tank screw
8. test
2. loosened the screw below the gas tank
3. used pliers to remove 2 connections on switch [note the direction the switch sets. and which wires to connect]
4. connect new swithc
5. put cover on.
6. put pack all screws
7. snug gas tank screw
8. test
Did you find this story helpful?
Thanks for voting and helping fellow customers!
stop switch failed.
Jose - March 22, 2019
Tool Type
Blower
Difficulty
Medium
Time
Less than 15 minutes
Tools Used
Screwdriver
Parts Used
parts for an older Hitachi blower are hard to find, glad they had parts I needed, in stock.
Did you find this story helpful?
Thanks for voting and helping fellow customers!
Unable to turn off
Charles - October 11, 2017
Tool Type
Trimmer
Difficulty
Easy
Time
15-30 minutes
Tools Used
Screwdriver
Parts Used
Removed the screws from the handle, and slowly separated them. Made not of where all of the inside parts were. Removed the wires from the old switch and connected them to the new switch. The screwed the handle back together
Did you find this story helpful?
Thanks for voting and helping fellow customers!
Could not turn the trimmer off properly.
Roger - August 26, 2017
Tool Type
Trimmer
Difficulty
Easy
Time
Less than 15 minutes
Tools Used
Screwdriver
Parts Used
Removed the old stop switch. Removed the two wires, installed them on the new switch,and installed the new switch.
Did you find this story helpful?
Thanks for voting and helping fellow customers!
Muffler cover broke and in/off switch was defective
Henry - October 15, 2016
Tool Type
Trimmer
Difficulty
Easy
Time
Less than 15 minutes
Tools Used
Screwdriver
Parts Used
Removed the screws from the old cover and installed the new one. Remove the screws from the handle, pulled the leads off of the old switch and installed them on the new one, then put the handle back together.
Did you find this story helpful?
Thanks for voting and helping fellow customers!
Load More Install Stories
OEM stands for Original Equipment Manufacturer and means the part you’re buying is sourced directly from the manufacturer who made your product. At eReplacementParts, we sell only genuine OEM parts, guaranteeing the part you’re purchasing is of better design and of higher quality than aftermarket parts.
Our product descriptions are a combination of data sourced directly from the manufacturers who made your product as well as content researched and curated by our content & customer service teams. This content is edited and reviewed internally before being made public to customers.
Our customer service team are at the ready daily to answer your part and product questions. We have a dedicated staff with decades of collective experience in helping customers just like you purchase parts to repair their products.
All our part reviews are solicited directly from other customers who have purchased this exact part. While we moderate these reviews for profanity, offensive language or personally identifiable information, these reviews are posted exactly as submitted and no alterations are made by our team.
All our customer repair instructions are solicited directly from other customers just like you who have purchased and replaced this exact part. While we moderate these reviews for profanity, offensive language or personally identifiable information, these reviews are posted exactly as submitted and no alterations are made by our team.
Based on data from past customer purchasing behaviors, these parts are most commonly purchased together along with the part you are viewing. These parts may be necessary or helpful to replace to complete your current repair.
All our installation videos are created and produced in collaboration with our in-house repair technician, Mark Sodja, who has helped millions of eReplacementParts customers over the last 13 years repair their products. Mark has years of experience in selling and repairing both commercial and residential products with a specialty in gas-powered equipment.
This data is collected from customers who submitted a repair instruction after replacing this exact part. Customers can rate how easy the repair was to complete and how long it took. We aggregate this data to provide a repair rating that allows customers to quickly determine the difficulty and time needed to perform their own repair.