
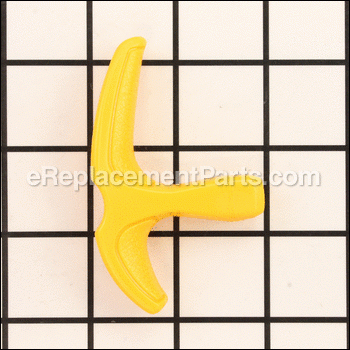

Starter Grip PS06114
Part Number: PS06114
Leaves our warehouse within
7 - 12 business days
7 - 12 business days
*This part replaces obsolete part #: PS03480, UP08113, UP04216, 511731001 and 07588.
Product Information
Description:
| Genuine OEM replacement part, this item is sold individually. This is the Starter Grip for all of the outdoor products shown below. This is the Grip that is attaches the the starter rope that starts the engine. To attach the starter rope to the grip, push the rope thru the bottom hole in the grip, then bring it out the other side and tie a knot. |
Frequently Purchased With

Compatibility
the 150+ compatible machines
This part is compatible with the following machines:
Ryobi
CS30 (RY30000) 30cc String Trimmer
RY30000B 30cc String Trimmer
SS30 (RY30002) 30cc String Trimmer
SS30 (RY30002A) 30cc String Trimmer
RY30002B 30cc String Trimmer
BC30 (RY30004) 30cc Brushcutter
BC30 (RY30004A) 30cc Brushcutter
RY30004B 30cc Brushcutter
RY30004D 30cc Brushcutter
RY30020 30cc Curved Shaft String Trimmer
RY30020A 30cc String Trimmer
RY30020B 30cc String Trimmer
CS30 (RY30021A) 30cc String Trimmer
RY30023 30cc Curved Shaft String Trimmer
SS30 (RY30040) 30cc Straight Shaft String Trimmer
RY30040A 30cc String Trimmer
RY30040B 30cc String Trimmer
SS30 (RY30041A) 30cc String Trimmer
SS30 (RY30043) 30cc Straight Shaft String Trimmer
RY30060A 30cc Brushcutter
RY30060B 30cc Brushcutter
BC30 (RY30061A) 30cc Brushcutter
RY30063 30cc Brushcutter
RY30120 30cc String Trimmer
RY30140 30cc String Trimmer
BC30 (RY30160) 30cc Brushcutter
RY30220 30cc String Trimmer
RY30220A 30cc String Trimmer
RY30220B 30cc String Trimmer
RY30240 30cc String Trimmer
RY30240B 30cc String Trimmer
RY30260 30cc Brushcutter
RY30260B 30cc Brushcutter
RY30524 30cc String Trimmer
RY30530 30cc String Trimmer and Brushcutter
RY30544 30cc String Trimmer
RY30550 30cc String Trimmer and Brushcutter
RY30564 30cc Brushcutter
RY30570 30cc String Trimmer and Brushcutter
RY30931 30 cc String Trimmer and Brushcutter
RY30951 30cc String Trimmer and Brushcutter
RY30971 30cc String Trimmer and Brushcutter
RY52001 Pruner / Trimmer
RY52001 Pruner / Trimmer
RY52001A Pruner / Trimmer
RY52001A Pruner / Trimmer
RY52002 Pruner / Trimmer
RY52002 Pruner / Trimmer
RY52002A Pruner / Trimmer
RY52002A Pruner / Trimmer
RY52003 Gas Pruner
RY52003A Gas Pruner
RY52004 30cc Gas Pruner
RY52004A Gas Pruner
RY52014 TP30 Gas Pruner
RY52502 Gas Pruner
RY52504 Gas Pruner
RY52903 Gas Pruner
RY52905 Gas Pruner
RY70101 Curved Shaft Trimmer
RY70101A Curved Shaft Trimmer
RY70103 Curved Shaft Trimmer
RY70103A Curved Shaft Trimmer
RY70105 Straight Shaft Trimmer
RY70105A Straight Shaft Trimmer
RY70107 Straight Shaft Trimmer
RY70107A Straight Shaft Trimmer
RY70111 Curved Shaft Trimmer
RY70113 Curved Split Shaft Trimmer
RY74003D 33cc - 14 in. Chain Saw
RY74003D 33cc - 14 in. Chain Saw
RY74005D 38cc - 16 in. Chain Saw
RY74005D 38cc - 16 in. Chain Saw
RY74007D 45cc - 18 in. Chain Saw
RY74007D 45cc - 18 in. Chain Saw
RY30060 30cc Brushcutter
RY26500 Trimmer
CS30 (RY26500) Trimmer
RY26901 Trimmer
RY26520 Trimmer
RY26921 Trimmer
RY26540 Brush Cutter
RY26941 Brush Cutter
RY09550 Blower / Vacuum
RY09550 Blower / Vacuum
RY09551 Blower / Vacuum
RY09551 Blower / Vacuum
RY28000 26cc String Trimmer
RY28020 (CS26) 26cc String Trimmer
RY28040 (SS26) 26cc String Trimmer
RY26000 26cc Power Head
RY09050 Gas Blower/Vac
RY09053 2 Cycle Blower / Vacuum
RY09053 2 Cycle Blower / Vacuum
RY30963 30cc String Trimmer
RY30943 30cc String Trimmer
RY30923 30cc String Trimmer
RY30562 30cc String Trimmer
RY30542 30cc String Trimmer
RY30522 30cc String Trimmer
RY28021 String Trimmer
RY28041 String Trimmer
Homelite
UT-20042 25cc EZ Reach String Trimmer
UT-20042-A 25cc EZ Reach String Trimmer
UT-20043-A 25cc EZ Reach String Trimmer
UT-20022 25cc Trimmer
UT-20022-A 25cc Trimmer
UT-20023-A 25cc Trimmer
UT-20002 25cc Trimmer
UT-20002-A 25cc Trimmer
UT-20003-A 25cc Trimmer
UT15198 (BC1600) Trimmer
C1200 (UT-20809) Trimmer
UT-50500 Edger
UT-50901 Edger
UT-60526 Gas Tiller/Cultivator
UT22600 26cc String Trimmer
UT22650 26cc String Trimmer
UT-10848 Chainsaw
UT-10848 Chainsaw
UT20006 25cc String Trimmer
UT20026 String Trimmer
UT20046 String Trimmer
UT09510 2 Cycle Blower
UT32600 Curved Shaft String Trimmer
UT32650 Straight Shaft String Trimmer
UT09521 26cc Blower
UT09520 26cc Blower
UT-21566 Mightylite Versatool String Trimmer
UT-21004 Mightylite String Trimmer
UT-21044 Mightylite String Trimmer
UT-29005 Mightylite String Trimmer
UT-29045 Mightylite String Trimmer
UT10947A Chainsaw
UT10947A Chainsaw
UT32601 Gas Trimmer
D3300 (UT10855) Chainsaw
D3300 (UT10855) Chainsaw
UT-10803 Chainsaw
UT-10803 Chainsaw
UT20004A (TrimLite) 25 CC String Trimmer
UT20004B (TrimLite) 25cc String Trimmer
UT10946D 45cc 20 In. Chainsaw
UT10946D 45cc 20 In. Chainsaw
UT10927D 38cc 16 In. Chainsaw
UT10927D 38cc 16 In. Chainsaw
UT10942D 45cc 18 In. Chainsaw
UT10942D 45cc 18 In. Chainsaw
UT09523 26cc Blower
UT09525 26cc Blower
Products Compatibility
List
This item works with the following types of products:
- • Blower
- • Chain Saw
- • Cultivator
- • Edger
- • Pruner
- • Saw
- • Trimmer
- • Vacuum
Repair Guides
![]()

Watch the Repair Video for
Starter Grip

Articles:
|
Get a grip: Step-by-step instructions show you how to quickly remove and install the starter grip on your Ryobi trimmer....
September 02, 2016
|

Questions & Answers for Starter Grip
No questions have been asked yet
Repair Instructions: Submitted by Customers Like You
Tool Type:
Trimmer
Repair Difficulty:
Easy
Time Spent Repairing:
Less than 15 minutes
Tools Used:
Screwdriver, Pliers, magnifying glass
TRimmer Pull Start Handle broke
Start handle rplacement
1. Slowly pull out start rope to allow slack to untie knot using needle nose pliers.
2. Wrap rope around screw driver to prevent retraction of rope.
3. Pull knot out of handle.
4. inspect knot so that you can replicate knot once you loosen it.
5. Slide off broken handle.
6.Feed rope into new handle.
7. Tie knot and insert into top of handle.
8. Pull on handle to check that knot will not pull thought handle.
9. Remove rope from screw driver and slowly test pull starter rope.
10 Test start engine. magnifying glass
Did you find this story helpful?
Thanks for voting and helping fellow customers!
Tool Type:
Trimmer
Parts Used:
Repair Difficulty:
Easy
Time Spent Repairing:
30-60 minutes
Tools Used:
Screwdriver, Pliers
Trimmer parts were old and breaking
Reattached starter handle. then grass deflector. I had to take handle apart to put on new grip and throttle spring, but I got it done quickly.
Did you find this story helpful?
Thanks for voting and helping fellow customers!
Tool Type:
Trimmer
Repair Difficulty:
Easy
Time Spent Repairing:
Less than 15 minutes
Tools Used:
Adjustable Wrench
Old retainer wore out, handle broke in half..
Pulled rope and secured to tie new handle.
Installed a new spool retainer
Installed a new spool retainer
Did you find this story helpful?
Thanks for voting and helping fellow customers!
Tool Type:
Trimmer
Repair Difficulty:
Medium
Time Spent Repairing:
Less than 15 minutes
Tools Used:
Pliers
Broken handle on pull starter and wore out spool retainer. Plastic around bolt was almost gone from feeding new line.
Pulled line out, removed knot and installed new handle and retired knot. Unscrewed worn out retainer and installed new one.
Did you find this story helpful?
Thanks for voting and helping fellow customers!
Tool Type:
Trimmer
Repair Difficulty:
Easy
Time Spent Repairing:
Less than 15 minutes
Tools Used:
, Torx head
Trimmer fuel lines were old and dry rotted. Replaced tank that came w/ new fuel lines & filters. Also replaced handle that broke in two. Entire fix took less than 10 minutes. Parts cost less than $15
Handle - untied knot on rope, fed rope through new handle, retied knot.
Fuel tank - Removed fuel lines from carb, unscrewed and removed tank w/#25 torx head, replaced tank, re-attached fuel lines.
Fuel tank - Removed fuel lines from carb, unscrewed and removed tank w/#25 torx head, replaced tank, re-attached fuel lines.
Did you find this story helpful?
Thanks for voting and helping fellow customers!
Tool Type:
Trimmer
Parts Used:
Repair Difficulty:
Easy
Time Spent Repairing:
Less than 15 minutes
Tools Used:
, Lighter, knife
Starter handle was cracking
Replaced the starter grip
Did you find this story helpful?
Thanks for voting and helping fellow customers!
Tool Type:
Edger
Repair Difficulty:
Medium
Time Spent Repairing:
15-30 minutes
Tools Used:
Pliers
Fuel cap was leaking. Pull starter grip was broken.
Pulled starter rope out like starting edger. Used needle nose pliers to untie the knot. It was very tight. Put new starter handle on and knotted the rope back up. Replaced old fuel cap with new one.
Did you find this story helpful?
Thanks for voting and helping fellow customers!
Tool Type:
Trimmer
Repair Difficulty:
Easy
Time Spent Repairing:
15-30 minutes
Tools Used:
Trimmer head broken. Pull handle broken
Remove the spool retaining nut, then remove the head assembly. Install the new head assembly and secure with the spool retaining nut. Untie the cord in the handle, then retie it in the new handle.
Did you find this story helpful?
Thanks for voting and helping fellow customers!
Tool Type:
Trimmer
Repair Difficulty:
Easy
Time Spent Repairing:
Less than 15 minutes
Tools Used:
Wrench Set
Replaced Gas Tank and Pull Start Handle
Remove three screws from the old fuel tank, then remove the fuel lines. Then just screw the new tank on and replace the fuel lines. For the starter grip, slide the grip forward on the rope, untie the knot, then remove the old grip, insert the new grip on the rope and tie a knot at the end.
Did you find this story helpful?
Thanks for voting and helping fellow customers!
Reviews
2 Reviews
Average Rating (out of 5):
Click to filter by ratings:
5 stars
1
4 stars
1
3 stars
0
2 stars
0
1 stars
0
< PREV
- 1
Easy Repair - works as advertised
I can take it in my hand and pull the rope to start the trimmer
Guest -
November 4, 2020
Verified Purchase
Great transaction
Quality part, fast shipping
Guest -
June 11, 2021
Verified Purchase
Verified Purchase
eReplacementParts Team
< PREV
- 1
Product Information
Repair Guides
![]()
Watch the Repair Video for
Starter Grip
Articles:
|
Get a grip: Step-by-step instructions show you how to quickly remove and install the starter grip on your Ryobi trimmer....
September 02, 2016
|