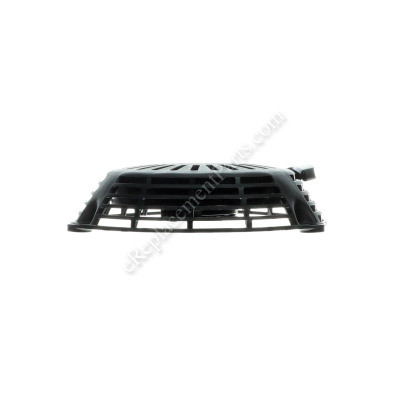


This is an authentic OEM sourced starter assembly, it is not an aftermarket imitation. It is a high quality item designed for Honda engines. This assembly allows user to crank-start the unit. It includes a plastic shroud, starter pulley, starter spring, grip and the pull rope. Please note, the hardware to secure this starter assembly is not included, it is sold separately. To complete this repair you would need a wrench.
Starter Assembly- Recoil Nh1 28400-Z1A-013ZA
OEM part for: Honda
Part Number: 28400-Z1A-013ZA
$12.52
In Stock
Jump To:
Frequently Purchased Together ?

Compatibility
This part will fit the following 46 machines
Honda
GC190A (Type DHAF)(VIN# GCAAA-1000001) Small Engine View Diagrams & Manuals
GC190A (Type MEA2)(VIN# GCAAA-8000001-9999999) Small Engine View Diagrams & Manuals
GC190A (Type QEAF)(VIN# GCAAA-8000001-9999999) Small Engine View Diagrams & Manuals
GC190A (Type QHA)(VIN# GCAAA-1000001-7999999) Small Engine View Diagrams & Manuals
GC190A (Type QHA1)(VIN# GCAAA-1000001-7999999) Small Engine View Diagrams & Manuals
GC190A (Type QHA2)(VIN# GCAAA-1000001-7999999) Small Engine View Diagrams & Manuals
GC190A (Type QHAF)(VIN# GCAAA-1000001-1496156) Small Engine View Diagrams & Manuals
GC190A (Type VBA)(VIN# GCAAA-1000001-7999999) Small Engine View Diagrams & Manuals
GC190A (Type VXA)(VIN# GCAAA-1000001) Small Engine View Diagrams & Manuals
GC190LA (Type MHA2)(VIN# GCAAA-1496157-8000000) Small Engine View Diagrams & Manuals
GC190LA (Type QHAF)(VIN# GCAAA-1496157-8000000) Small Engine View Diagrams & Manuals
GC190A (Type MHA2)(VIN# GCAAA-1000001-1496156) Small Engine View Diagrams & Manuals
GC190A (Type QEA)(VIN# GCAAA-8000001-9999999) Small Engine View Diagrams & Manuals
GC190A (Type QEA2)(VIN# GCAAA-8000001-9999999) Small Engine View Diagrams & Manuals
GCV190A (Type N1A)(VIN# GJAAA-1000001-1607128) Small Engine View Diagrams & Manuals
GCV190A (Type N1AF)(VIN# GJAAA-1000001) Small Engine View Diagrams & Manuals
GCV190A (Type N5A)(VIN# GJAAA-1000001) Small Engine View Diagrams & Manuals
GCV190A (Type N5AF)(VIN# GJAAA-1000001-1607128) Small Engine View Diagrams & Manuals
GCV190LA (Type N1A)(VIN# GJAAA-1607129) Small Engine View Diagrams & Manuals
GCV190LA (Type N5AF)(VIN# GJAAA-1607129) Small Engine View Diagrams & Manuals
GCV190LA (Type N5AP)(VIN# GJAAA-1607129) Small Engine View Diagrams & Manuals
GS190A (Type MBA2)(VIN# GCACA-1000001-9999999) Small Engine View Diagrams & Manuals
GS190A (Type QBA)(VIN# GCACA-1000001-9999999) Small Engine View Diagrams & Manuals
GS190A (Type QBA1)(VIN# GCACA-1000001-9999999) Small Engine View Diagrams & Manuals
GS190A (Type QBA2)(VIN# GCACA-1000001-9999999) Small Engine View Diagrams & Manuals
GS190A (Type QBAF)(VIN# GCACA-1000001-9999999) Small Engine View Diagrams & Manuals
GS190A (Type VXA)(VIN# GCACA-1000001) Small Engine View Diagrams & Manuals
GSV190A (Type N1AF)(VIN# GJACA-1000001) Small Engine View Diagrams & Manuals
GSV190A (Type N5AF)(VIN# GJACA-1000001) Small Engine View Diagrams & Manuals
GCV190LA N5AV (GJAAA-1607129) Four-Stroke Gas Engine View Diagrams & Manuals
GC190LA (Type QHGF)(VIN# GCAAA-1496157-9999999) Engine View Diagrams & Manuals
GC190LA (Type QTT)(VIN# GCAAA-1496157-9999999) Engine View Diagrams & Manuals
GC190LA (Type VBAF)(VIN# GCAAA-1496157-9999999) Engine View Diagrams & Manuals
GCV190LA (Type BHH)(VIN# GJAAA-1607129-9999999) Engine View Diagrams & Manuals
GCV190LA (Type G5AP)(VIN# GJAAA-1607129-9999999) Engine View Diagrams & Manuals
GCV190LA (Type G5B)(VIN# GJAAA-1607129-9999999) Engine View Diagrams & Manuals
GCV190LA (Type G5BR)(VIN# GJAAA-1607129-9999999) Engine View Diagrams & Manuals
GCV190LA (Type N5AV)(VIN# GJAAA-1607129-9999999) Engine View Diagrams & Manuals
GCV190LA (Type N5B)(VIN# GJAAA-1607129-9999999) Engine View Diagrams & Manuals
GCV190LA (Type N5BR)(VIN# GJAAA-1607129-9999999) Engine View Diagrams & Manuals
GCV190LA (Type N5RB)(VIN# GJAAA-1607129-9999999) Engine View Diagrams & Manuals
GCV190LA (Type S3C)(VIN# GJAAA-1607129-9999999) Engine View Diagrams & Manuals
GCV190LA (Type S3L)(VIN# GJAAA-1607129-9999999) Engine View Diagrams & Manuals
GCV190LA (Type SBA)(VIN# GJAAA-1607129-9999999) Engine View Diagrams & Manuals
GCV190LA (Type SBH)(VIN# GJAAA-1607129-9999999) Engine View Diagrams & Manuals
GCV190LA (Type SBL)(VIN# GJAAA-1607129-9999999) Engine View Diagrams & Manuals
Show More Compatible Models
This item works with the following types of products:
- Engine Parts
Customer Part Reviews ?
Questions & Answers ?
Our customer Service team is at the ready daily to answer your part and product questions.

Ask our Team
We have a dedicated staff with decades of collective experience in helping customers just like you purchase parts to repair their products.
Does this fit my product?Questions & Answers for Starter Assembly- Recoil Nh1
No questions have been asked yet
Customer Repair Instructions ?
All our customer repair instructions are solicited directly from other customers just like you who have purchased and replaced this exact part.
Recoil broke
Thomas - February 24, 2019
👍 1 of 1 people found this instruction helpful
Tool Type
Engine
Difficulty
Easy
Time
Less than 15 minutes
Tools Used
Socket set
Just put the new on . thank you
Did you find this story helpful?
Thanks for voting and helping fellow customers!
Plastic "dog ear" broke from the pull start.
FRANK - October 24, 2017
👍 1 of 1 people found this instruction helpful
Tool Type
Engine
Difficulty
Easy
Time
Less than 15 minutes
Tools Used
Nutdriver
Removed three nuts and replaced the old pull start with the new one.
Did you find this story helpful?
Thanks for voting and helping fellow customers!
Recoil spring broke in pull rope assembly
marvin - June 14, 2017
Tool Type
Engine
Difficulty
Easy
Time
Less than 15 minutes
Tools Used
Socket set
Ordered a new one and opened the box and put it on in 5 minutes. Best $18.00 dollars I've spent in years!!
Did you find this story helpful?
Thanks for voting and helping fellow customers!
Engine caught fire during refill of hot engine. Replaced melted and damaged parts.
Robert - May 30, 2017
Tool Type
Engine
Difficulty
Easy
Time
15-30 minutes
Tools Used
Pliers, Socket set
Made assessment of damaged parts needed
1. Removed melted engine cover, starter recoil assembly and cooling fin.
2. Replaced with new parts
3. Attached new labels
1. Removed melted engine cover, starter recoil assembly and cooling fin.
2. Replaced with new parts
3. Attached new labels
Did you find this story helpful?
Thanks for voting and helping fellow customers!
Pressure washer starter rope would not recoil the recoil spring in the starter assembly broke
Roger - July 15, 2016
Tool Type
Engine
Difficulty
Easy
Time
Less than 15 minutes
Tools Used
Nutdriver
1. removed the 3 bolts holding the starter assembly housing with the nut driver
2. removed the shoulder spacers from the old starter assembly housing
3. Replaced the shoulder spacers from the old starter assembly housing into the new housing
4. Bolted the new starter assembly housing in place.
2. removed the shoulder spacers from the old starter assembly housing
3. Replaced the shoulder spacers from the old starter assembly housing into the new housing
4. Bolted the new starter assembly housing in place.
Did you find this story helpful?
Thanks for voting and helping fellow customers!
The recoil starter spring broke on my pressure washer equipped with a Honda engine.
Howard - May 7, 2016
Tool Type
Engine
Difficulty
Easy
Time
Less than 15 minutes
Tools Used
Nutdriver
Simply remove the three nuts holding the starter assembly to the engine, remove and replace the recoil starter assembly, reinstall three nuts , and go back to work. Takes longer to gather the tools than to do the actual repair.
Did you find this story helpful?
Thanks for voting and helping fellow customers!
Broken recoil spring and starter cord
RANDY - March 31, 2016
Tool Type
Pressure Washer
Difficulty
Easy
Time
Less than 15 minutes
Tools Used
Wrench Set
Remove old unit (3 nuts) and replace with new starter assembly. It took less than 2 minutes.
Thank You !
Thank You !
Did you find this story helpful?
Thanks for voting and helping fellow customers!
Broken starter assembly.
Dale - March 30, 2016
Tool Type
Engine
Difficulty
Easy
Time
Less than 15 minutes
Tools Used
Nutdriver
Remove three screws nuts, pulled off broken assembly install new assembly. Replaced new starter by using the same 3 screw nuts then tighten.
Did you find this story helpful?
Thanks for voting and helping fellow customers!
The starter rope wouldn't retract
Jim - March 23, 2016
Tool Type
Engine
Difficulty
Easy
Time
Less than 15 minutes
Tools Used
Screwdriver
Remove 3 screws and the old starter comes right off. Install the new one with the same three screws, and your ready to get going. Very easy
Did you find this story helpful?
Thanks for voting and helping fellow customers!
Starter recoil mechanism was broke
Andrew - January 5, 2016
Tool Type
Engine
Difficulty
Easy
Time
Less than 15 minutes
Tools Used
Nutdriver
I just removed the old one and replaced it with the one you sent me. To remove the starter assembly remove the 3 nuts ,10mm, lift off the broken starter, then set the new one back on the studs and replace the nuts.
Did you find this story helpful?
Thanks for voting and helping fellow customers!
Load More Install Stories
OEM stands for Original Equipment Manufacturer and means the part you’re buying is sourced directly from the manufacturer who made your product. At eReplacementParts, we sell only genuine OEM parts, guaranteeing the part you’re purchasing is of better design and of higher quality than aftermarket parts.
Our product descriptions are a combination of data sourced directly from the manufacturers who made your product as well as content researched and curated by our content & customer service teams. This content is edited and reviewed internally before being made public to customers.
Our customer service team are at the ready daily to answer your part and product questions. We have a dedicated staff with decades of collective experience in helping customers just like you purchase parts to repair their products.
All our part reviews are solicited directly from other customers who have purchased this exact part. While we moderate these reviews for profanity, offensive language or personally identifiable information, these reviews are posted exactly as submitted and no alterations are made by our team.
All our customer repair instructions are solicited directly from other customers just like you who have purchased and replaced this exact part. While we moderate these reviews for profanity, offensive language or personally identifiable information, these reviews are posted exactly as submitted and no alterations are made by our team.
Based on data from past customer purchasing behaviors, these parts are most commonly purchased together along with the part you are viewing. These parts may be necessary or helpful to replace to complete your current repair.
All our installation videos are created and produced in collaboration with our in-house repair technician, Mark Sodja, who has helped millions of eReplacementParts customers over the last 13 years repair their products. Mark has years of experience in selling and repairing both commercial and residential products with a specialty in gas-powered equipment.
This data is collected from customers who submitted a repair instruction after replacing this exact part. Customers can rate how easy the repair was to complete and how long it took. We aggregate this data to provide a repair rating that allows customers to quickly determine the difficulty and time needed to perform their own repair.